Dyeing fabrics is an obsession. I began with cottons as directed in the Elizabeth Barton class, Dyeing to Design, that I took over at Academy of Quilting. I had little interest in dyeing or so I thought, and only took the class because Elizabeth was teaching it and I wanted to take a class with her and it was the first class closest to the date when I started researching her classes. I had no idea I’d fall so completely in love with dyeing. But I did. After her class ended, I took her other dyeing Class – Basic Dyeing for Quiltmakers where we learned to over dye and dye just about any color we wanted. It was thrilling to see a color, figure out what primary colors went into it and then create it! But as is my way, I wasn’t content to dye just cottons.
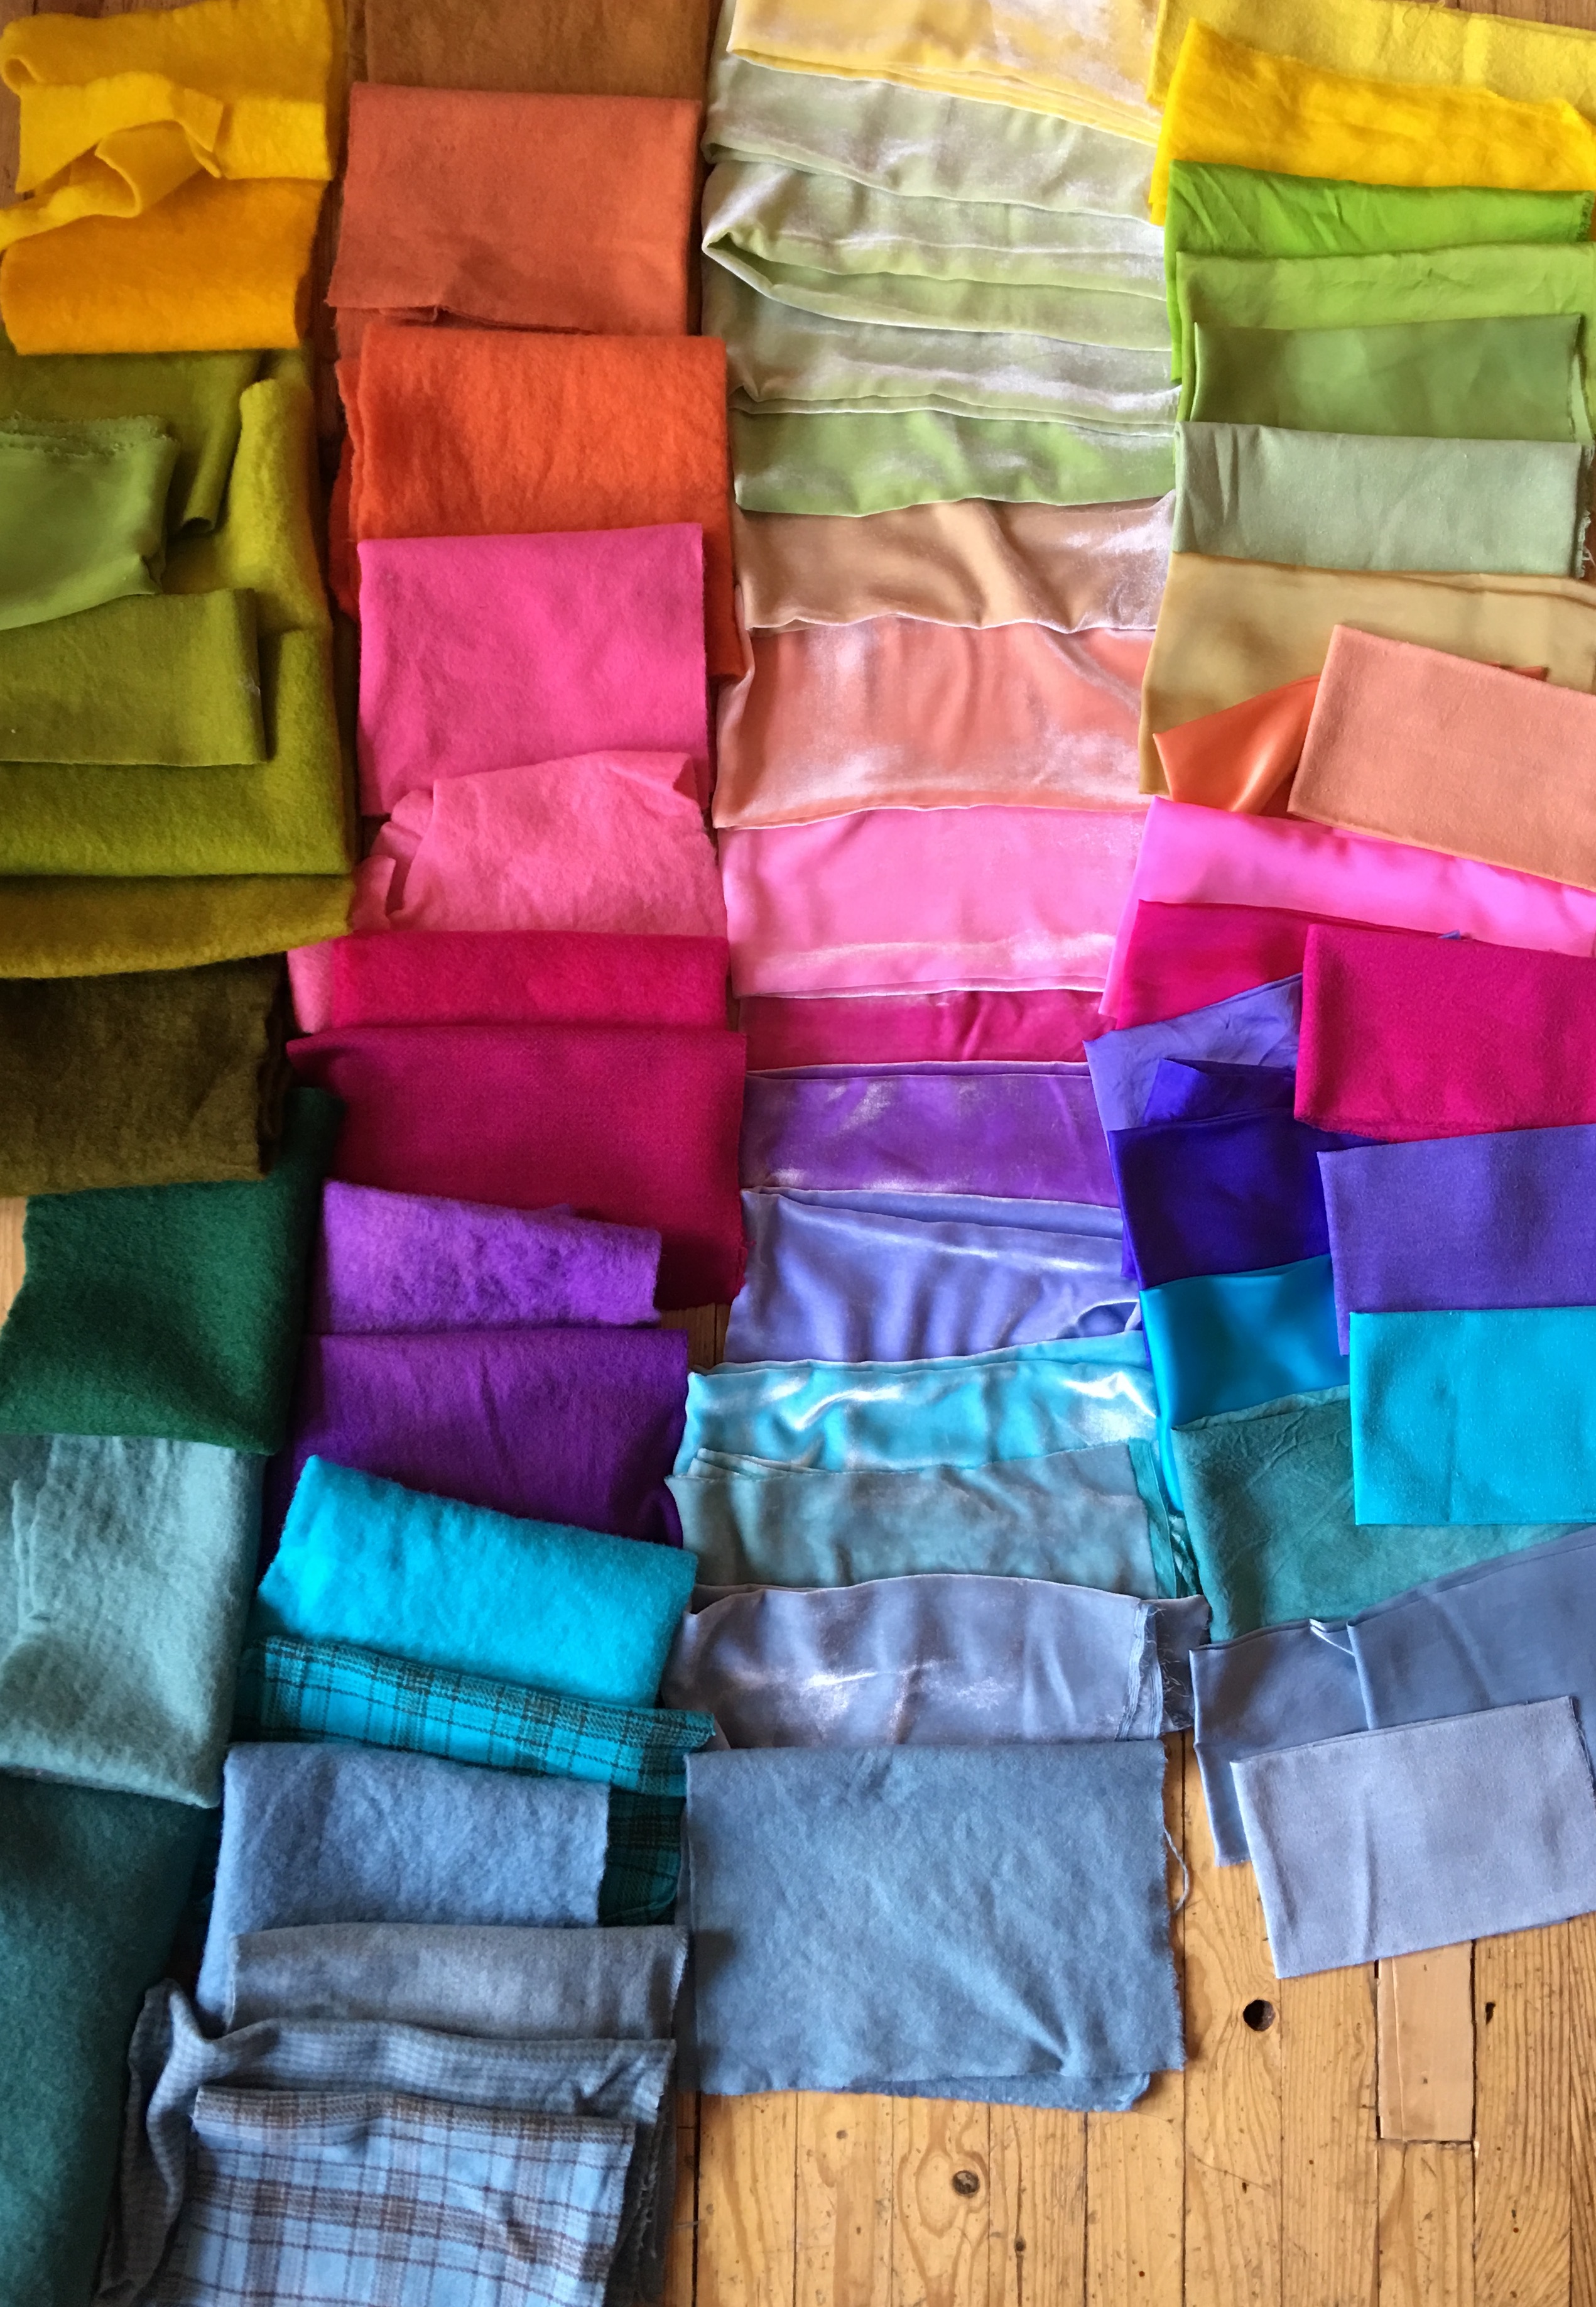
I decided I had to learn how to dye wool, which is a different process entirely, so I could finish my block of the month designs (more on that in another post). So I went over to Dharma Trading, a great company that sells dyes and everything related to dyeing. I sourced wool fabric, also not as easy as one might think, and then purchased a small amount of wools, silks, raw silks and silk/wools from a couple of different places. I even found some lovely silk velvet at Dharma, perfect to use on my wool appliqué pieces that I began designing a few months ago. And I began dyeing.
Aren’t they beautiful?
Here are all the cotton fabrics I dyed in Elizabeth’s class, including some of my silk screens and shibori dyed cottons…
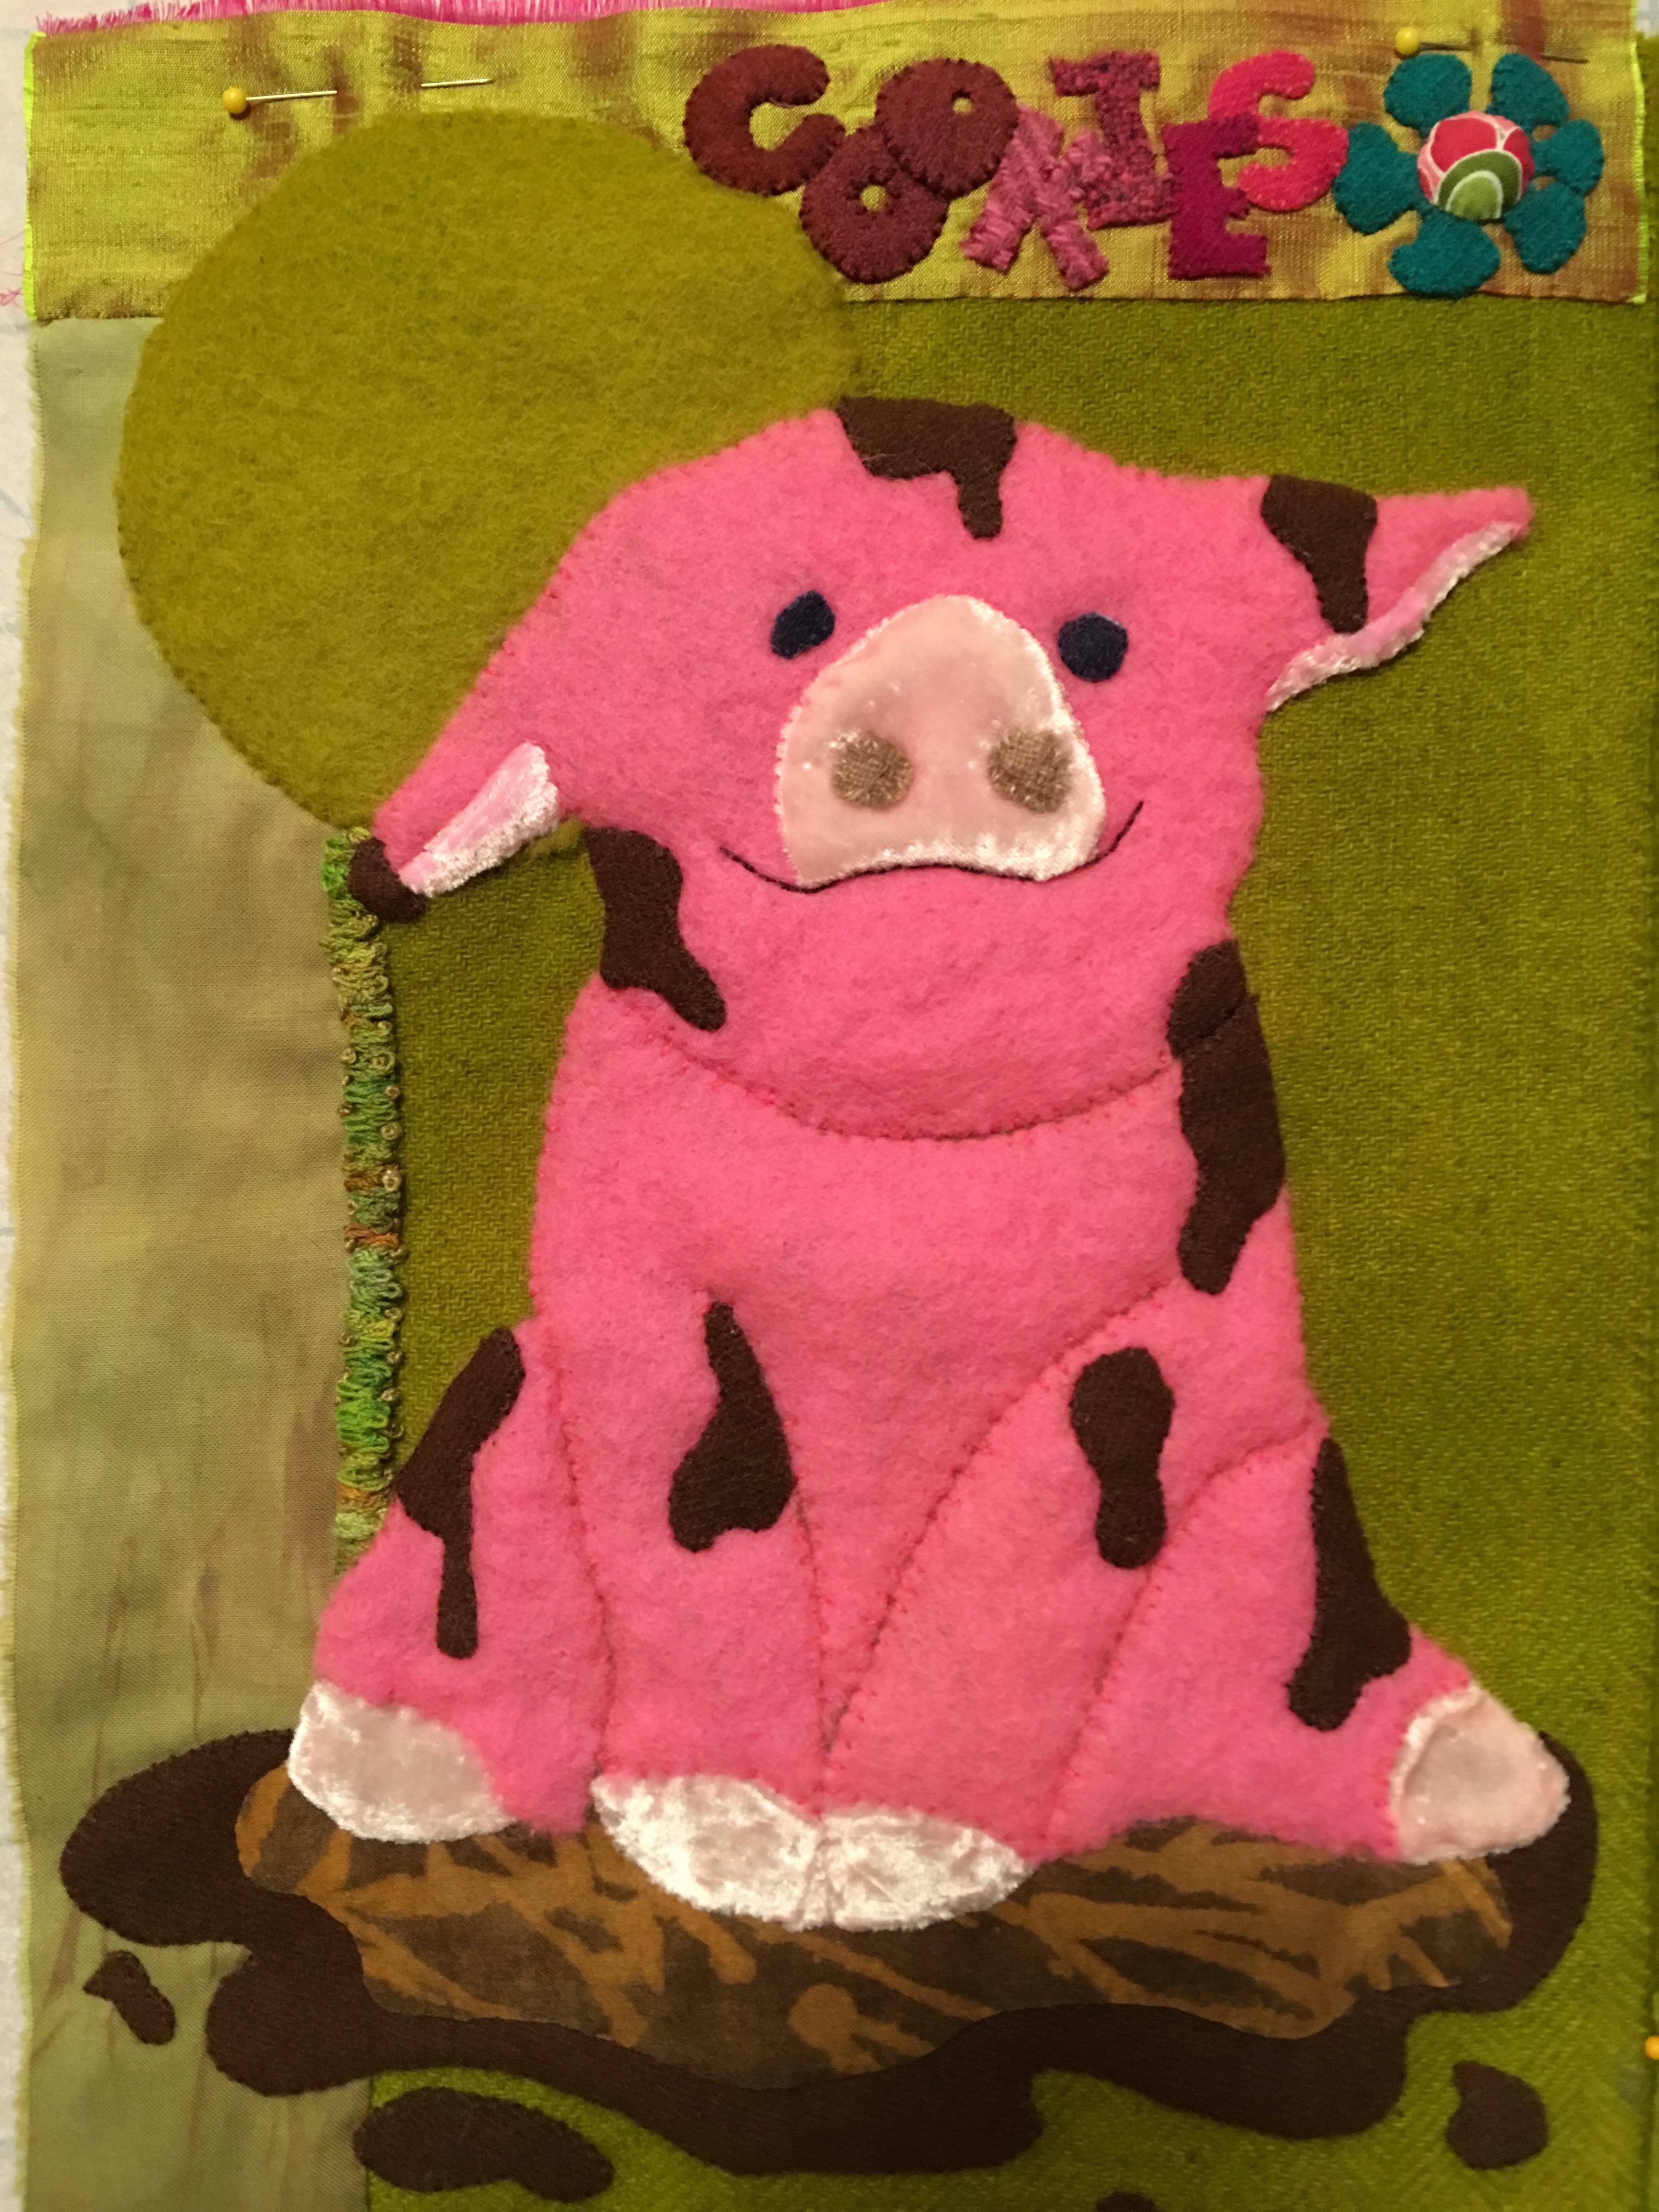
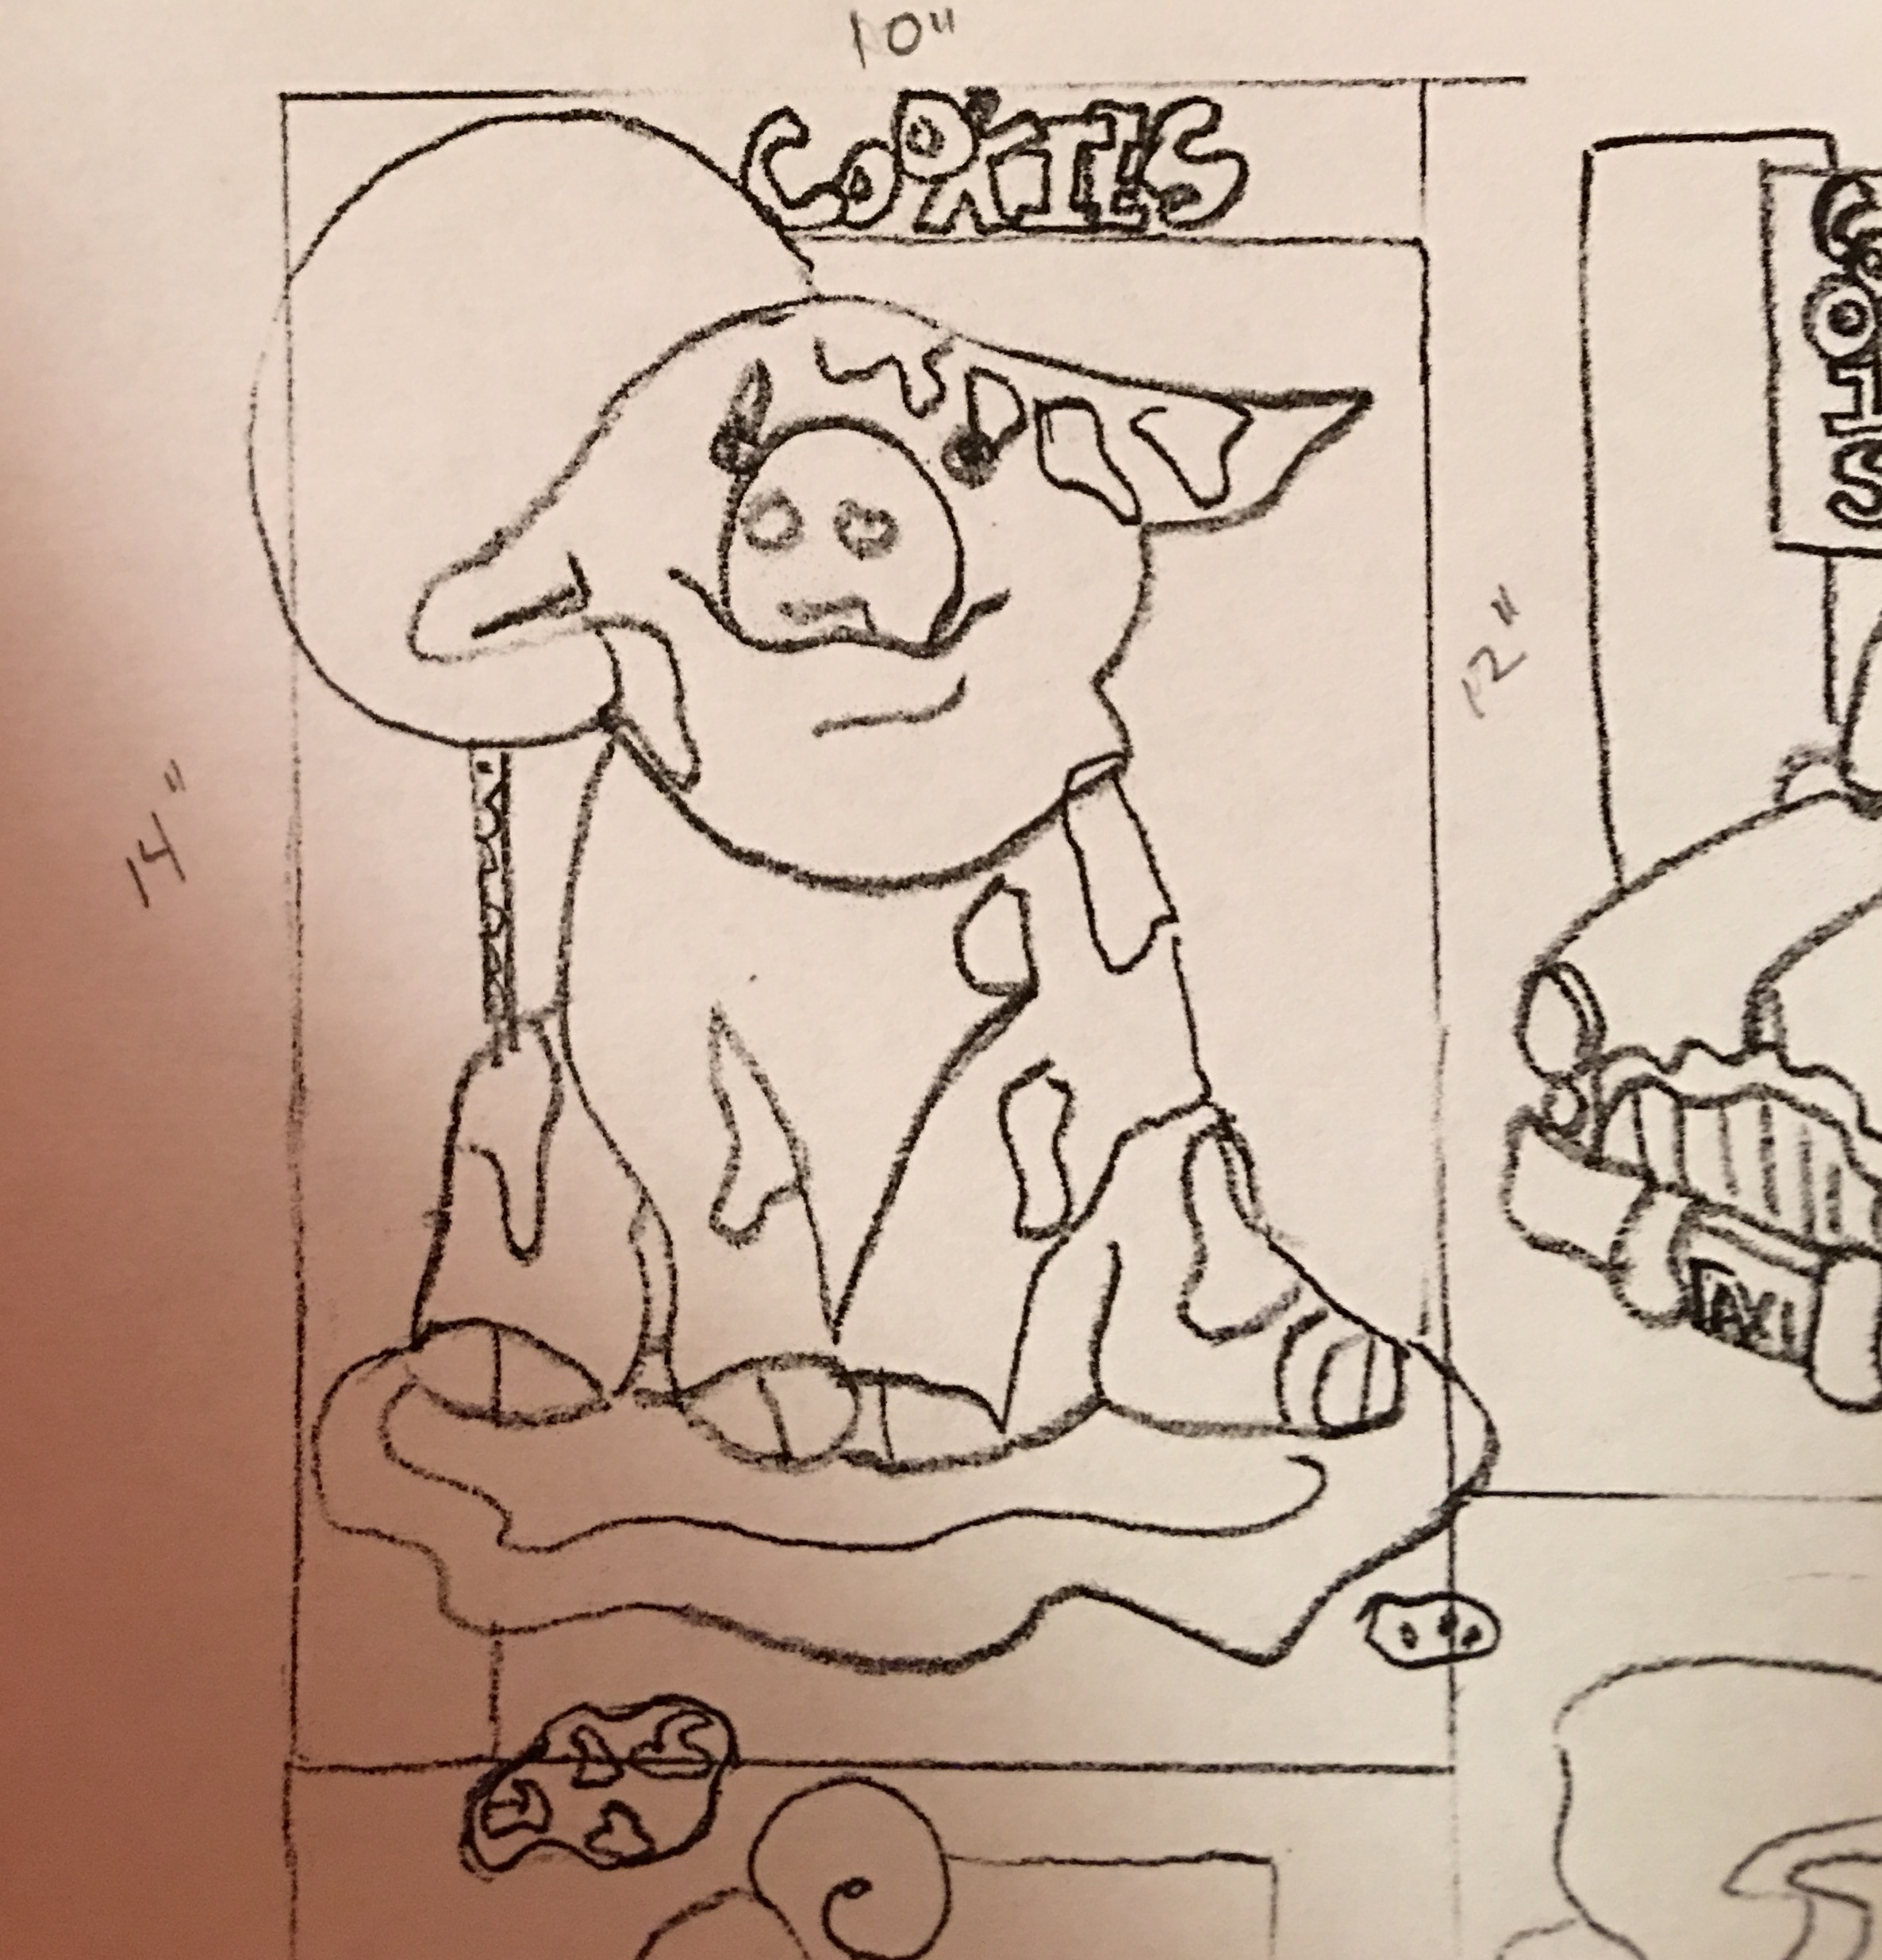
Now I’m back to designing so I can use all of these lovely fabrics. This is the beginning of Mr. Pig. He still needs to be embellished and is one of twelve blocks for my Block Of the Month project featuring cookie jars that I’m in the midst of creating patterns and, hopefully, kits for, that will come with many of my hand-dyed fabrics as well as everything you’ll need to make each block.
Notice the cotton fabric to the far left? That is one of my shibori dyed cottons and the green wools and pink wool and velvet are all my hand-dyed fabrics too!
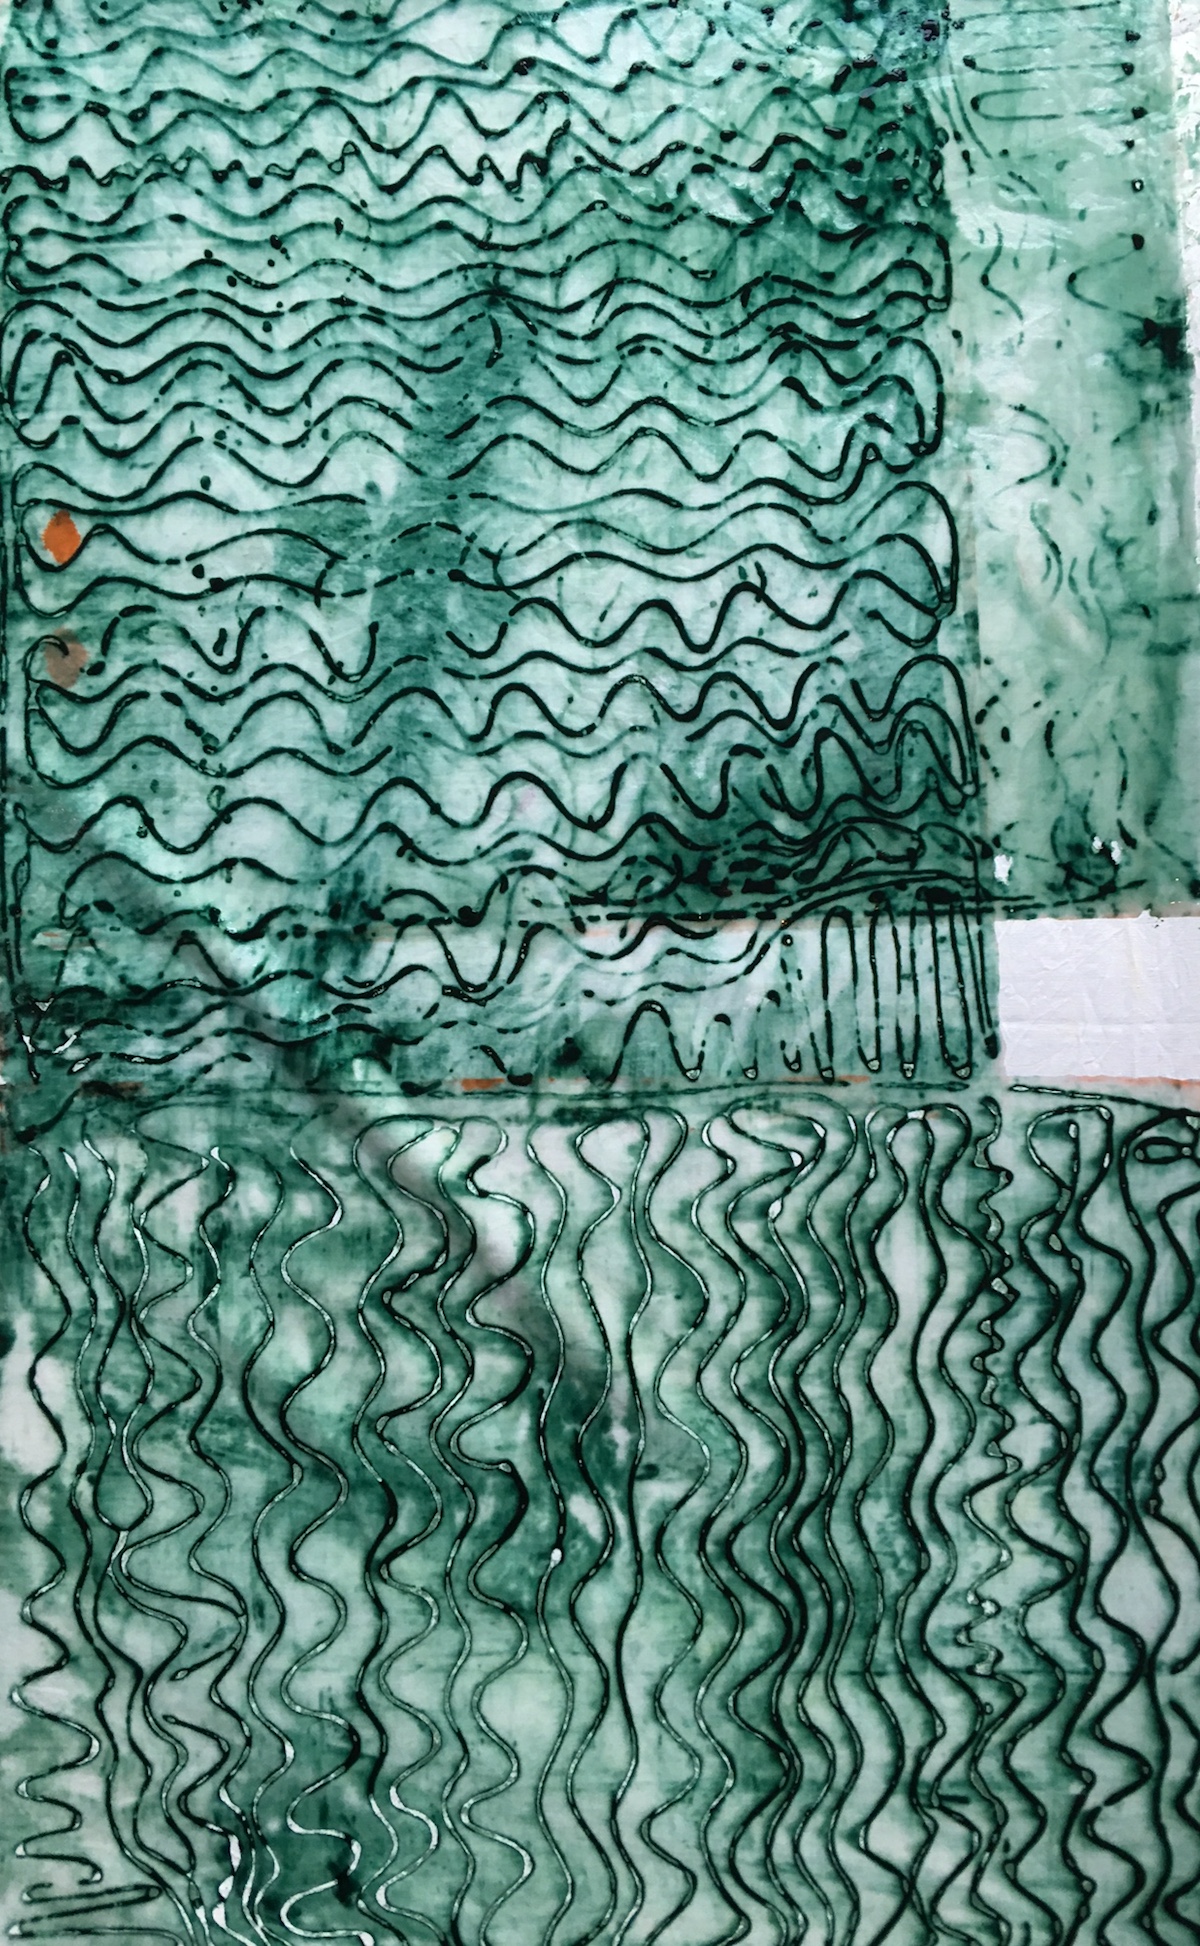
Fabric painting was something I knew nothing about before taking Elizabeth Barton‘s online class Dyeing to Design at the Academy of Quilting. Fabric painting is the process of combining fabric dye with a thickener so it can be used to paint fabric, just as one would paint on a canvas. Think about that. The possibilities are endless!! As we had been silk screening the week before, I used a couple of my silk screened fabrics and painted on them and then decided to branch out and paint on a blank white piece of cloth. Here are some of my doodles.
As you can see I had fun! I also painted the fabric in the photograph below, but I didn’t have a clear idea of what to do with any of it. While painting the fabric in this photo below I was thinking about how we are all moving along in our lives, sometimes following, at other times leading, sometimes crossing paths with others, but can often feel we are alone even though we live in a world populated by so many. Still, if we can just remember to reach out to others, we find our experiences are shared by many. Should I have just written all that in the first person singular? But then I might have felt that alone feeling again… Anyway, I sat with these various fabrics and did nothing for several days.
Then, having given up on the idea that I was going to be miraculously hit with a blast of inspiration, I cut up the fabric (just a little, nothing radical) and sewed it back together (photo below.) And then I sent it off to my class for feedback, that’s the whole reaching out thing that I mentioned above… Elizabeth is an excellent teacher and can be depended upon to make terrific suggestions. Which led to this…And this…And this…
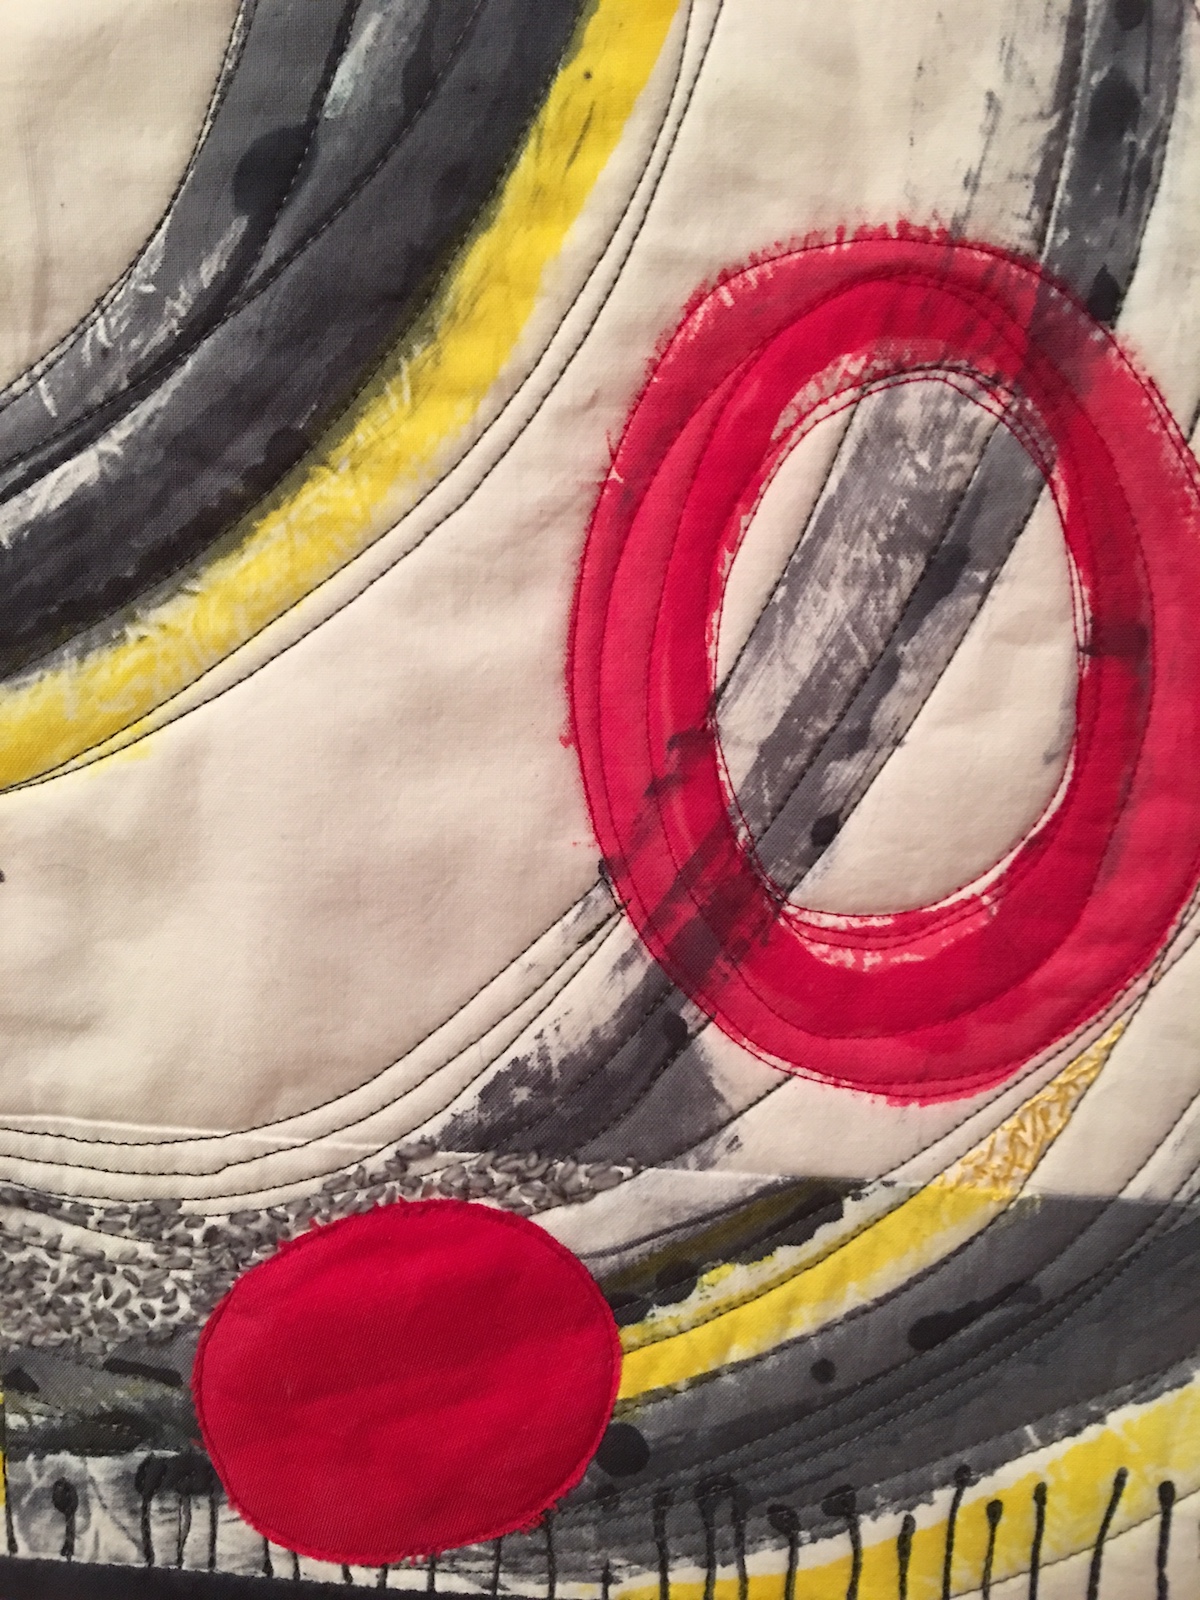
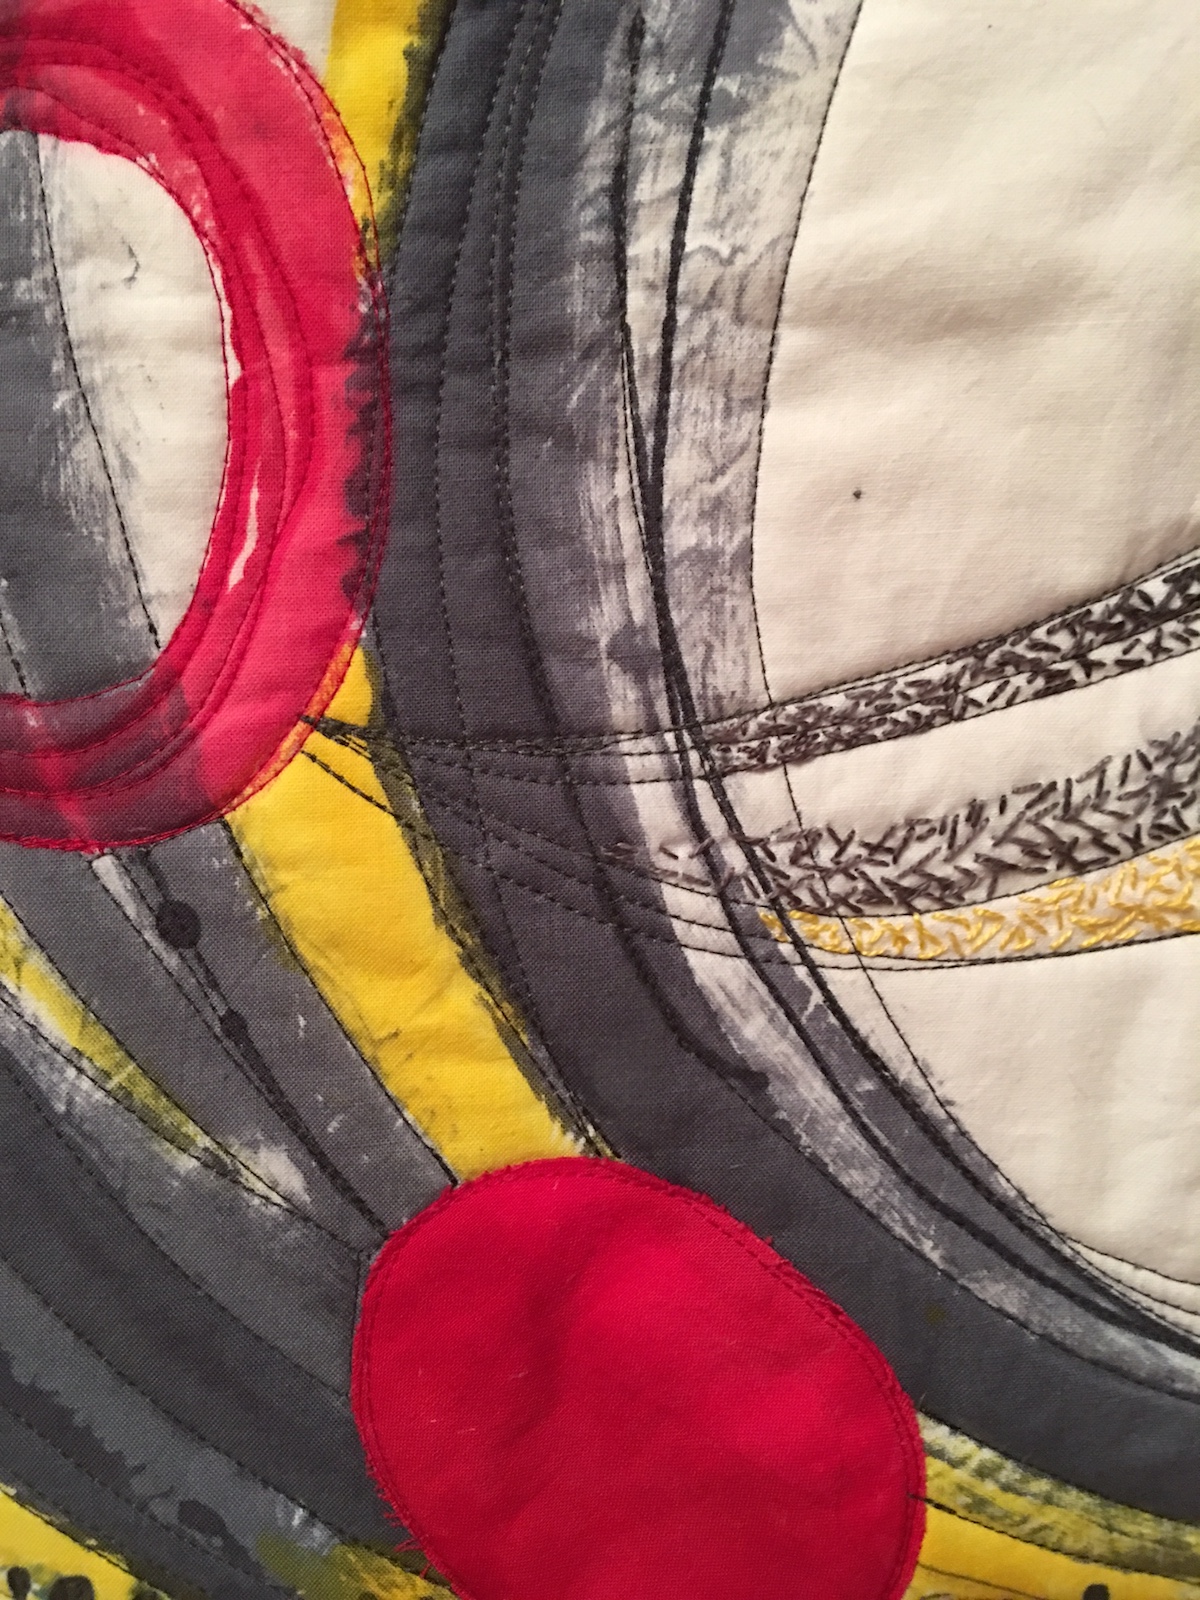
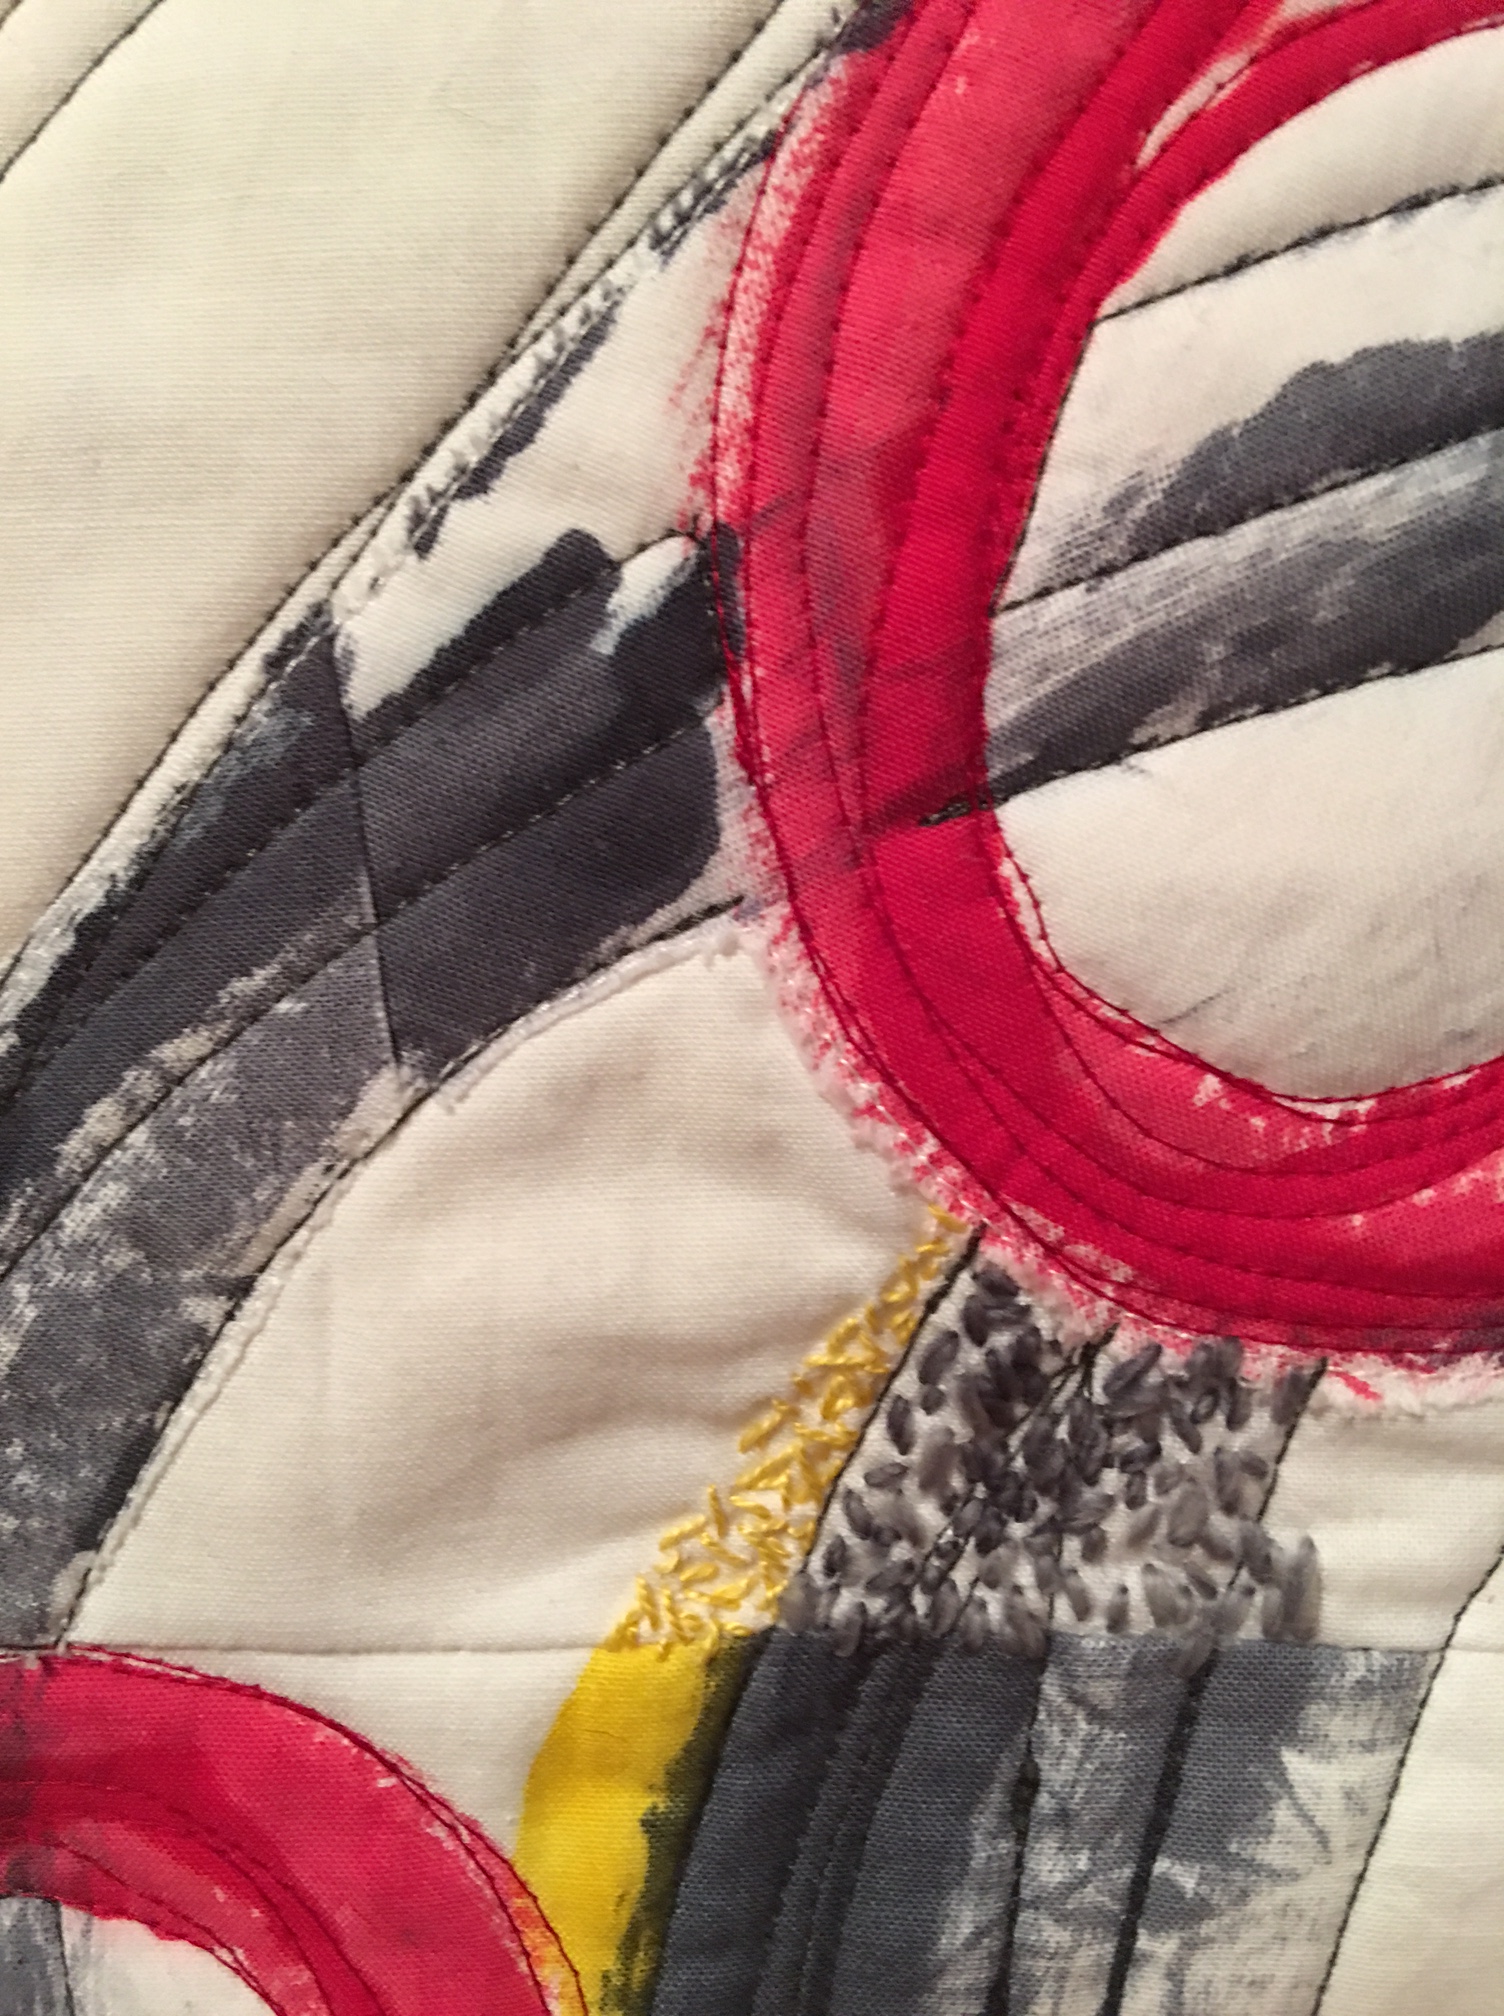
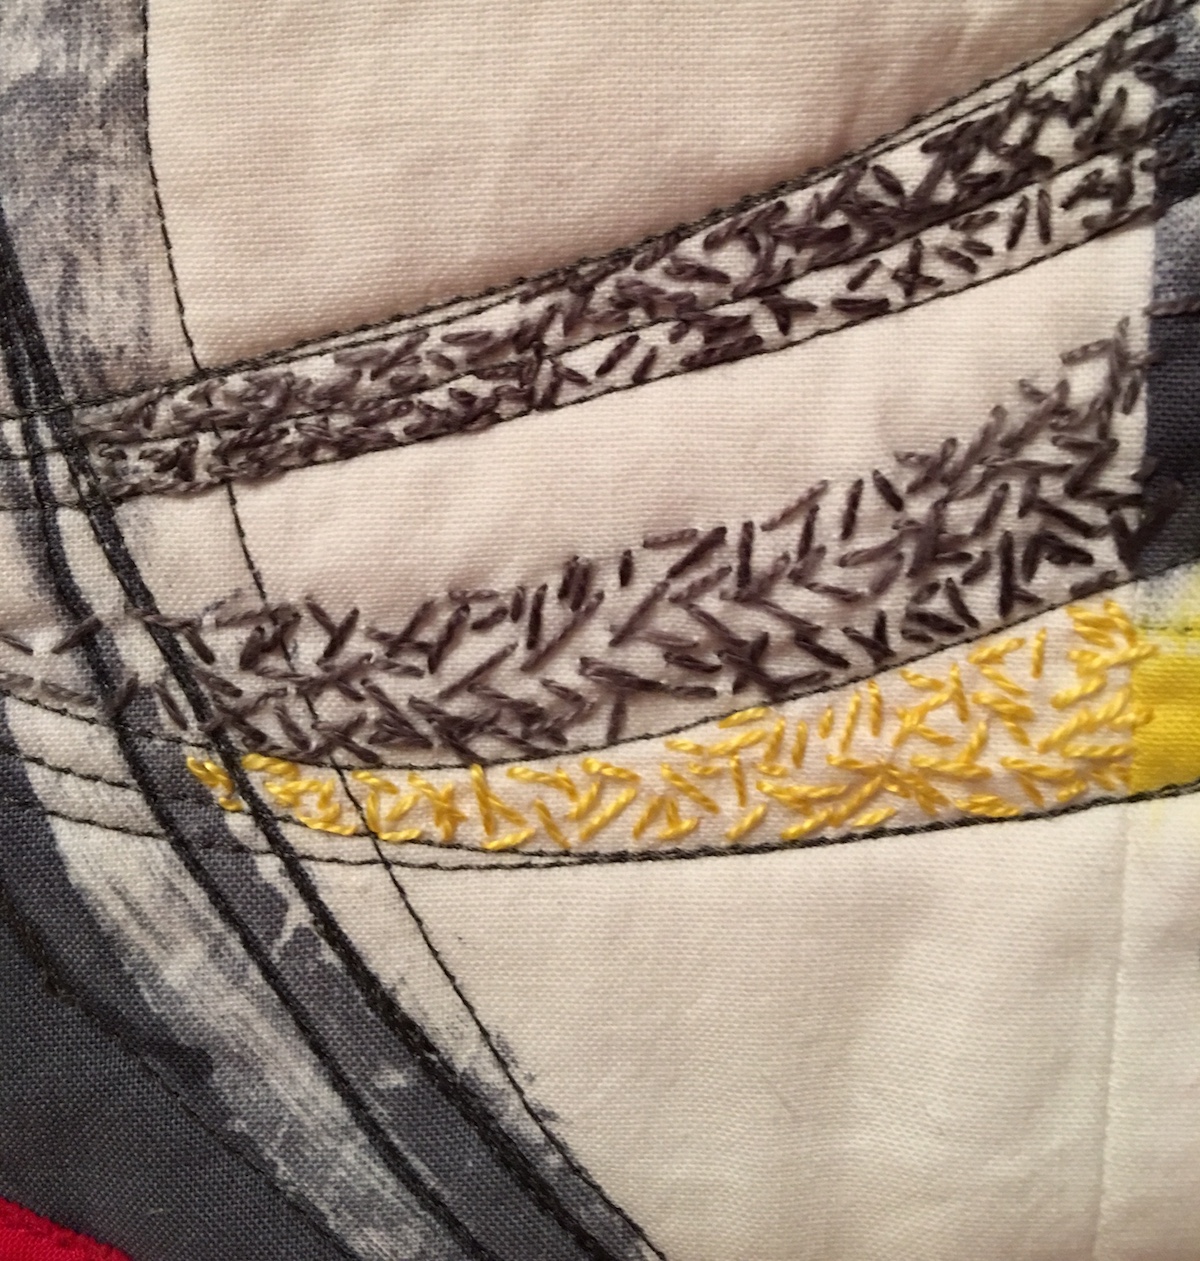
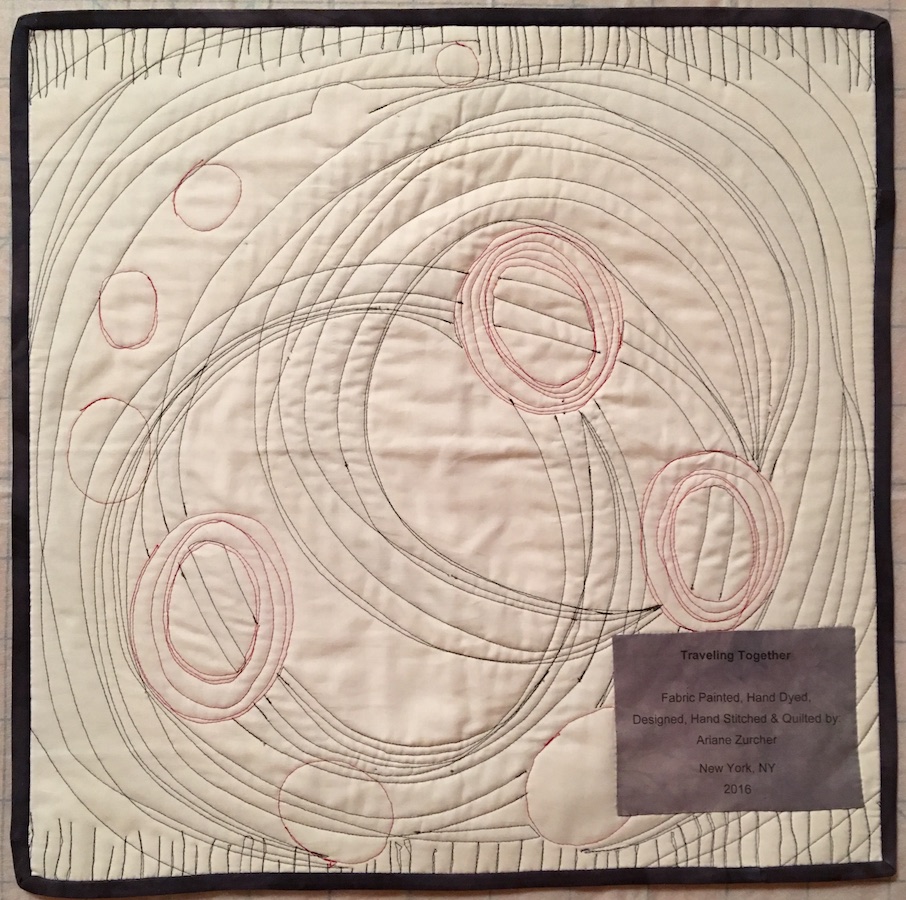
And finally, finally, finally… this…Which became this… traveling along our various paths…And finally, this… reaching out to others and no longer feeling so alone…Here are a few close ups of the machine and hand stitching…
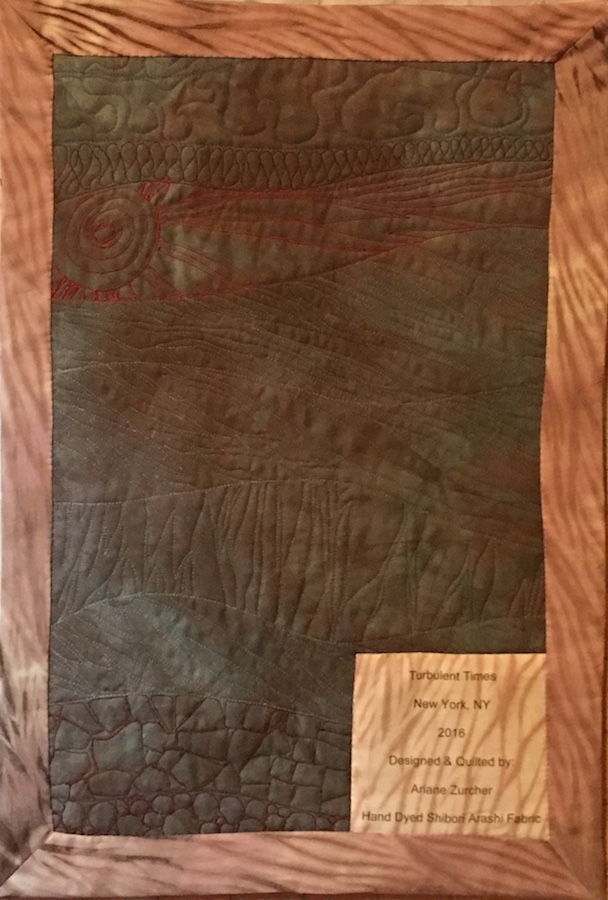
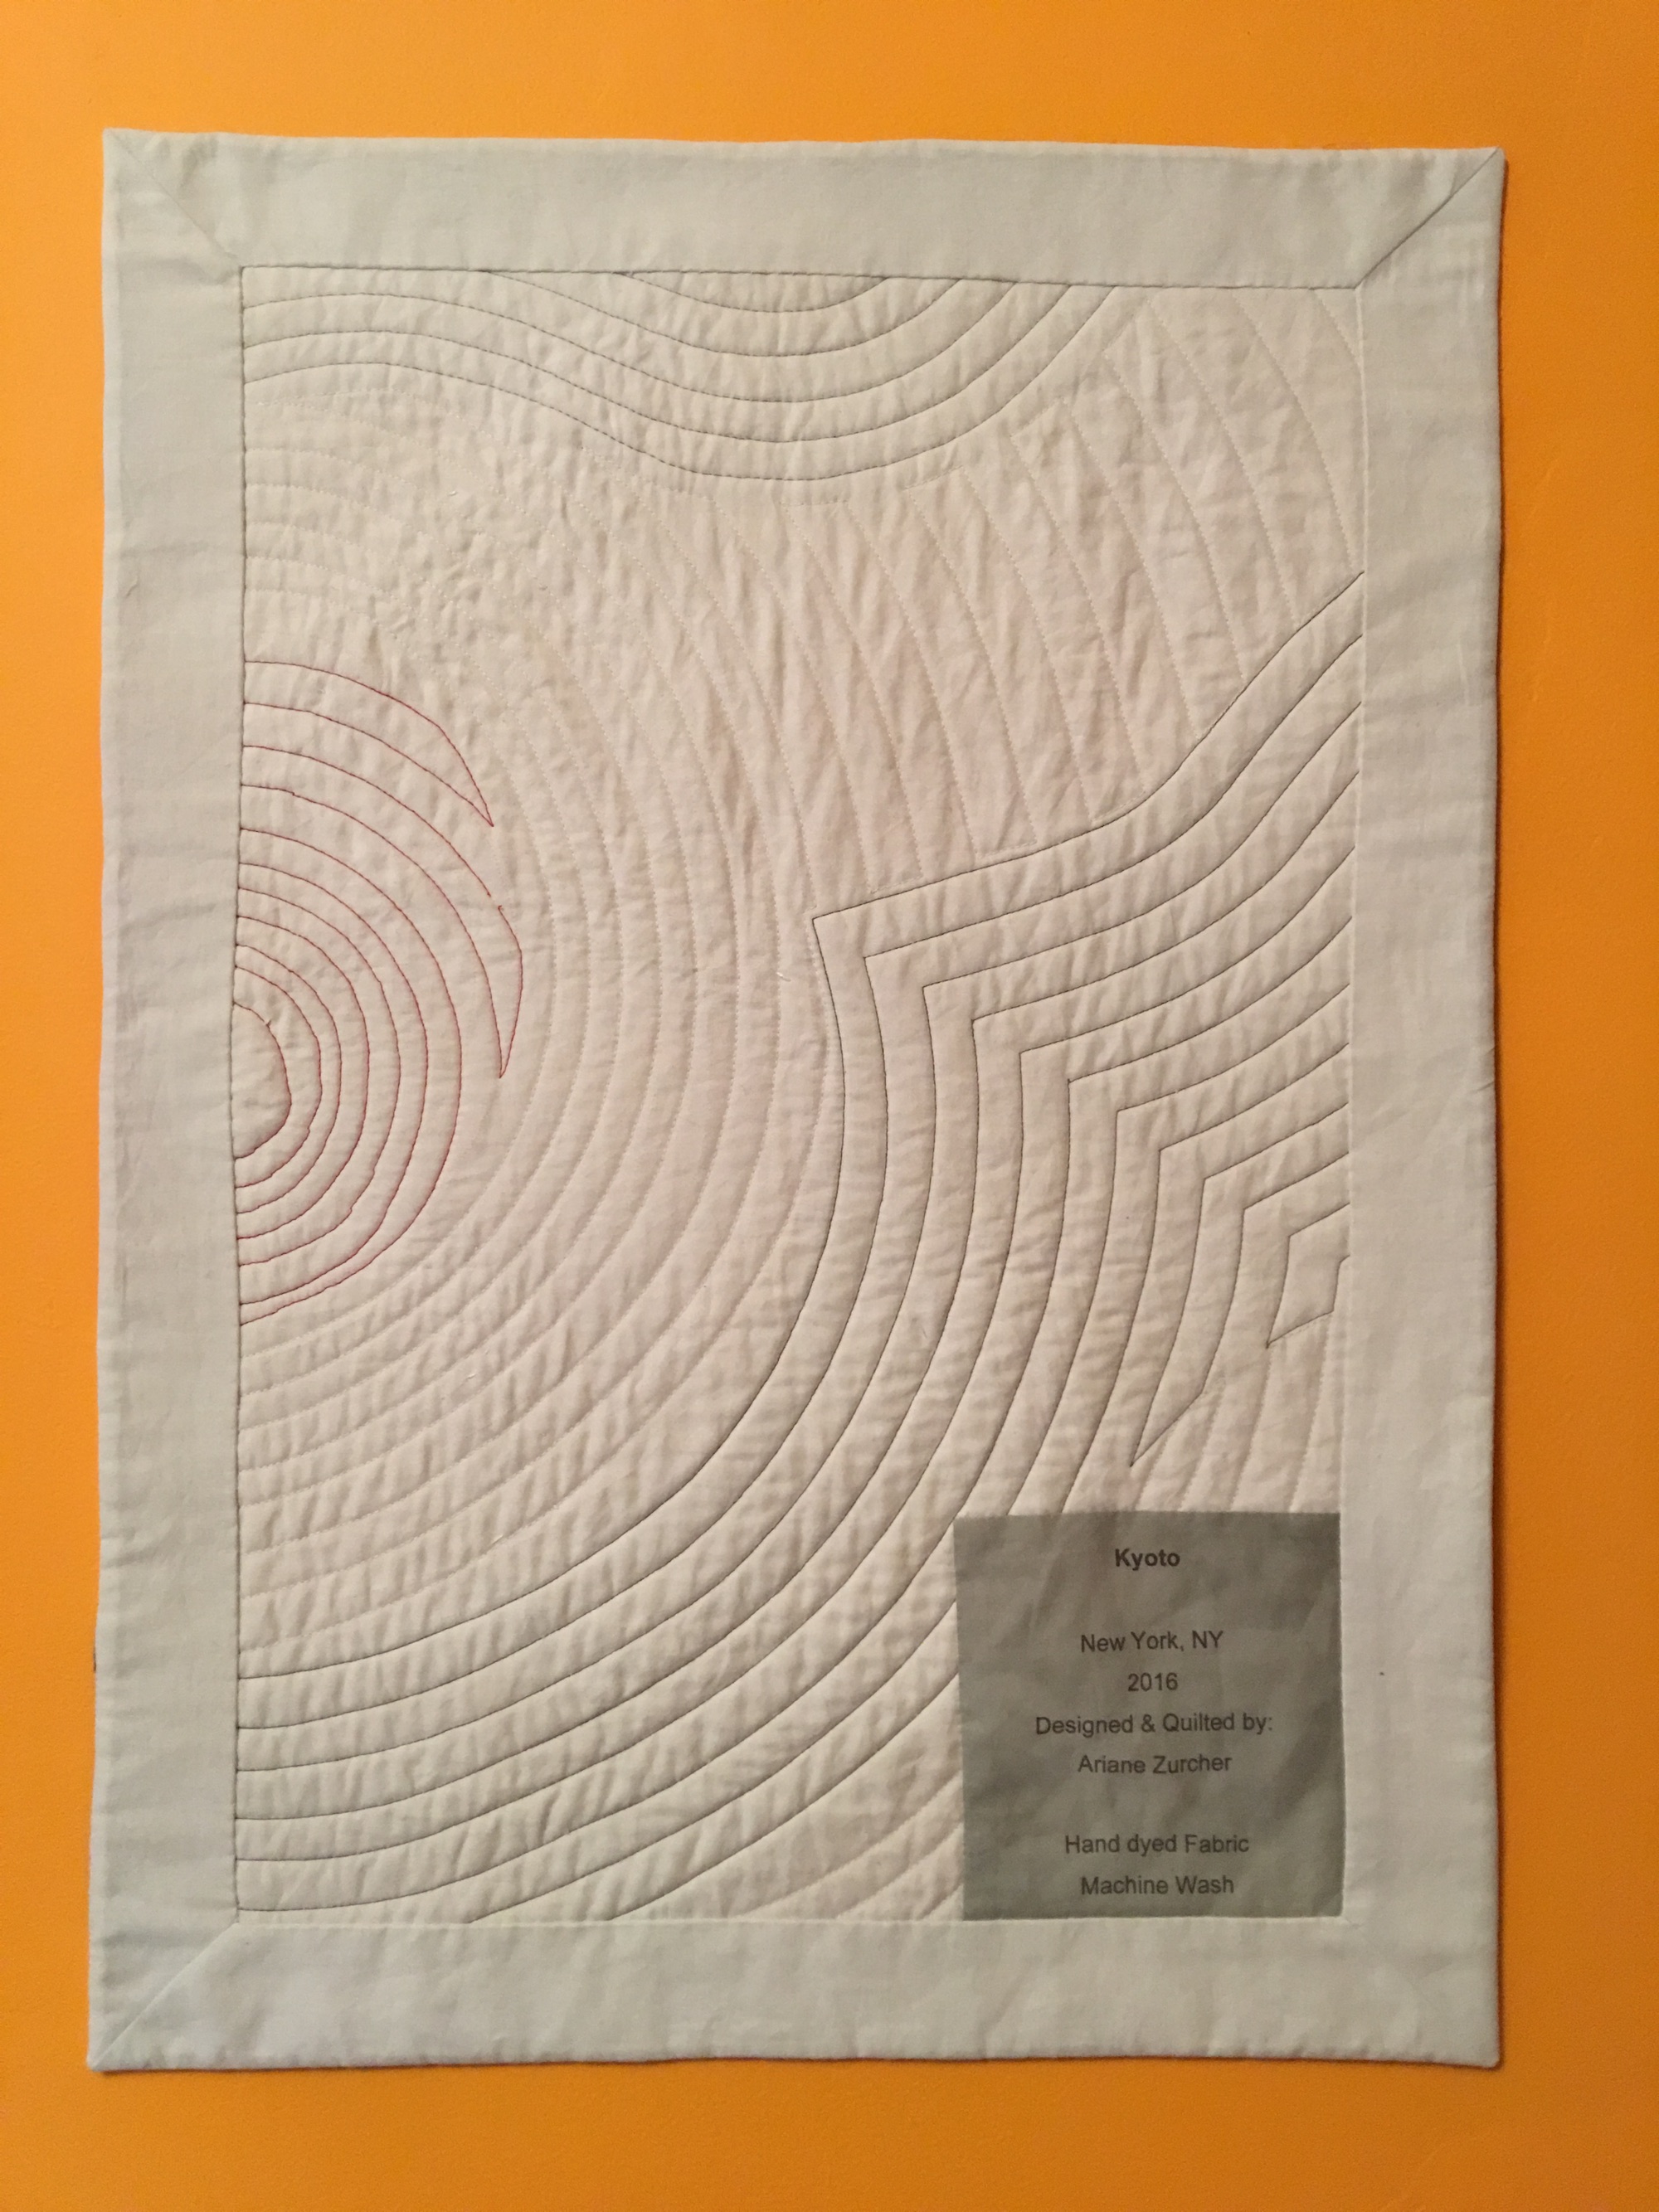
And this is the back.
Traveling Together measures 21.75″ x 21.75″ All the fabric was hand painted and hand dyed. Then quilted using a cotton batting and kona cotton back. I did the hand stitching using a perle cotton thread as well as a wool thread. The binding was hand dyed and sewn on, as was the label.
I still have not figured out what to do with my various silk screens, but I just finished painting over a few of them and plan to over dye a couple of others, so will see what the results are after that. In the meantime I painted a few more half yard pieces of fabric and am eager to see how they turn out.
Elizabeth’s Dyeing to Design class is over, but she’ll be teaching it again in the spring, I believe. I cannot recommend it more highly.
I was going to entitle this post Fear of Dyeing (and Silk Screening) but Where’s the Pun in That? But it was too long so I just went with the edited version… a girl can have a little pun. Okay, okay that’s enough. I’ve filled my quota of puns and I’m barely out of the starting gate. It’s all going to be very serious from here on out.
In my last post I promised screen printing, so here we go. All the photographs below are of techniques described by Elizabeth Barton in her wonderful class Dyeing to Design over at the Academy of Quilting.
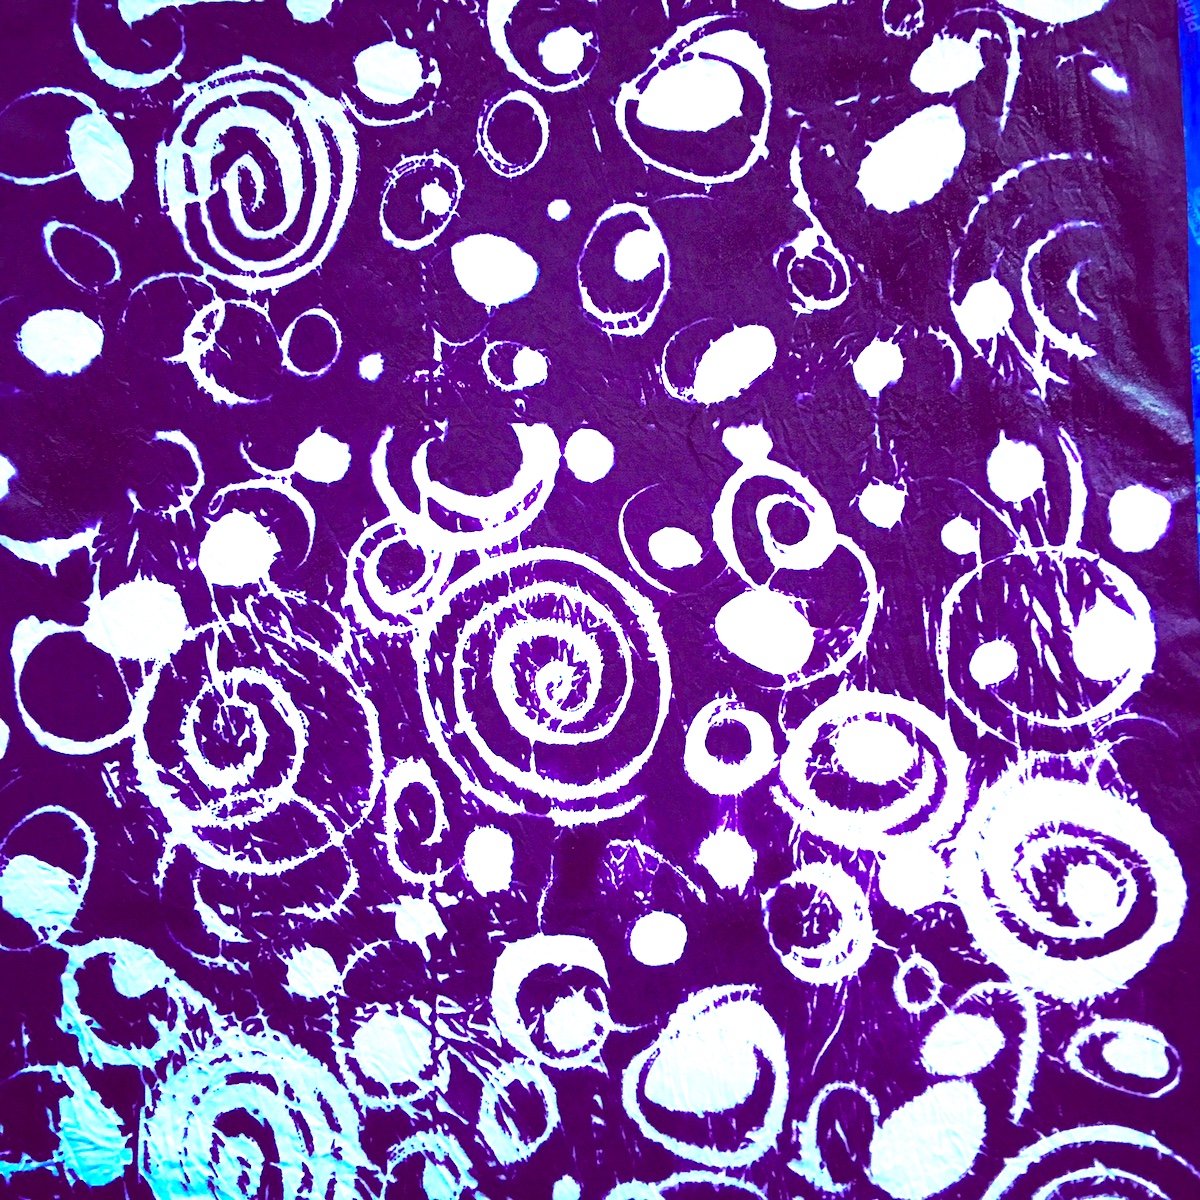
The last and only time I did screen printing was when I worked (briefly) for the fashion designer Zandra Rhodes while living in London having just graduated from Parsons School of Design about a hundred years ago. Zandra Rhodes is known for her beautiful silk screened fabrics as well as being the “Queen of Punk” a distinction given to her back in the late 70’s. All I remember from that time, aside from the time she told me to clean her bathroom, was using a huge squeegee-like thing to scrape paint across the enormous screens she used. I wish I could remember more as it might have helped me get over my fear when tackling Elizabeth’s silk screening lesson. I have to admit I was completely intimidated reading the lesson over, so much so that I read the lesson and then didn’t do any of the exercises mapped out in it for at least three days. Then another person in the class posted her gorgeous silk screened fabrics and it motivated me to at least try some of the techniques suggested.
Using newsprint this was my first attempt at silk screening on white cotton
Have I talked about fear during the creative process? I know, I know, I have. But maybe you didn’t read that post and anyway, I’m feeling compelled. I’m always surprised when I feel fear while designing or doing something art “worthy”. Why feel frightened when creating something? Why should I feel anything but joy? How does fear, even a twinge of it, make itself known through all the curiosity and excitement? And while I don’t have complete answers for these questions, I do know it isn’t unusual for artists to feel tremendous fear when creating. So much so that there’s even a terrific book written on this very subject called Art & Fear ~ Observations On The Perils (and Rewards) of Artmaking by David Bayles & Ted Orland. Heading up the chapter entitled: The Academic World is this quote from Howard Ikemoto –
“When my daughter was about seven years old, she asked me one day what I did at work. I told her I worked at the college – that my job was to teach people how to draw.
She stared back at me, incredulous, and said, “You mean they forget?”
I went to Parsons School of Design for my undergraduate degree and majored in Fashion Design. Much of what I learned had to do with the business of fashion design and that there’s no such thing as new, that everything is recycled and that in order to succeed one must be as determined, if not more, about the business as one is about creating. The truth is, I learned little about being an artist and more about the challenges of being a designer in the business world. By my last year my fairy tale notion of what it would be like to be a fashion designer was thoroughly squashed and in my disillusioned state I felt only dread at the idea that I was about to go out into the world and seek a job, much less in the fashion world. After floundering for a few years I abandoned fashion design in favor of a series of jobs/careers that I thought might be more fulfilling and less soul wrenching. And while all the things I tried my hand at varied, even dramatically, they were all in the “Arts” of some kind. What I’ve learned is that artists tend to have a difficult time making a living with their art, no matter what the medium is.
There’s a wonderful quote from Oscar Wilde that begins Part II of the book Art & Fear.
“When bankers get together for dinner, they discuss Art. When artists get together for dinner, they discuss money.”
How does one price one’s art, something that might have taken hundreds of hours to create through trial and error, through missteps, through experimentation, through FEAR? If artists used an hourly wage system to price their work, all art would be so expensive no one could afford it. So most of us don’t. We can’t. And while in an ideal world no one would have to concern themselves with making money from their art, and instead would just spend all their time making it, few live in such a privileged world. The fear of being able to sell our work, and how that inhibits the process is a whole other topic and one most of us can understand, but there is another fear that is far more complicated. It is the fear one feels when confronted with something new, something one has never done before, but would like to learn. There is the fear of failure or appearing incapable or of ridicule, criticism or being seen as incompetent by others, but also by oneself. To create art, is to be at once vulnerable and confident, and it is a tricky balancing act to not lean more one way or the other. Both carry their own pitfalls.
Creating is a messy process. Most people never see all the discarded bits, the beginnings and first steps taken to get to that finished piece. What I love about blogs is that people are willing to show their process. My favorite blogs, in fact, are the ones that do just that.
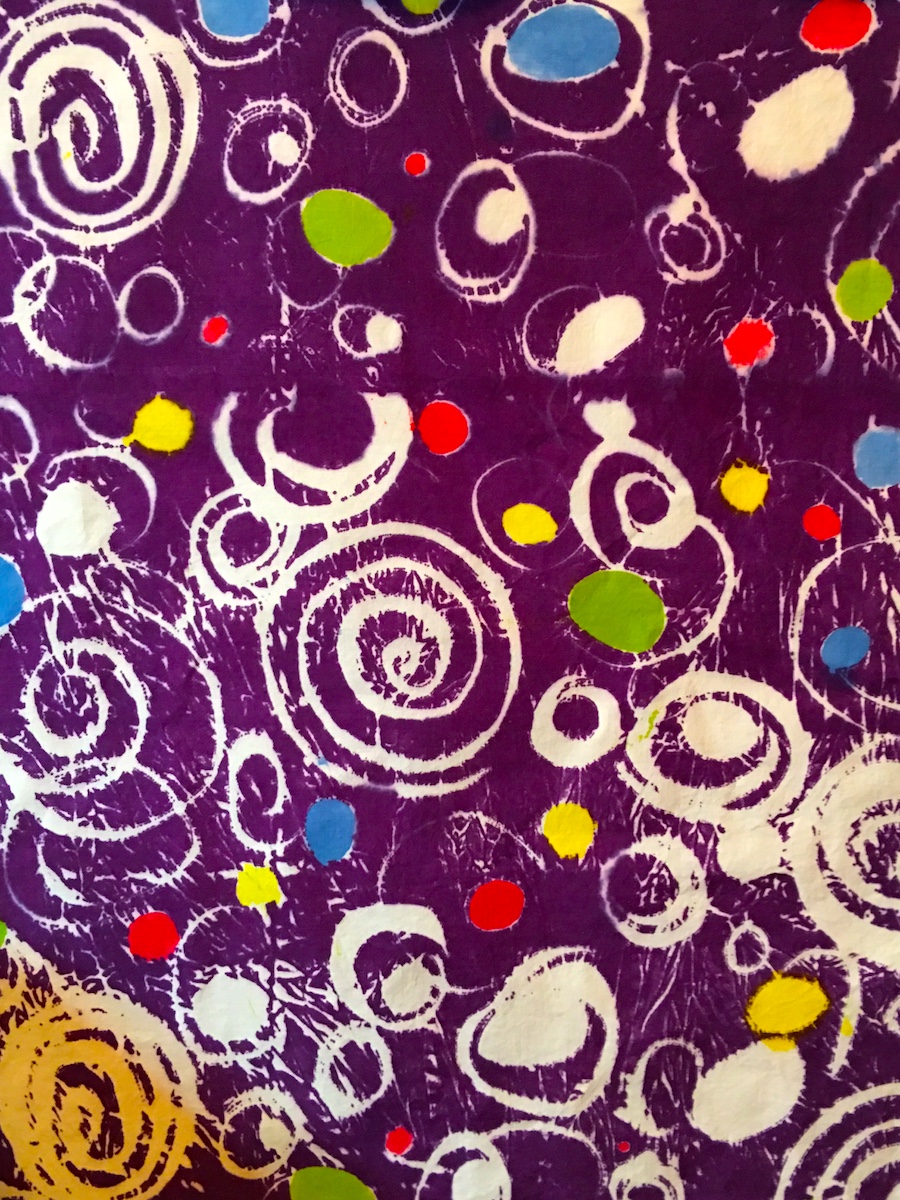
Adding color to the purple
When I am starting something new I often have an idea in my head. What I envision is always spectacular, but creating that idea takes skill, talent and knowledge, things I do not always have. So I have to learn, practice, and explore in order to be able to get the skills to (hopefully) produce the image I envision. Sometimes I’m successful, but more often I’m not. Sometimes I realize it will take me years to achieve the level of expertise required to make what I envisioned. So I have to accept that I won’t be able to do something as I’d hoped or modify what I’m doing to compensate or continue to practice, with the idea that eventually I might be able to produce what is in my mind.
Torn newsprint
For this piece I cut stencils out of a thin plastic sheet, before silk screening on top
This is the result of using those stencils that I removed for the red piece above
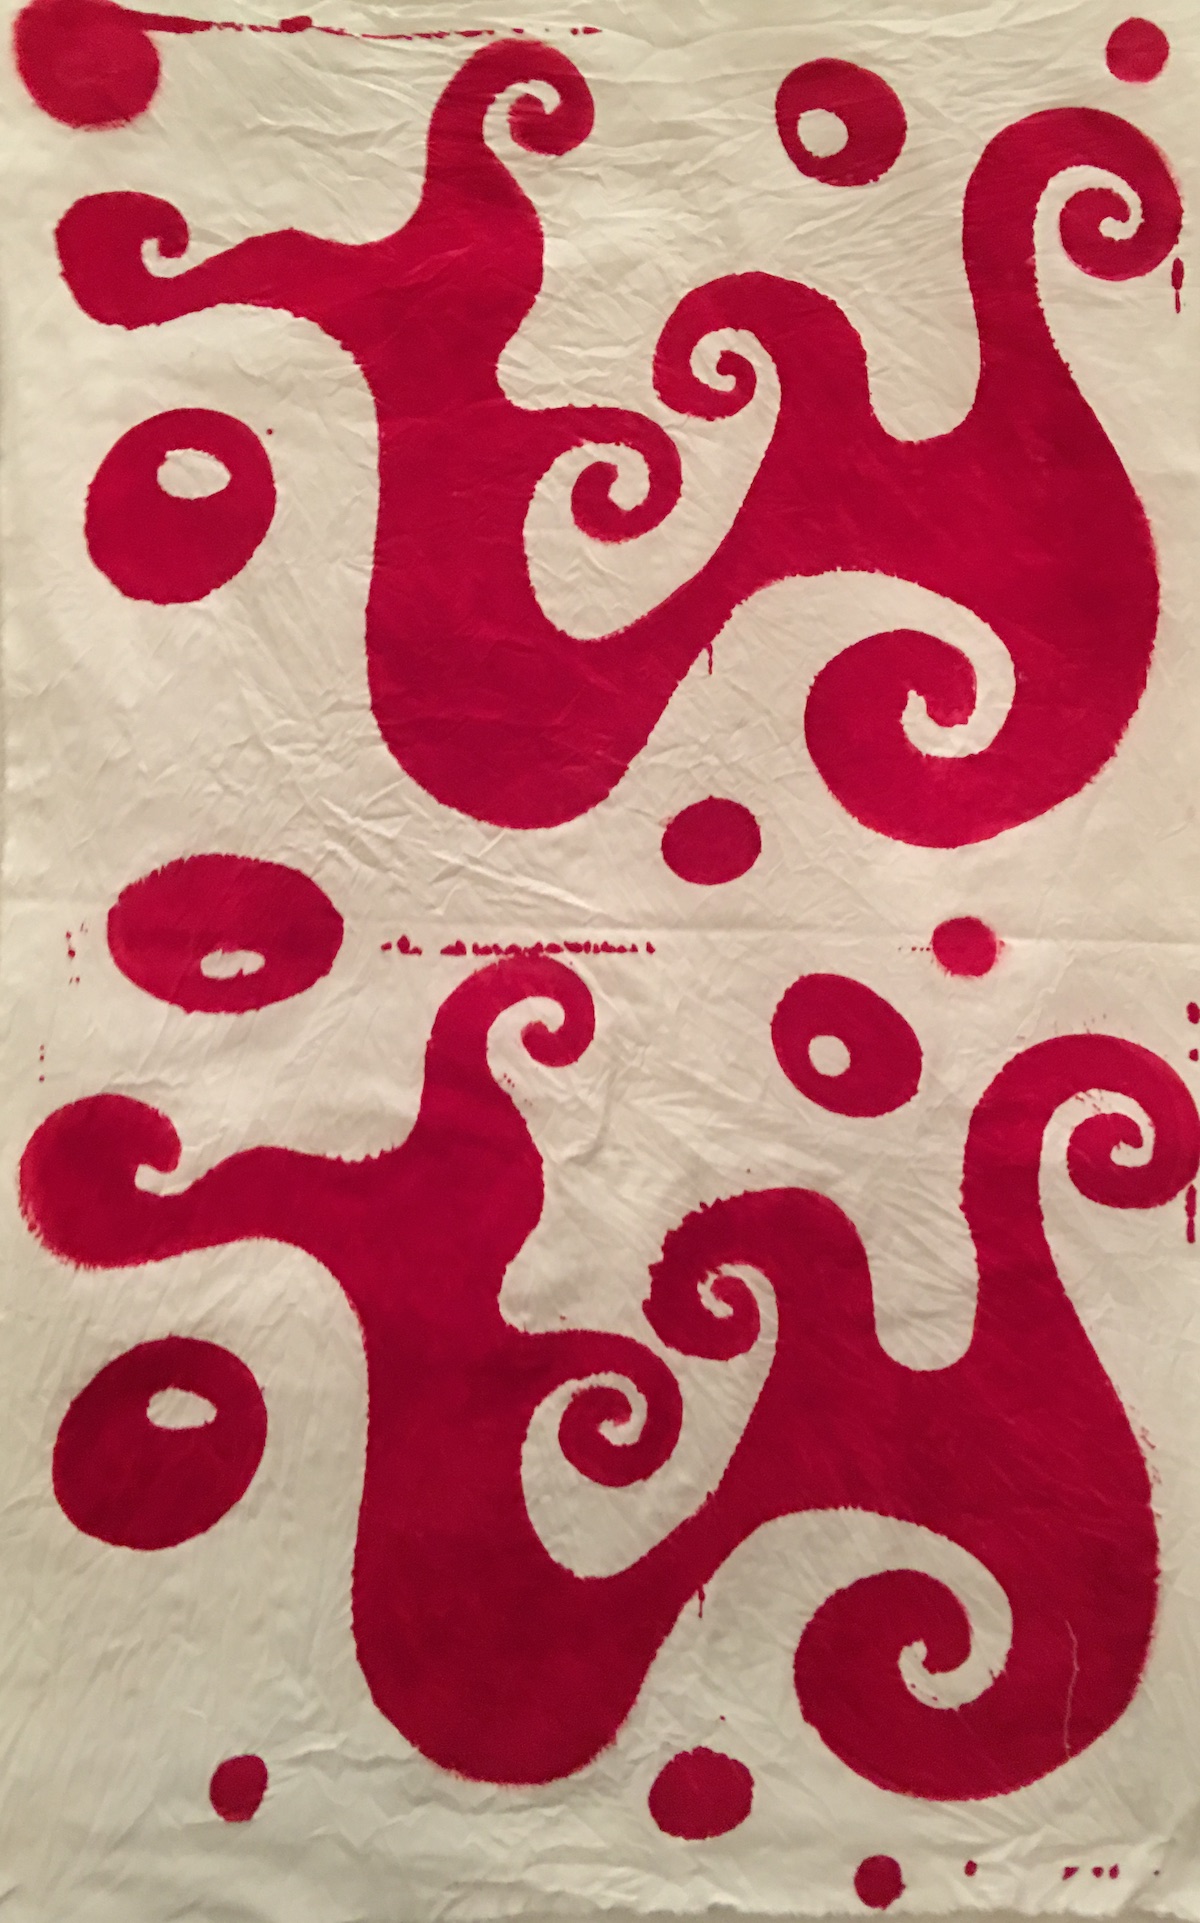
A technique attributed to Kerr Grabowski. This piece has yet to be washed, so who knows what it will look like!
Another technique described in Elizabeth’s class.
Regardless of the approach I take, perfectionism is truly the greatest kill joy and, for me anyway, the root from which almost all my fear springs. While some argue that without perfectionism, we would settle for less or not work as hard, they are misunderstanding perfectionism at its most destructive. I am referring to perfectionism that lacerates, the kind of self-talk that abuses and brutalizes. It is that awful voice that needs to be muted before anything can be created. Free from perfectionism I am allowed to explore and play.
I have no idea what I’m going to do with any of the fabric I’ve silk screened, and in some ways that’s beside the point. I didn’t approach this lesson with a preconceived idea. And that’s the beauty of taking a class like this one. The assignments require you to explore and play first and then after you’ve done that, consider what you’ll make. Most of these fabrics have been done for almost two weeks now and I still don’t know what to do with any of them. Or as one of the many talented and wonderful people taking this class said, “I’m waiting for divine inspiration.”
I began this blog a few years ago because I wanted a place where I could discuss creativity, art, inspiration and being an artist. Since life has always informed my art, I came up with the name – Where Art & Life Meet. Art has always been the thing that saves me. When I am creating I am completely present, focussed and I am most at peace. I’m in the zone, an almost trance-like state of being. I feel happy and serene. So when life gets turbulent, when I am scared, when the world feels chaotic and unpredictable, art is the thing that beckons me, soothing me, allowing me to appreciate life and it’s beauty, if only in that fleeting moment. However these last two weeks have been particularly difficult, so much so that for an entire day I couldn’t do any art at all. Nothing.
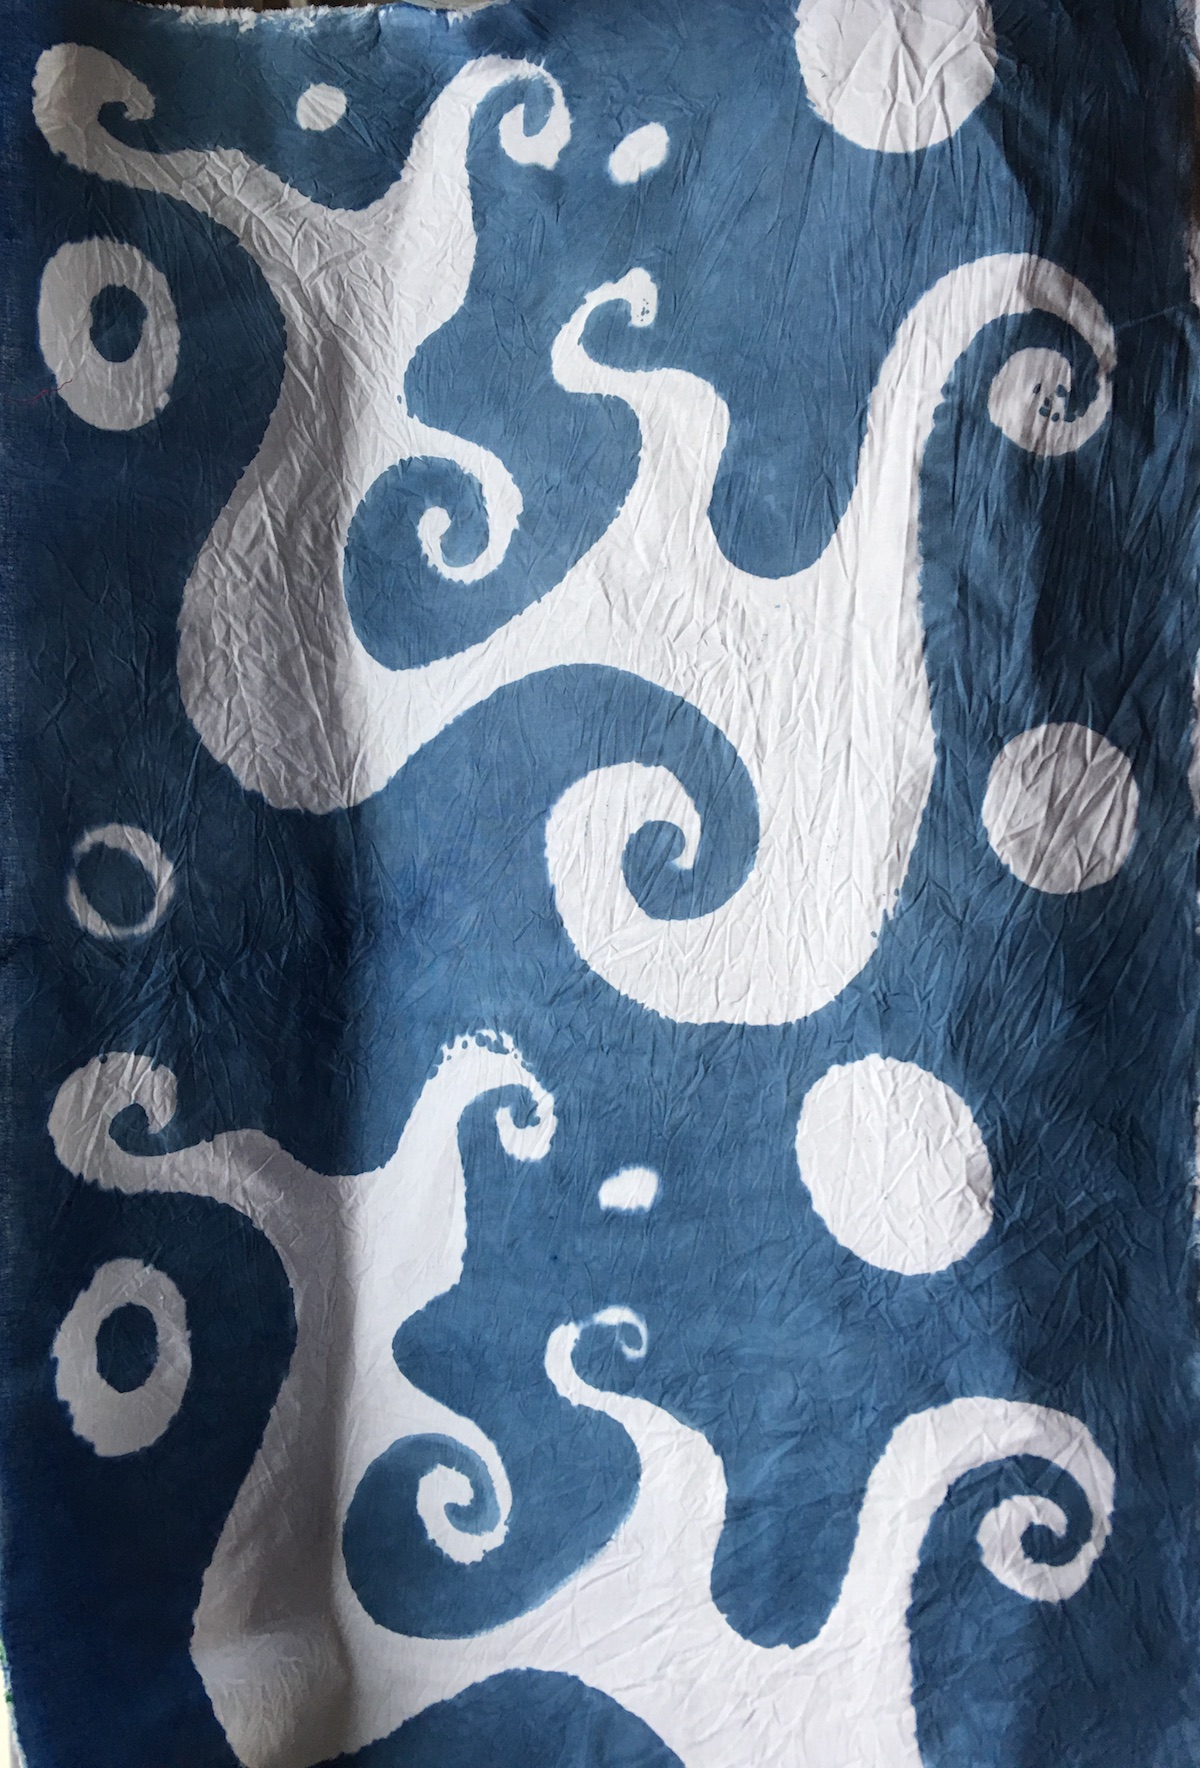
Thankfully, I had my online class, Dyeing to Design given by Elizabeth Barton, which I’ve written about ‘here‘ and ‘here‘ and we had another project due, so I forced myself to focus. We began with some basic shibori dyeing. Shibori is the Japanese art of wrinkling, creasing, folding and binding fabrics before dunking them into dye. One can get a great variety of patterns from Shibori. Here are some of mine.
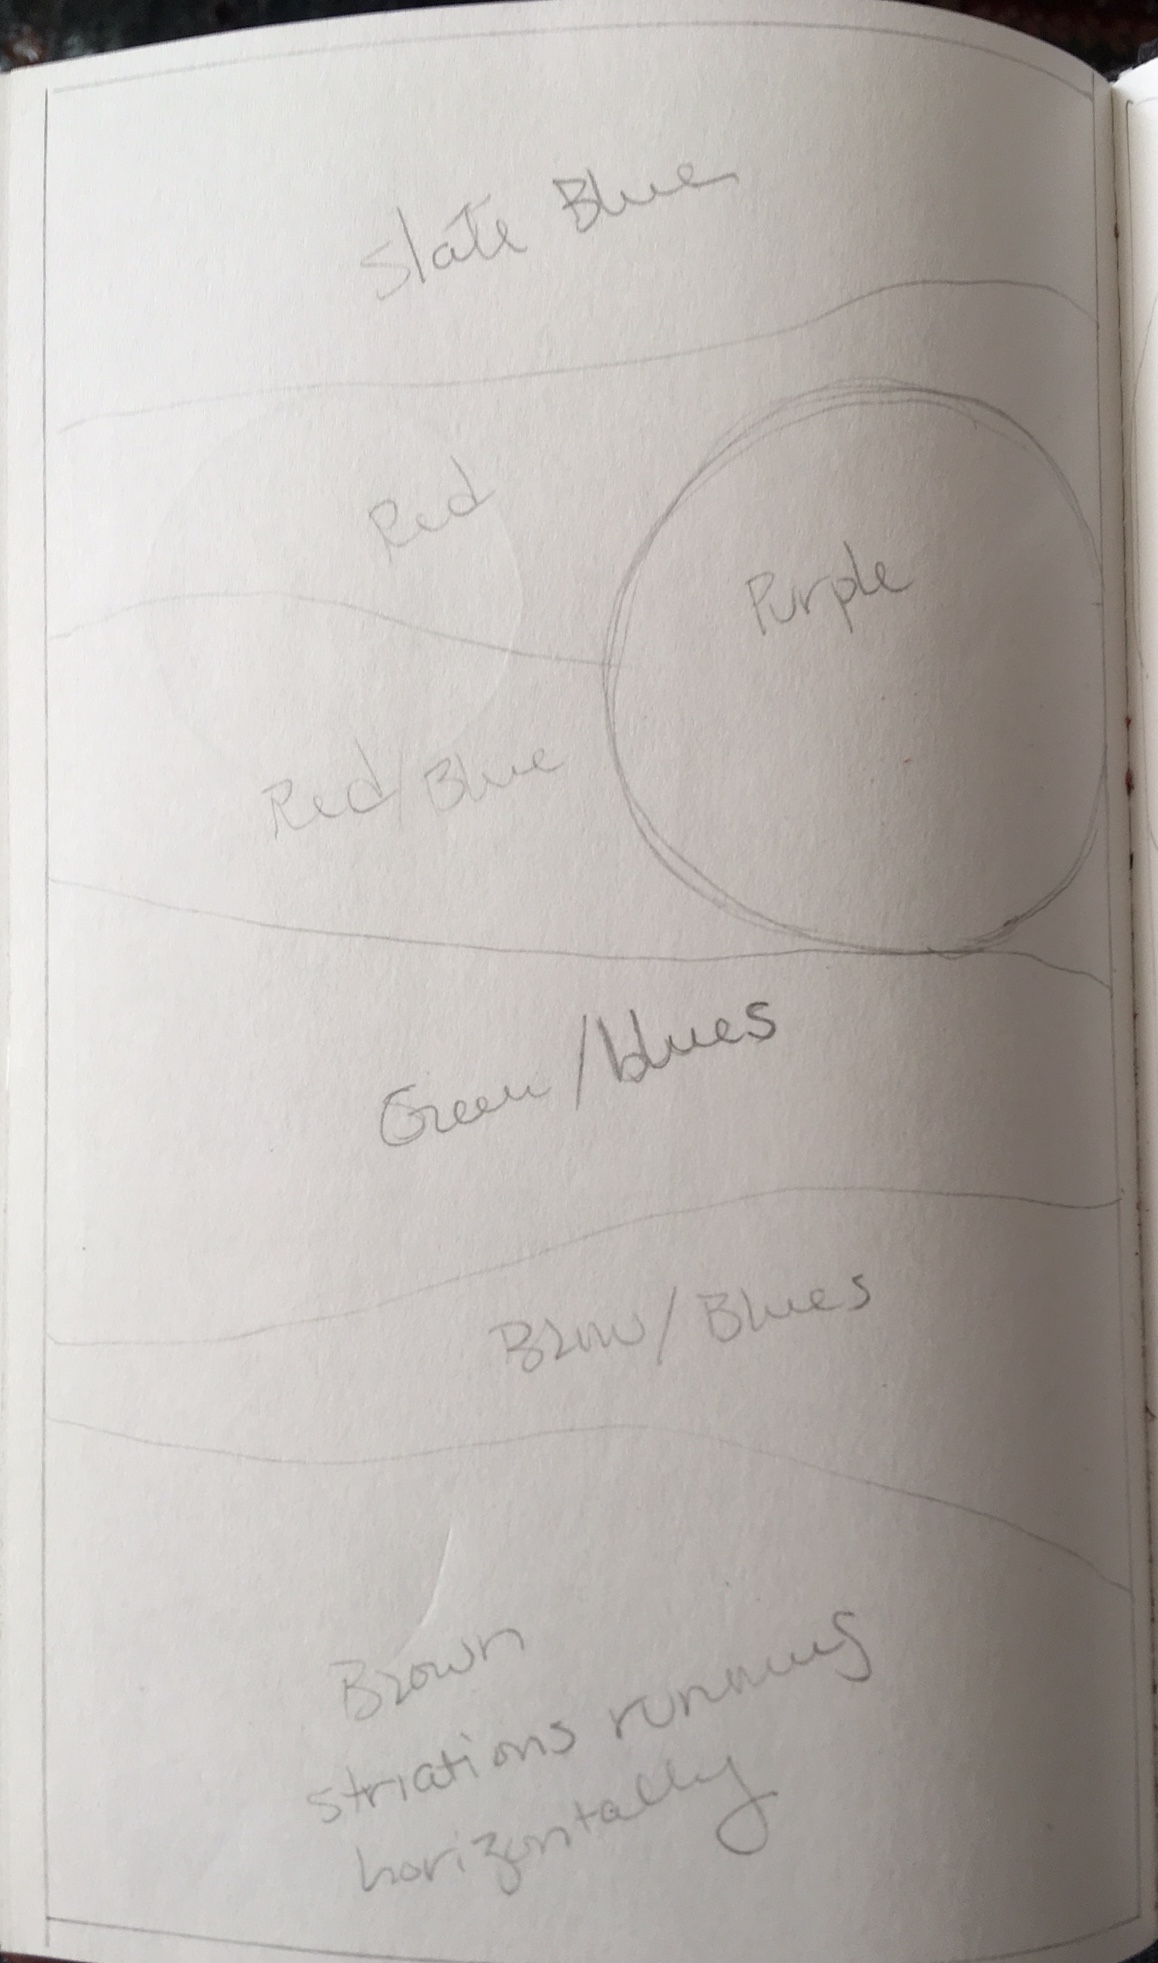
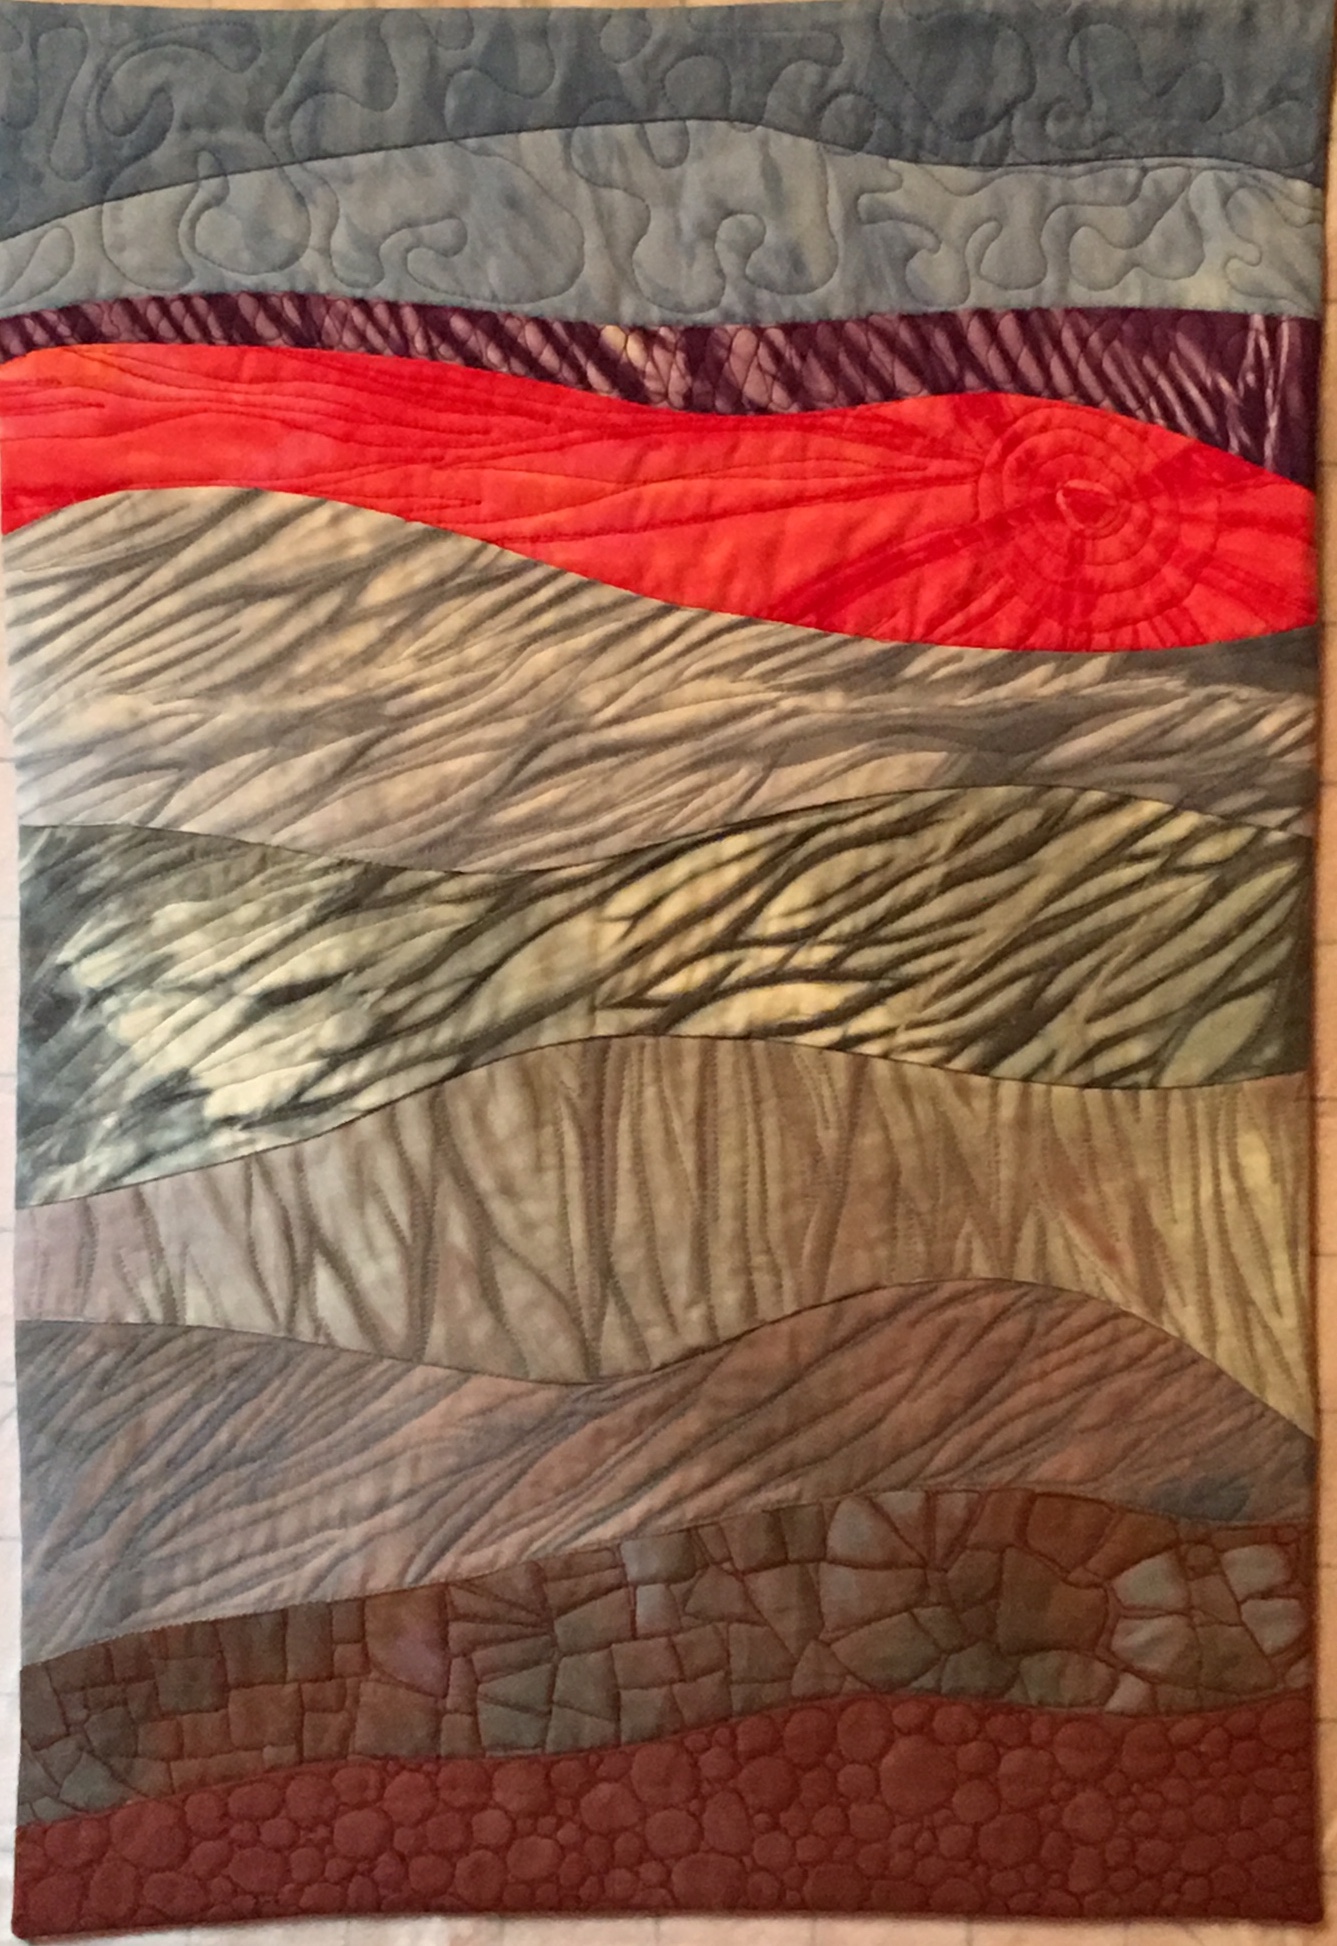
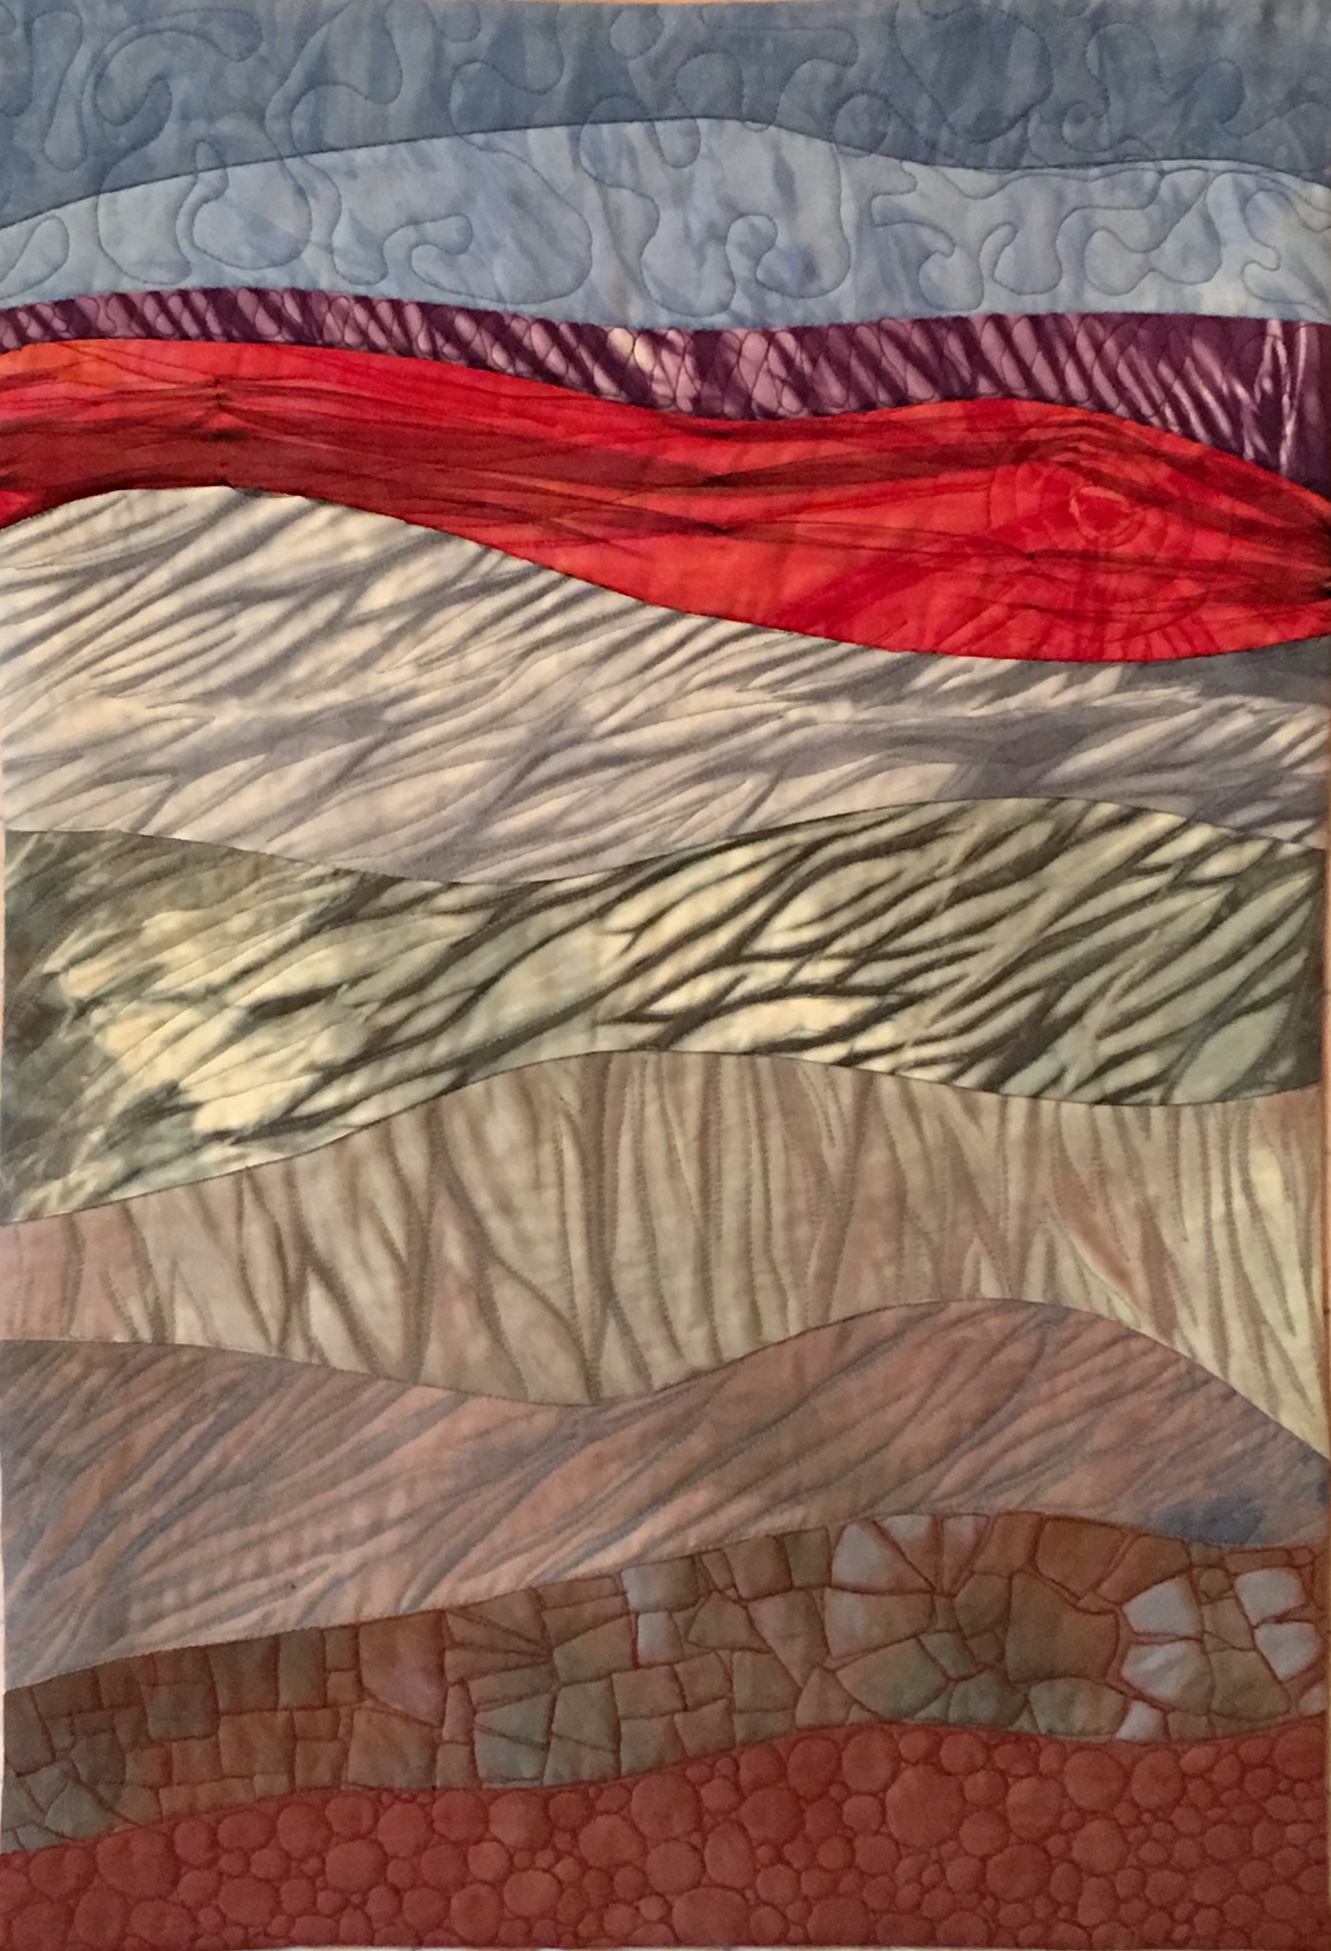
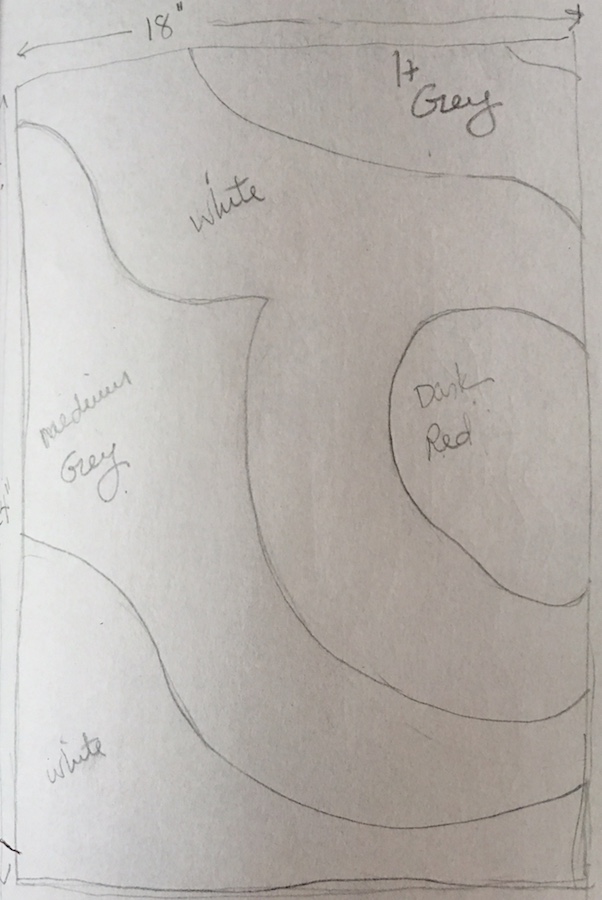
But once the fabrics were dyed, I felt at a loss as to what to do with them. I am drawn to shapes and usually sketch out my ideas first, but these fabrics are so bold, even bossy, that I couldn’t figure out how to respond to them. Finally I had an idea that I began to play around with, but it was going to be far too complicated and I didn’t have enough time to create it…
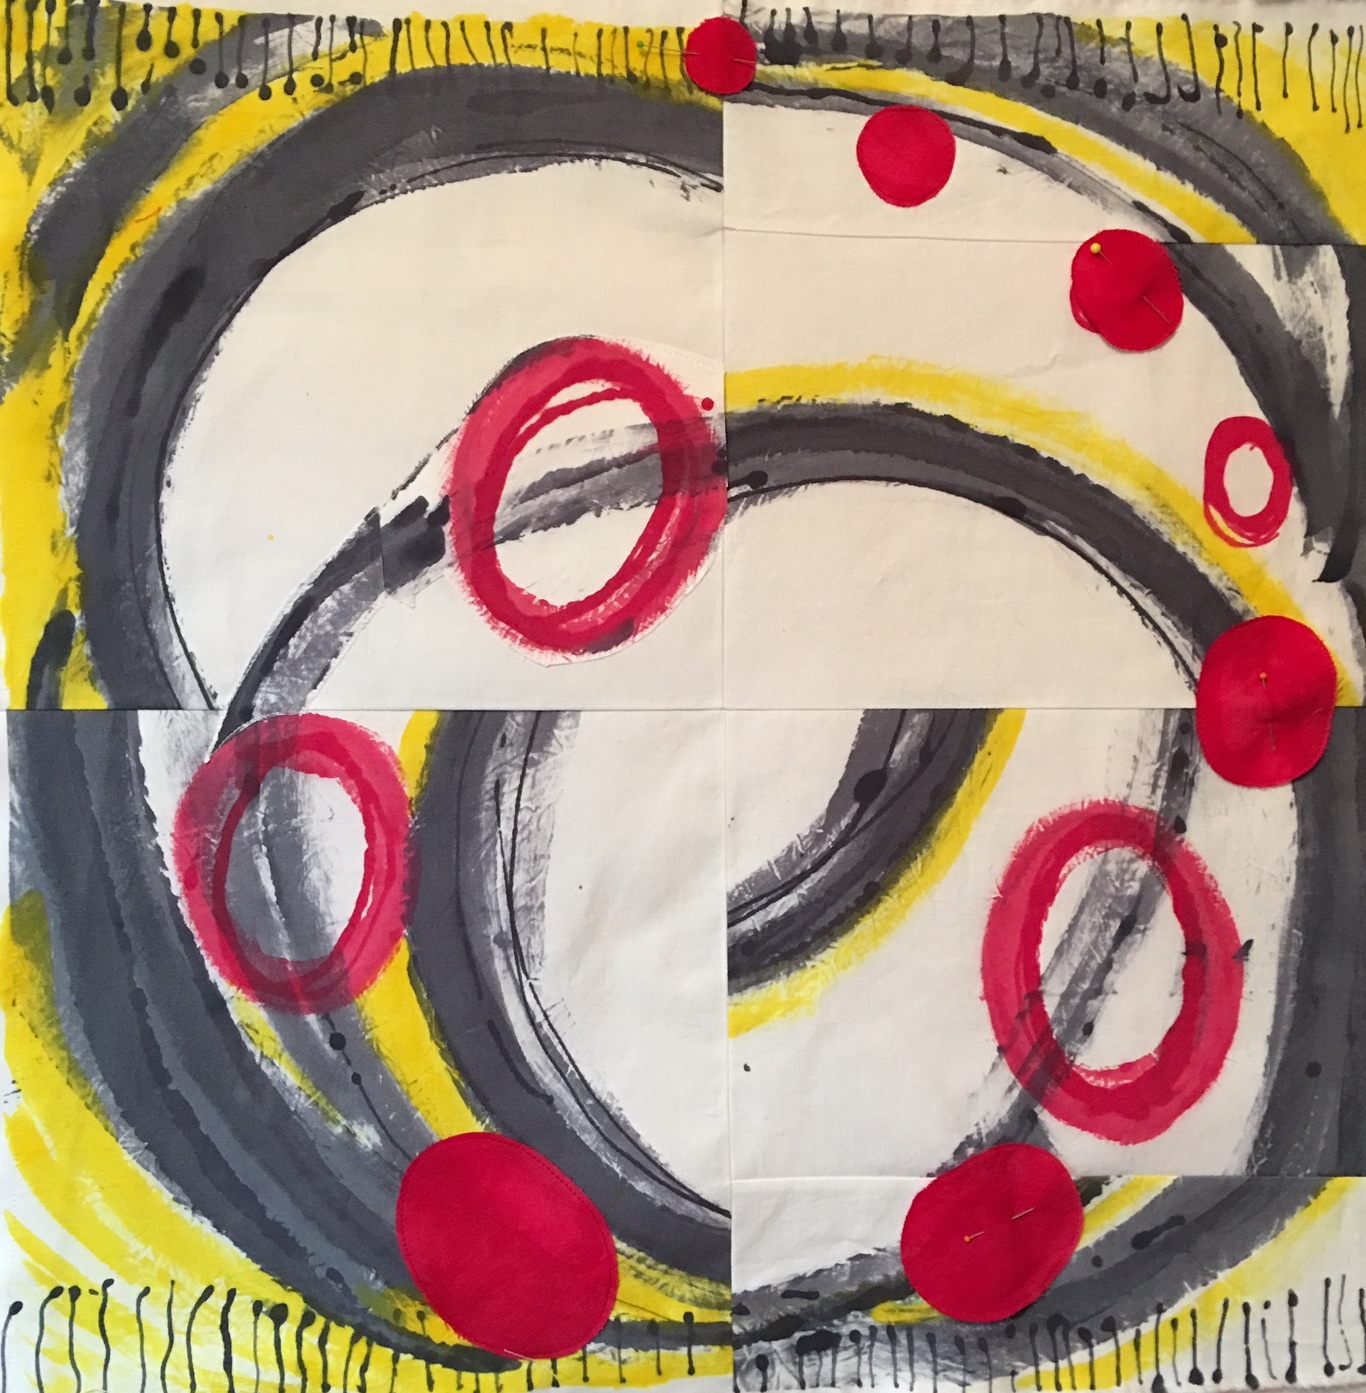
So I refined and came up with this…
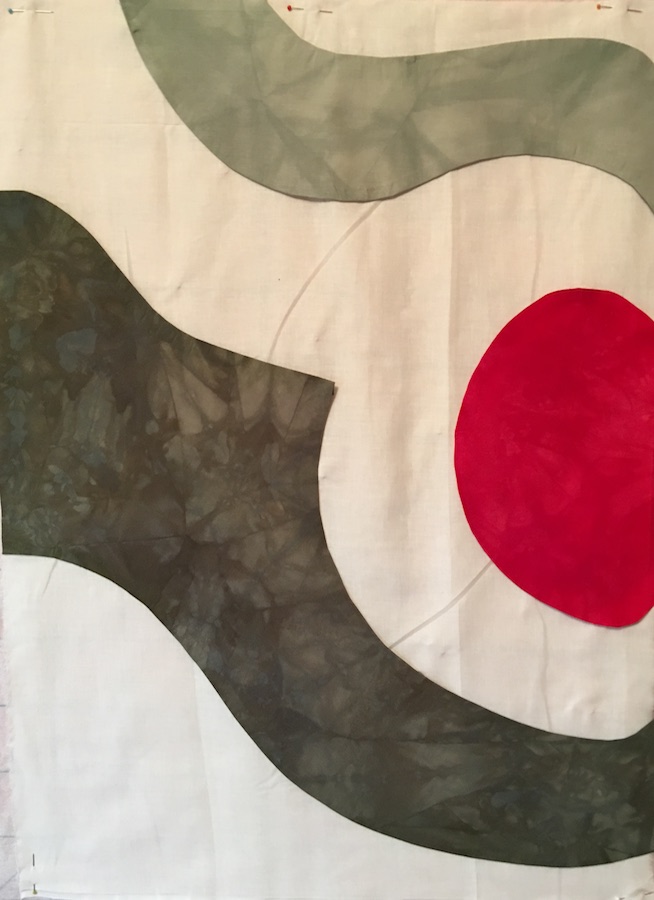
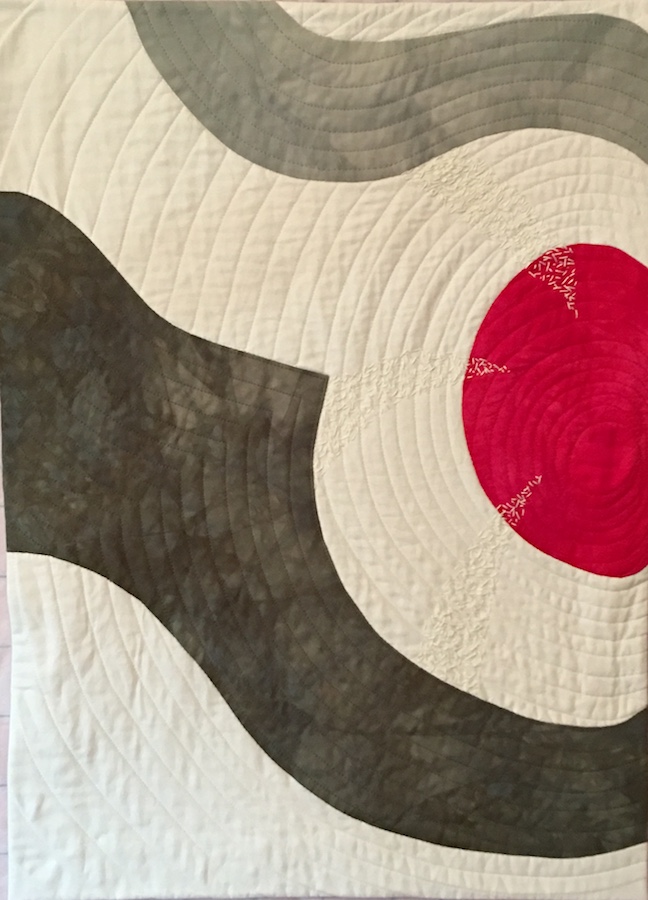
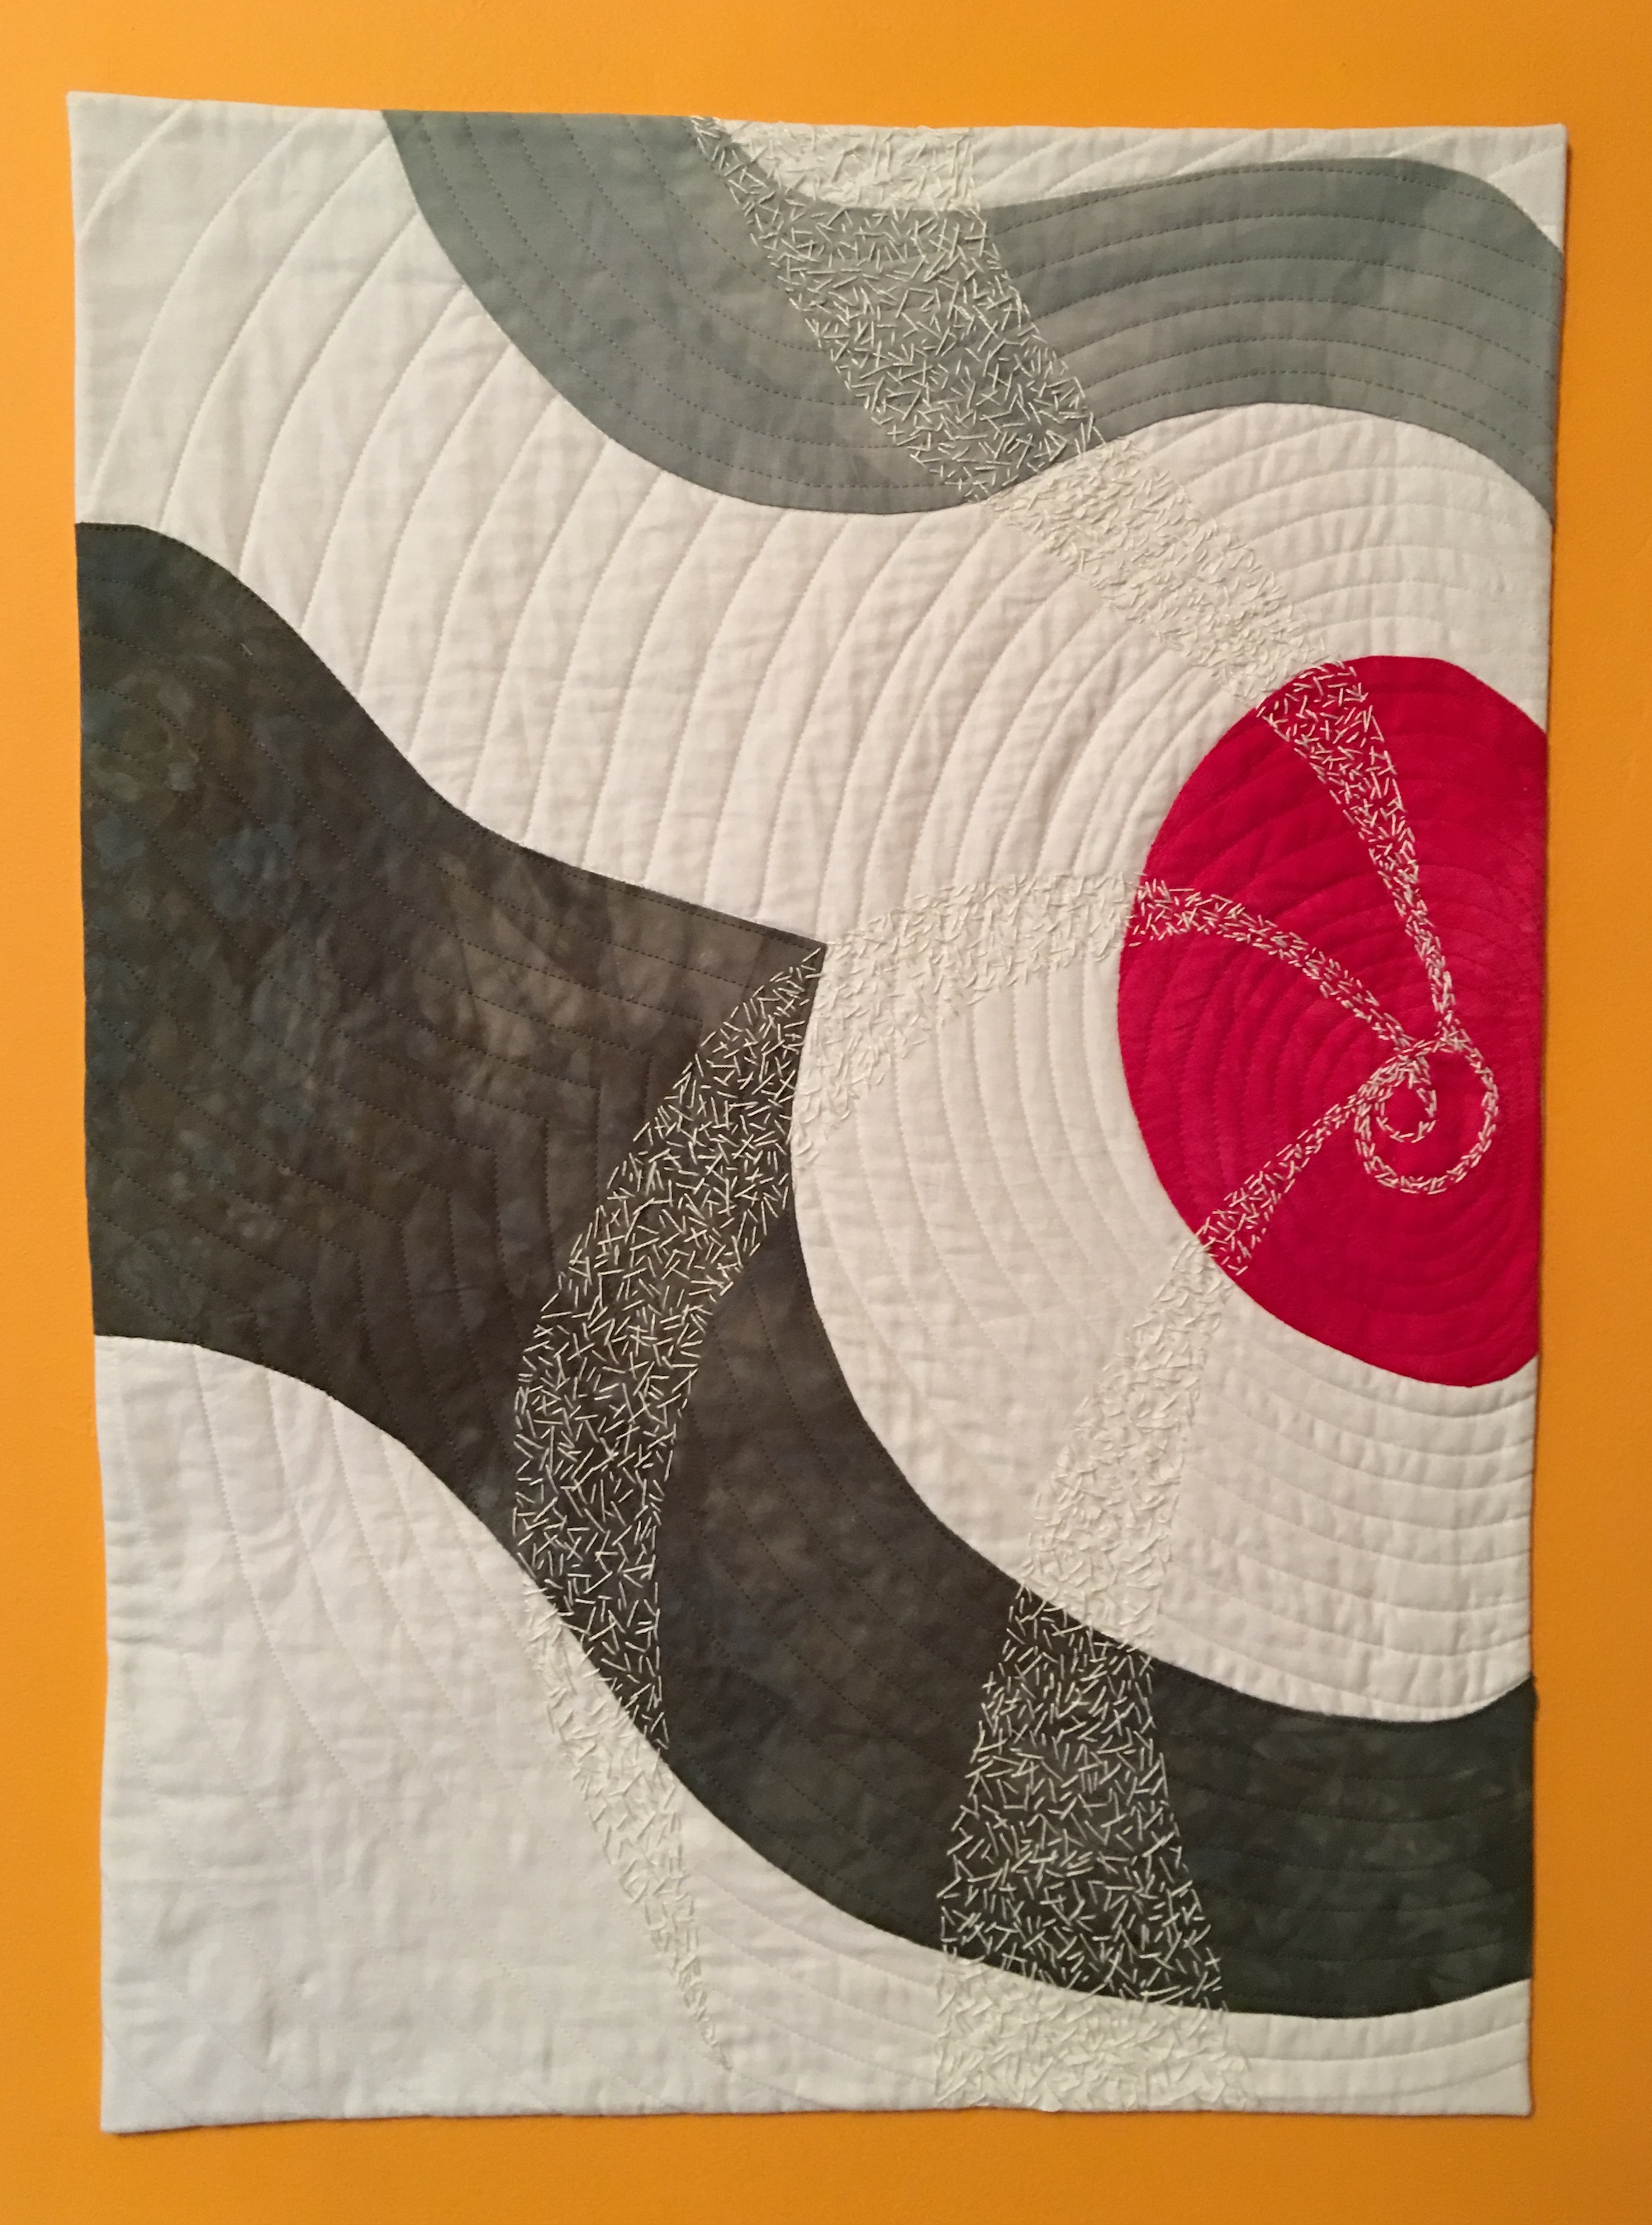
I plunged in and began cutting out shapes, putting them up on my design wall, pulling things down, putting other things up. Eventually I designed this.
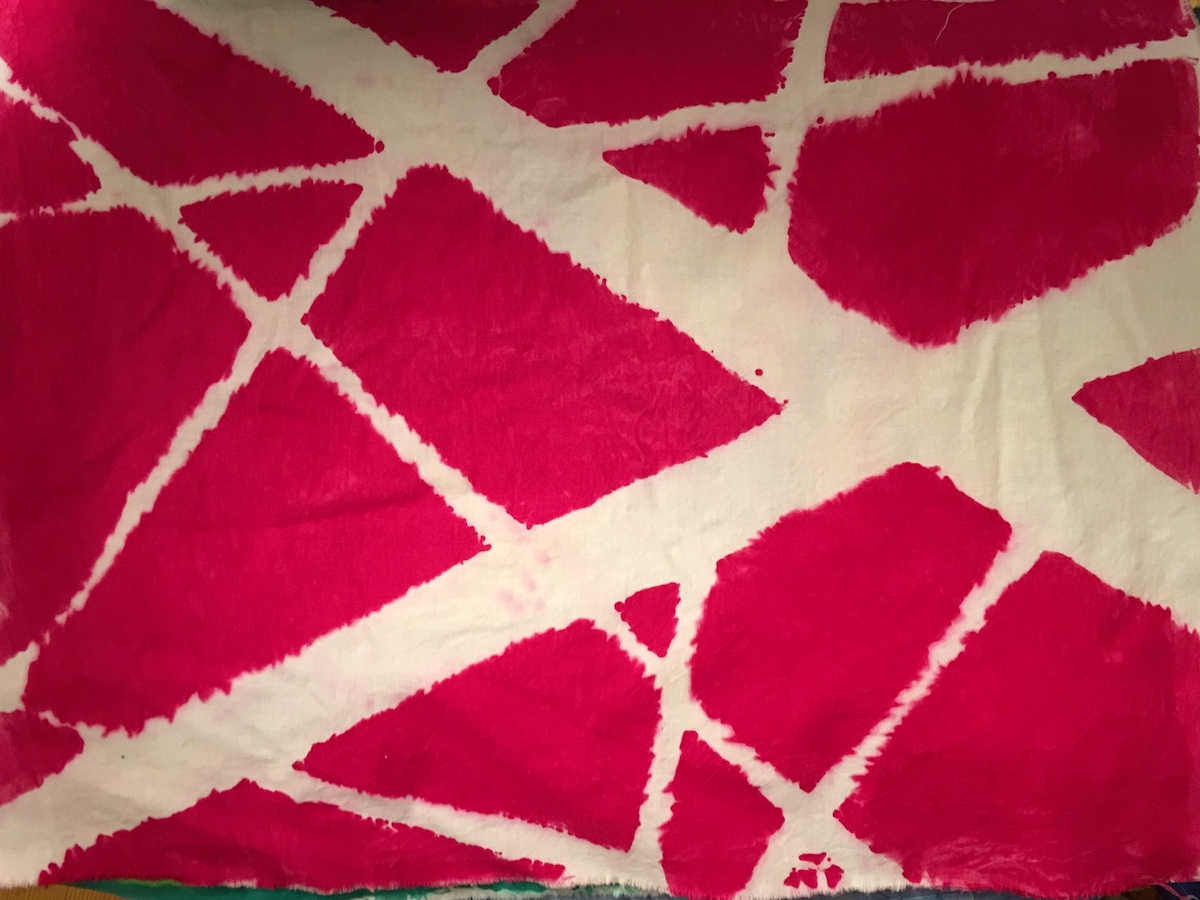
In part this piece was in response to a comment about how things seemed dark, but the sun would shine again. That red was glaring and SO red, so I went back to my design wall and did this.
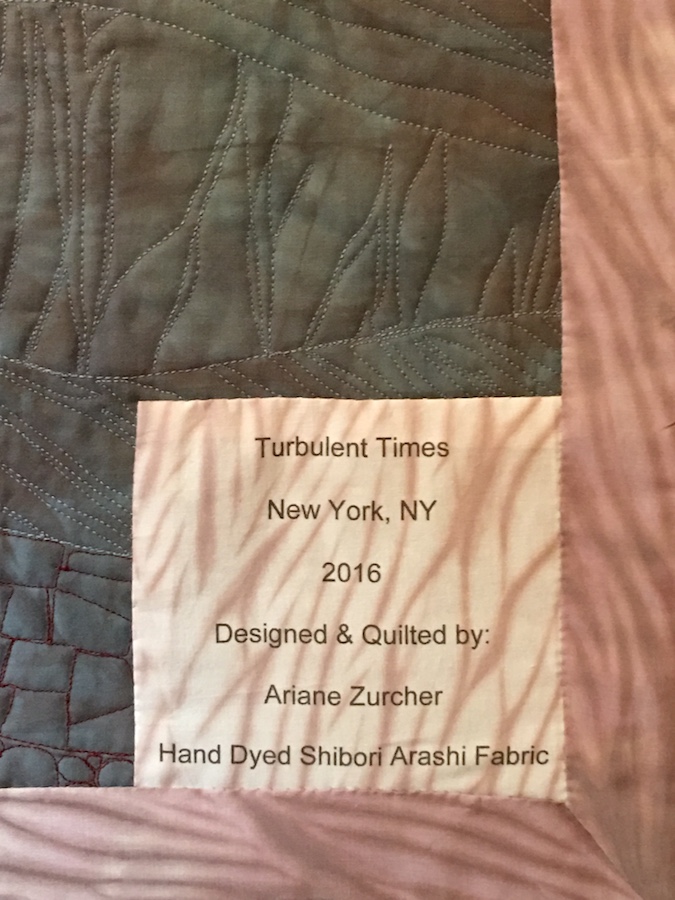
And here’s the back and the label.
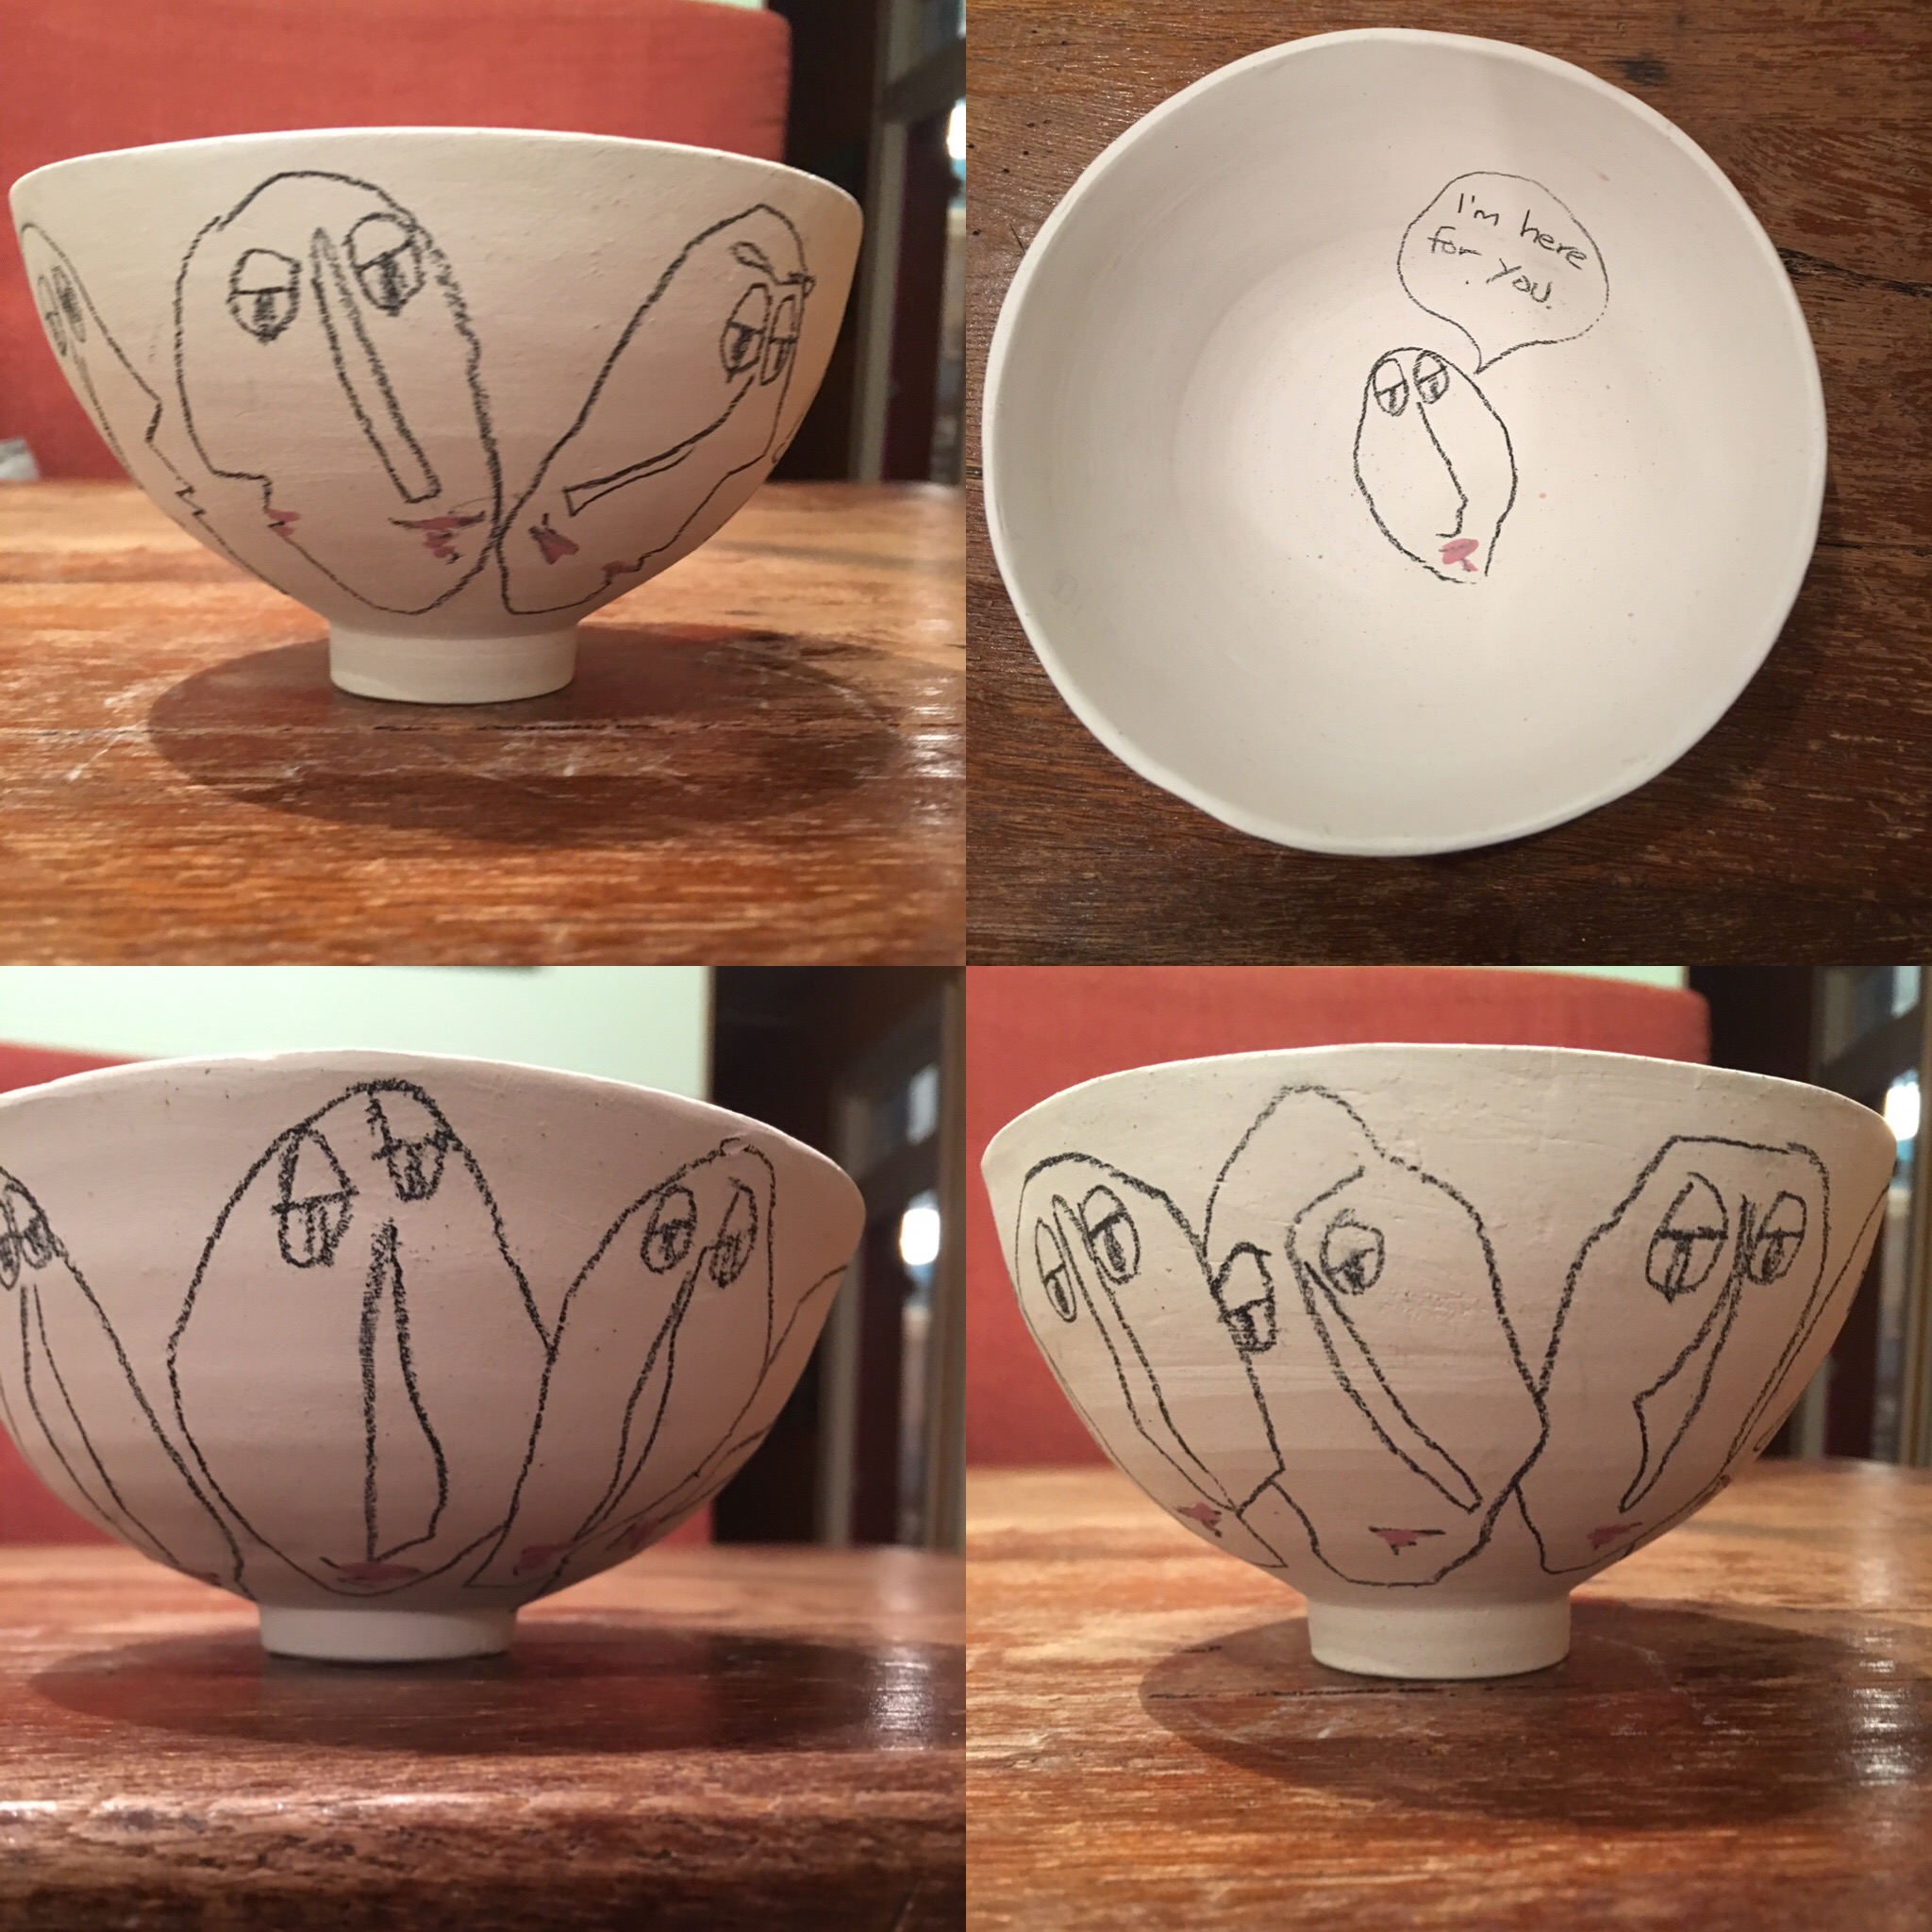
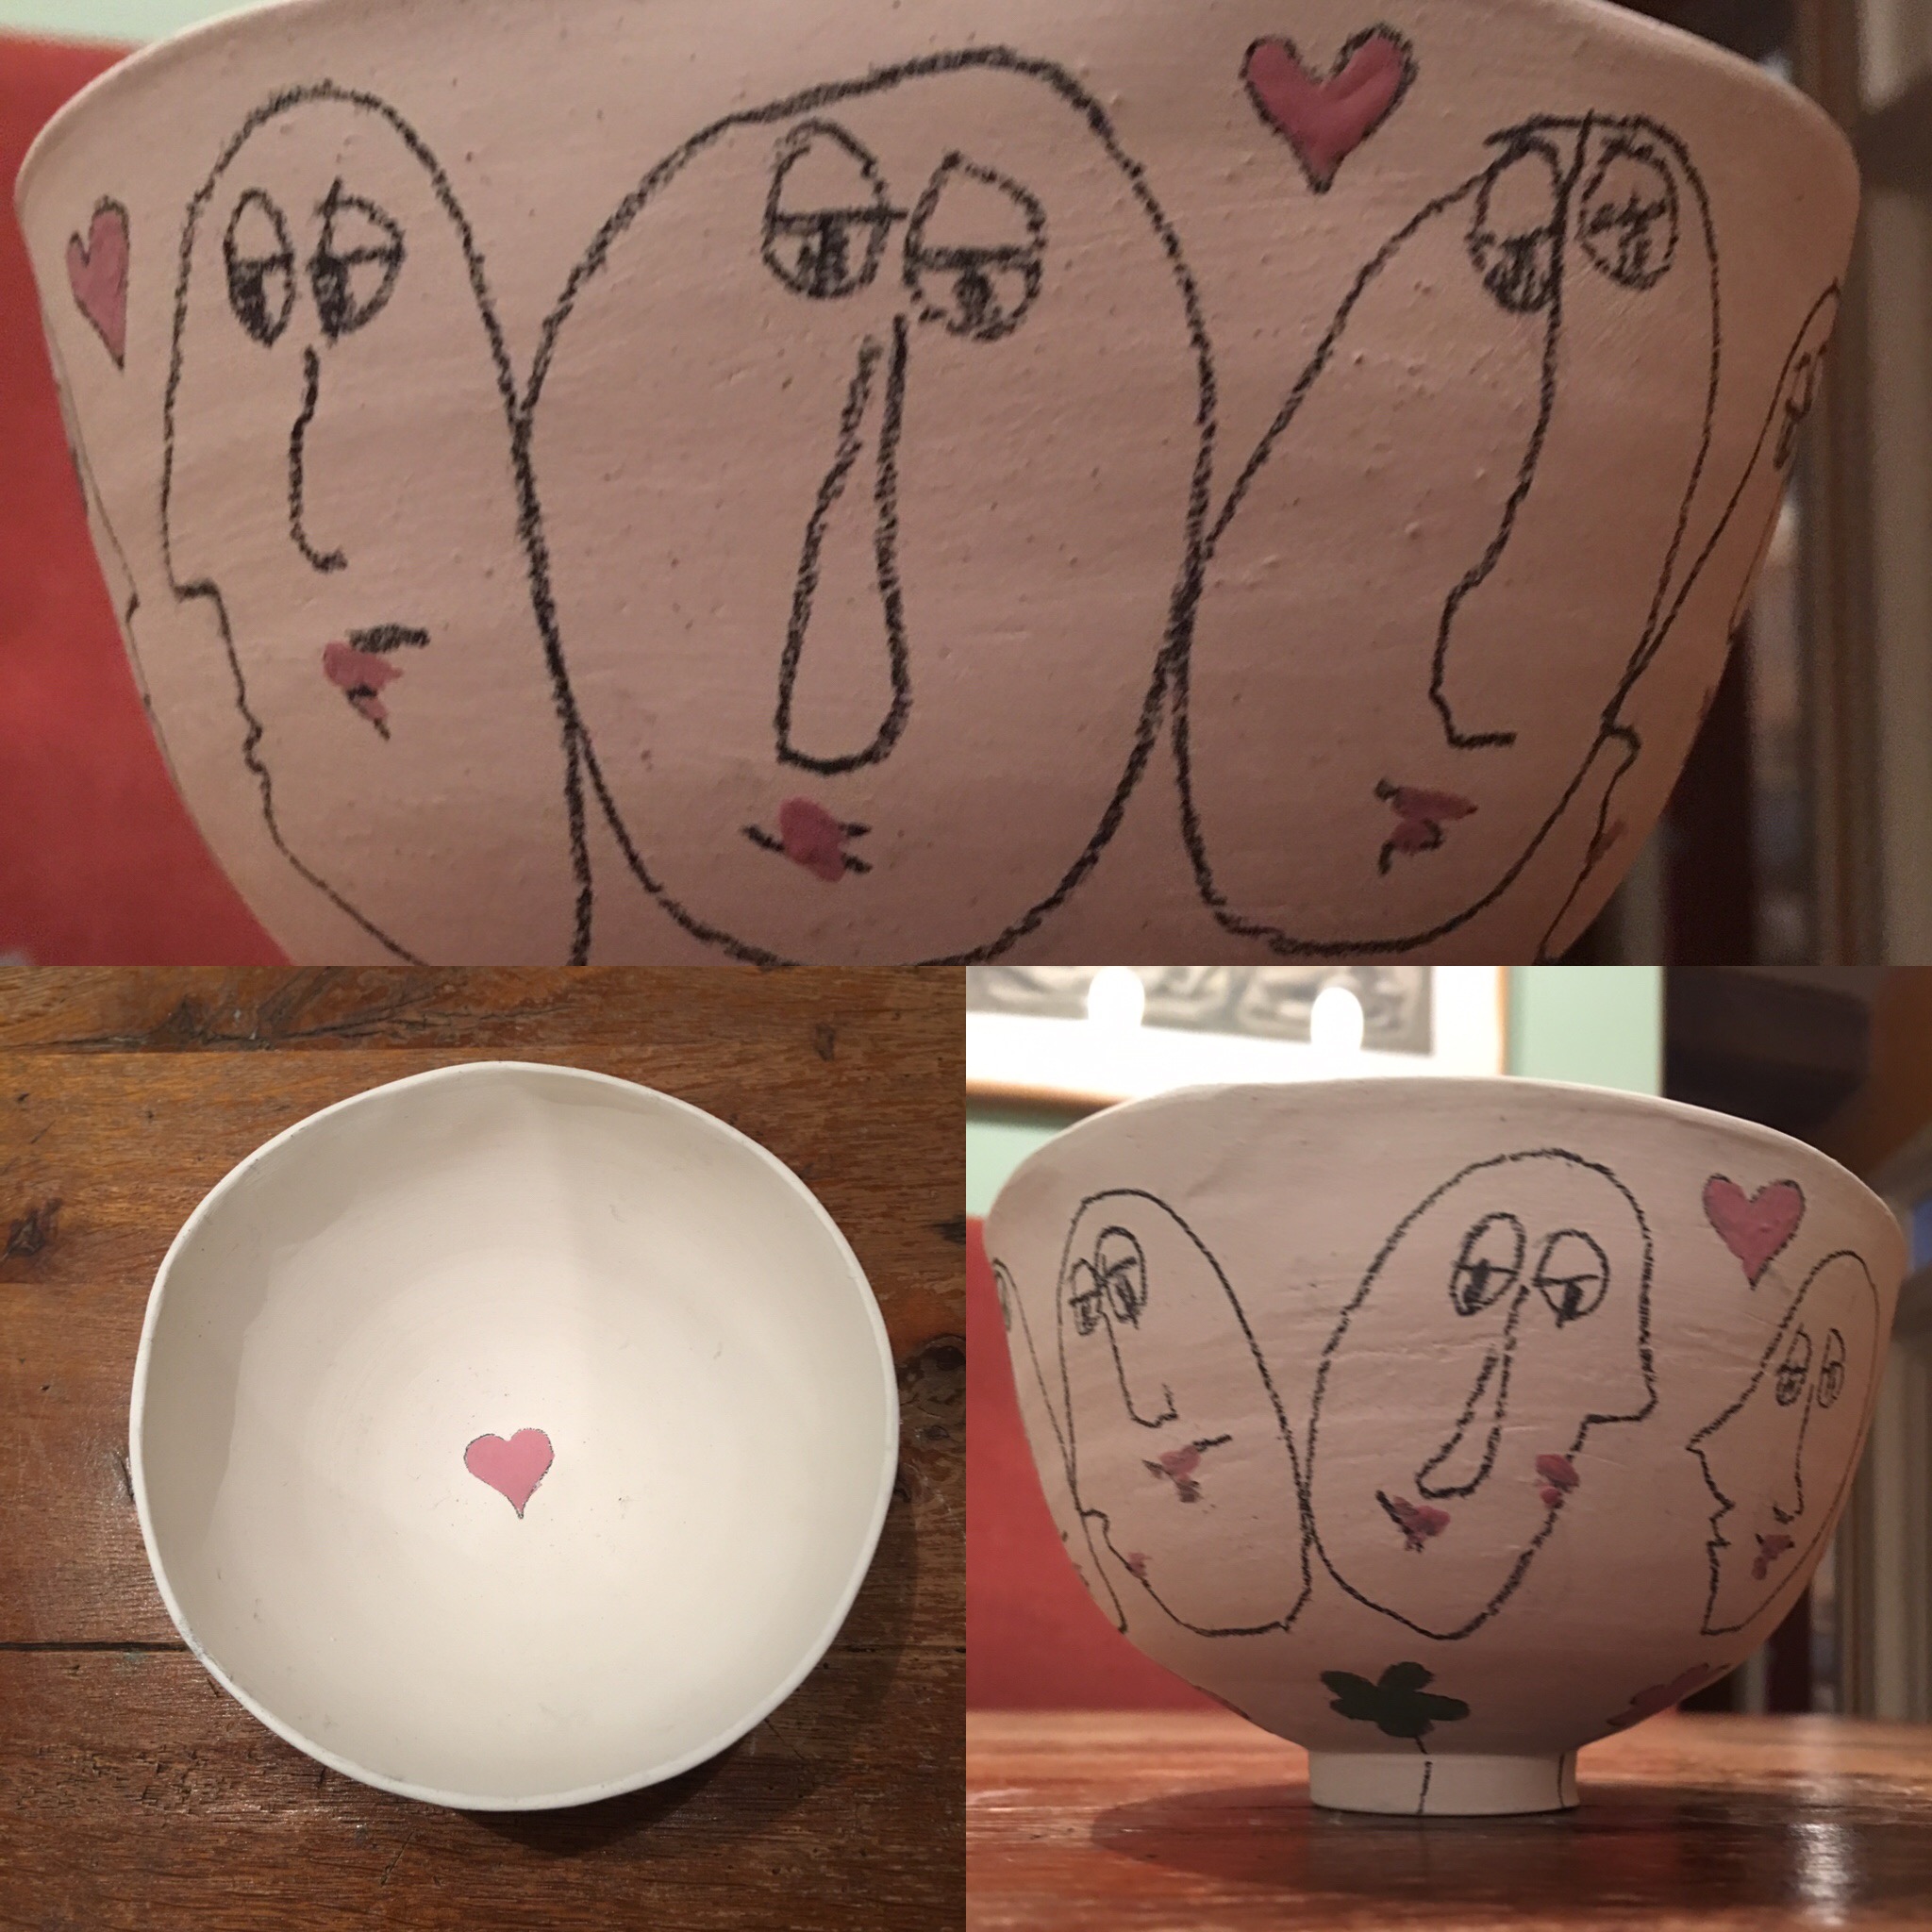
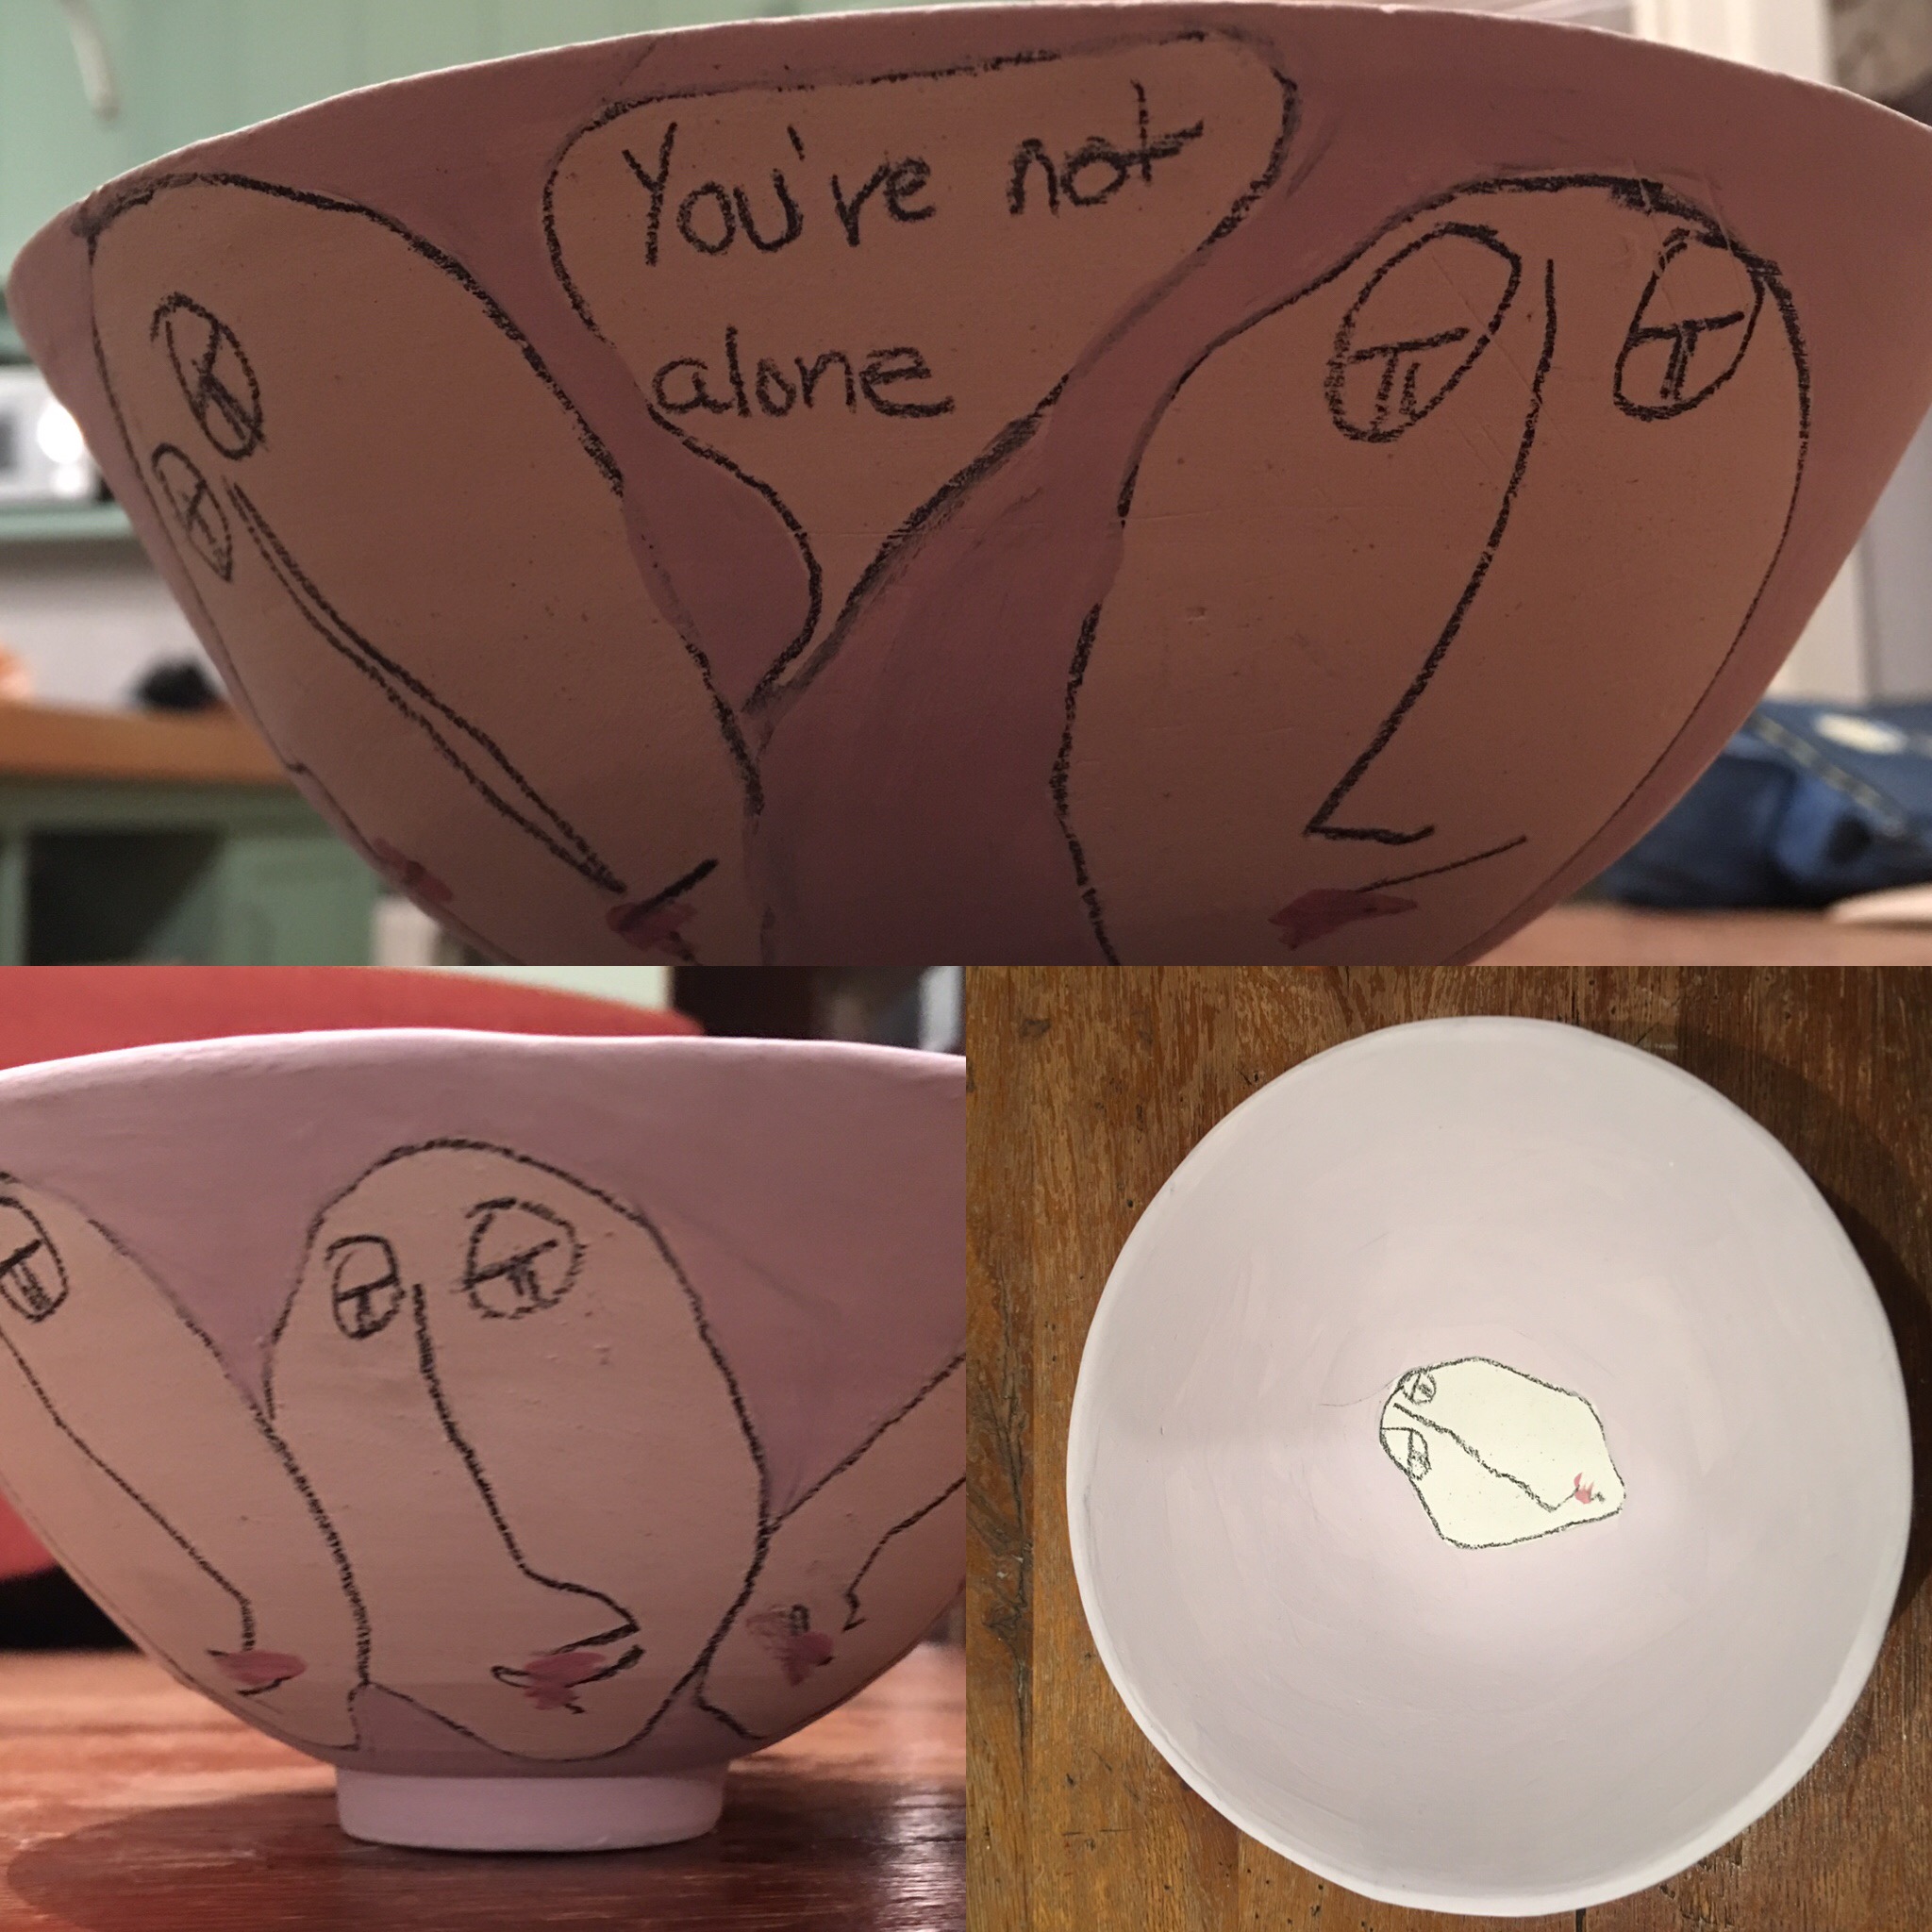
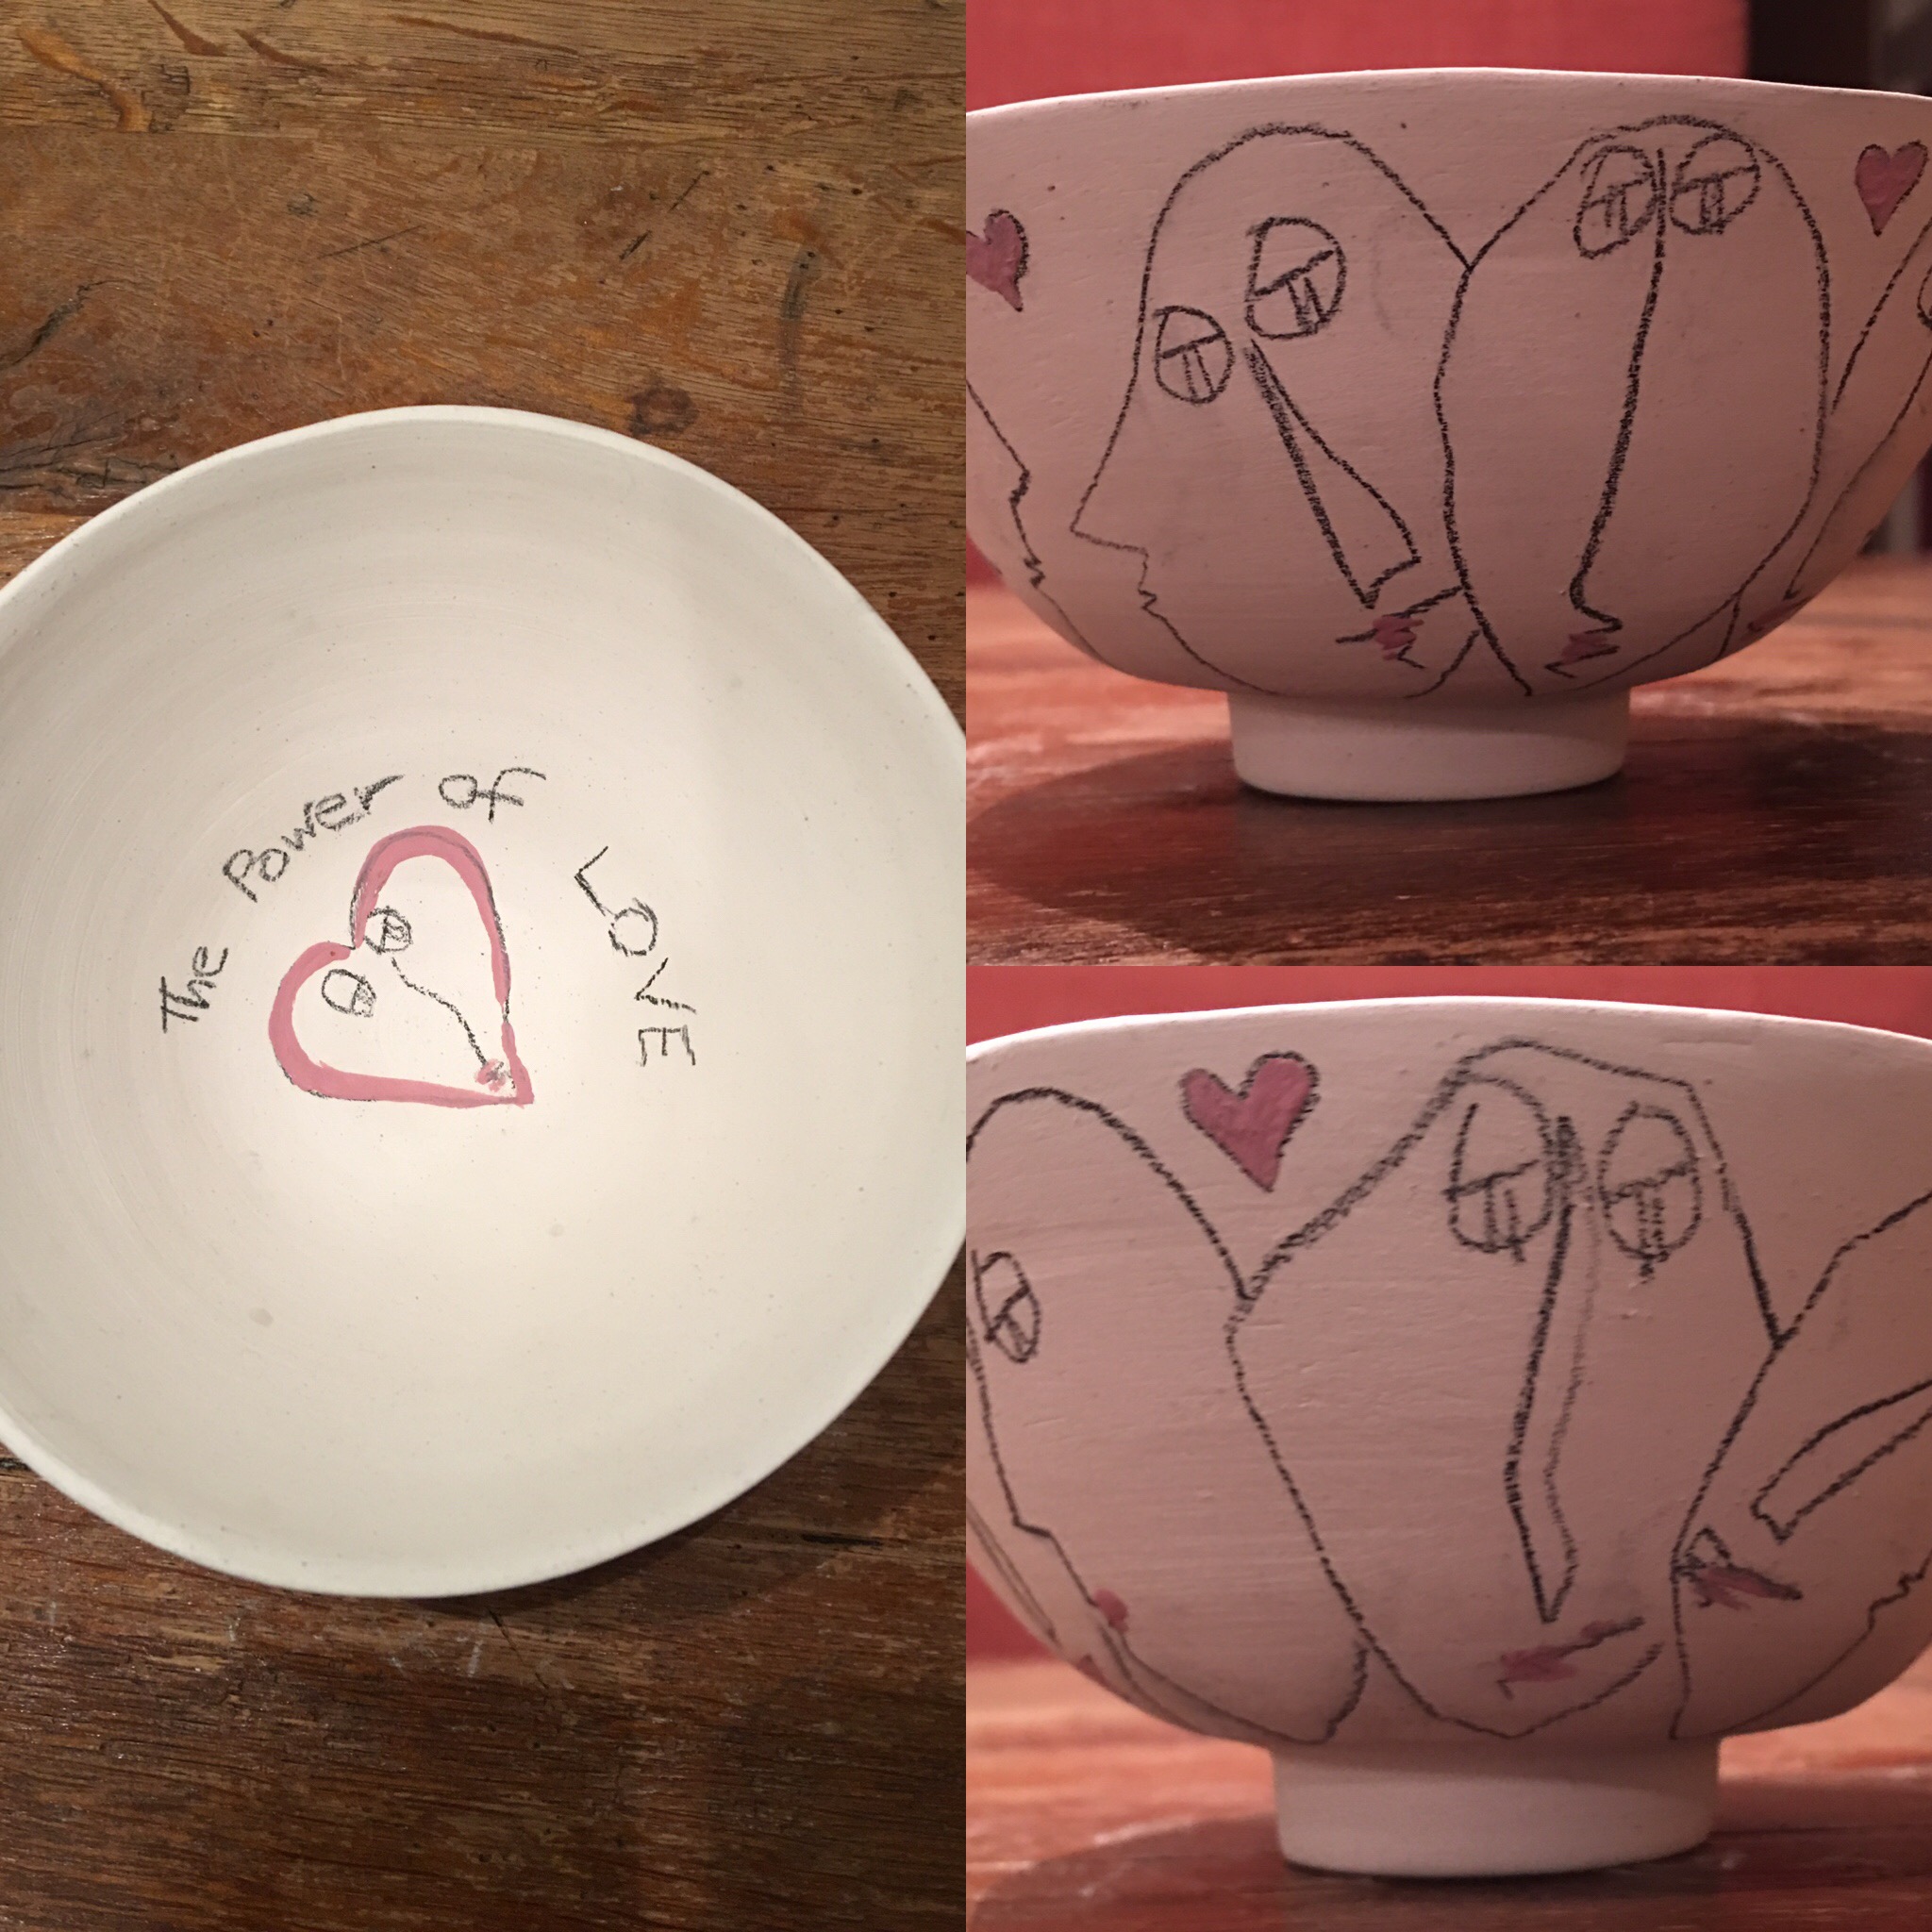
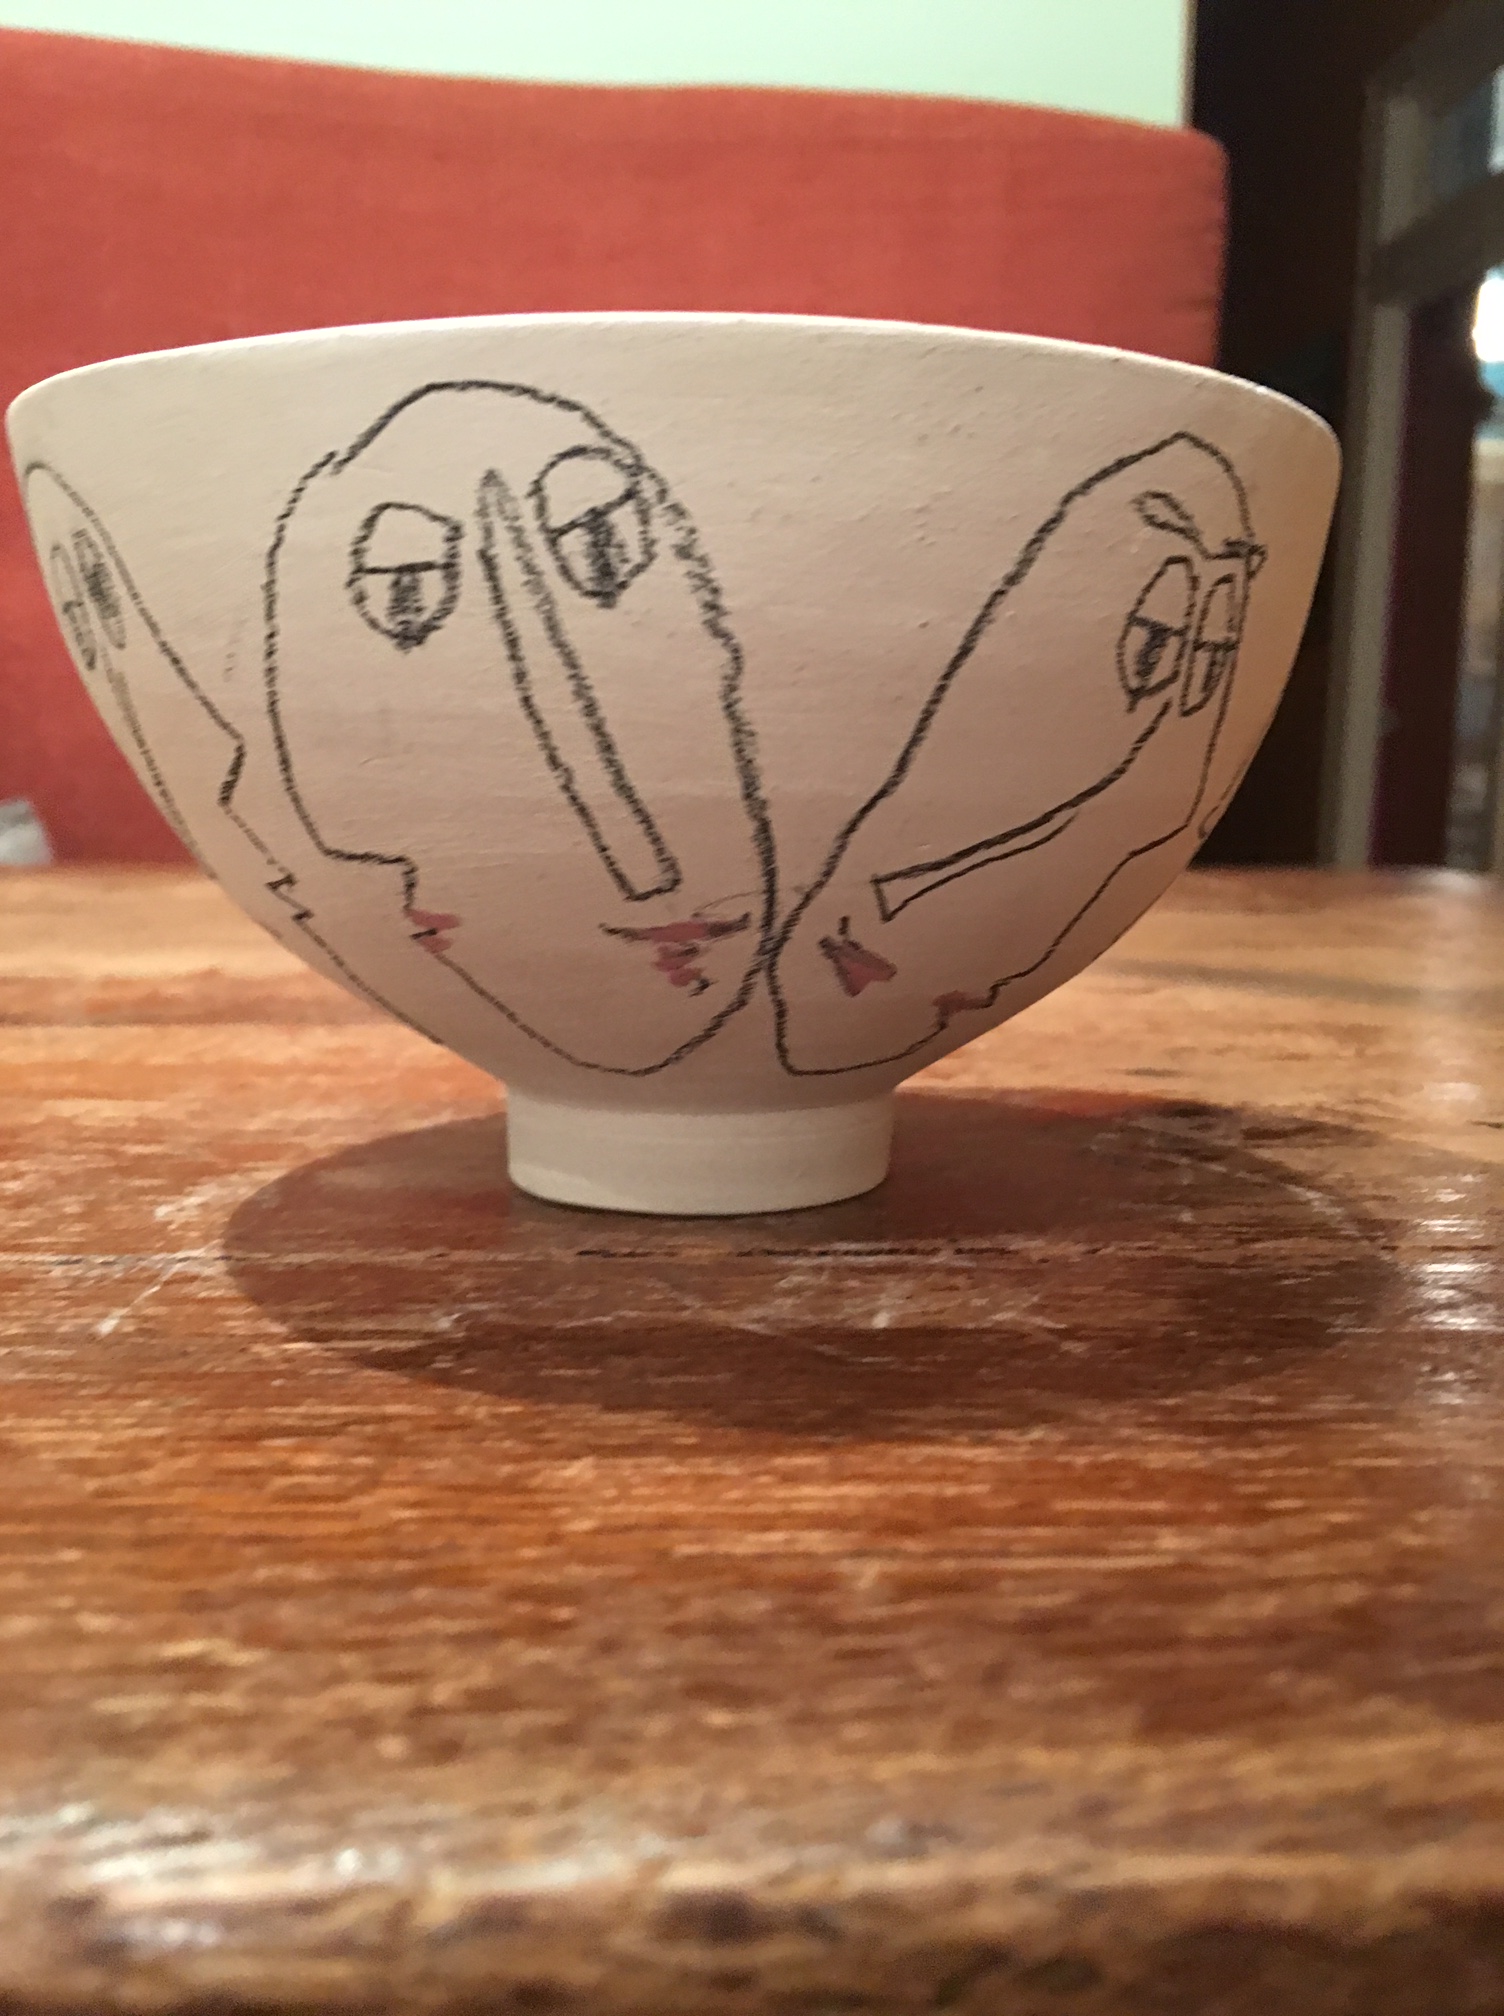
In between working on this piece, I lost myself in the bliss of hand painting some of my pots that I threw over a month ago. They make me happy. I am calling them “Message Pots.” The next batch will feature a more diverse population, which I’m looking forward to creating. Did I mention that I haven’t been sleeping much? I think all these guys look sleepy.
To all of you who celebrate Thanksgiving, have a happy one. To all who are feeling frightened and despondent, know that there are many feeling the same.
As for me, I will be losing myself in several days of cooking, another art form(!) before getting back to my painting, dyeing, quilts and designing.
I almost didn’t post this today as it’s Election Day and figured many of us would be out voting or thinking about voting or waiting in anxiety for the presidential election’s outcome and then I thought – a perfect time for some levity while waiting in line to vote or for those reading this from elsewhere… okay not sure where I’m going with this, so here it is…
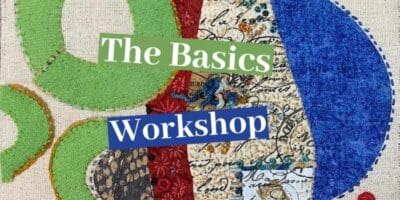
“Dyeing to Design” is the title of the terrific five week online class I’m taking given by the talented artist Elizabeth Barton through the Academy of Quilting. I wrote about the first week ‘here‘ and promised to write about the second.
I started the second week by pretty much dyeing every bit of white cotton fabric I had. Seriously. I went through the ten yards that was suppose to last us the entire five weeks of the class. Restraint is not a strong suit. In addition I went through so much dye that I realized I was not going to have enough to get me through the rest of the course, which meant I had to order both fabric and dye. Waiting was excruciating. I was going to work in a pun using the word “dyeing”, but restrained myself. See. I try where and when I can. While I waited however, I had all these beautiful fabrics to look at and consider for my next design.
The design I decided to do used shapes I come back to again and again, long ago when I was a fashion designer, now still designing jewelry and again this past week while using my hand dyed fabrics. Let’s not spend any time analyzing this, yes?
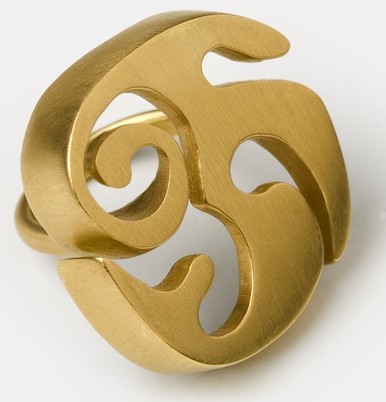
R17 – 18 Kt Brushed Gold
I chose two colors to work with, red and, with Elizabeth’s suggestion, an olive color. Elizabeth encouraged me to play with the olive color using it’s various gradations, which of course required more fabric that I didn’t have. Not easily thwarted, I pulled out some muslin and dyed that. It was at this point that the faucet in the kitchen sink suddenly stopped working. It was a drought. Nothing, but the slightest trickle of water, a whisper, really. However, we have a slop sink in the pantry. It was one of my brilliant ideas when we gutted the place; I envisioned our loft as a veritable greenhouse with furniture. Think Max’s bedroom when he falls asleep in Where the Wild Things Are. This vision of mine never came to fruition and so the slop sink became a receptacle for rags, cleaning supplies and other items no one knew what else to do with. And to add insult to injury underneath the sink we keep the kitty litter box. As we live in NYC our “pantry,” while sounding grand and spacious, is actually the size of a very, very small closet, combined with the kitty litter under foot, a stacked washer and dryer, the slop sink overflowing with assorted cleaning supplies… Let’s face it, it’s really really cramped.
I was determined to make it work, and while this made for some interesting maneuvering on my part, I did fall in love with my slop sink, but not so much that I didn’t call the plumber. He came a few days later and fixed the kitchen faucet, but in the meantime I washed all my dyed fabrics in my now beloved slop sink inside our closet, I mean pantry. It was all very Alice in Wonderlandish.
Two days later, after the sink was working again I came home to the smell of smoke and asked FH (fabulous husband) what happened. “Well,” FH said, and then after a lengthy pause and with a pained expression he finally added, “I think our washing machine blew up.” I would have suspected wild exaggeration on his part had it not been for the lingering evidence of noxious smoke wafting through our home. Evidently he was doing a load of laundry and heard a loud bang. He went over to investigate to find smoke billowing out of our front loader. You have no idea how happy I am that I was not there to witness. So for the next few weeks we are without a washing machine. But I digress… Here is the preliminary piece on my design wall.
Slowly it began to take shape and as everything seemed to be falling apart, exploding, going dry and whatever else, my sewing machine, not wanting to be left out of all the fun, decided it was no longer going to play nice with my walking foot, perhaps it was taking a cue from our presidential race, requiring me to spend more than five hours watching various you tube videos, reading the instructions over and over again to troubleshoot. There were a LOT of late, late nights. Eventually I was able to convince my sewing machine it was in its own best interest to get along and all is well. In actuality I realized that my walking foot was causing the automatic threader to jam. When I thread it manually everything works.
After I did the quilting I decided to add some hand stitching, but couldn’t decide whether to do more or take it all out. So what does one do when you’re not sure? Ask Elizabeth and others in the class for feedback, of course!
Which led to this…
And here’s the back.
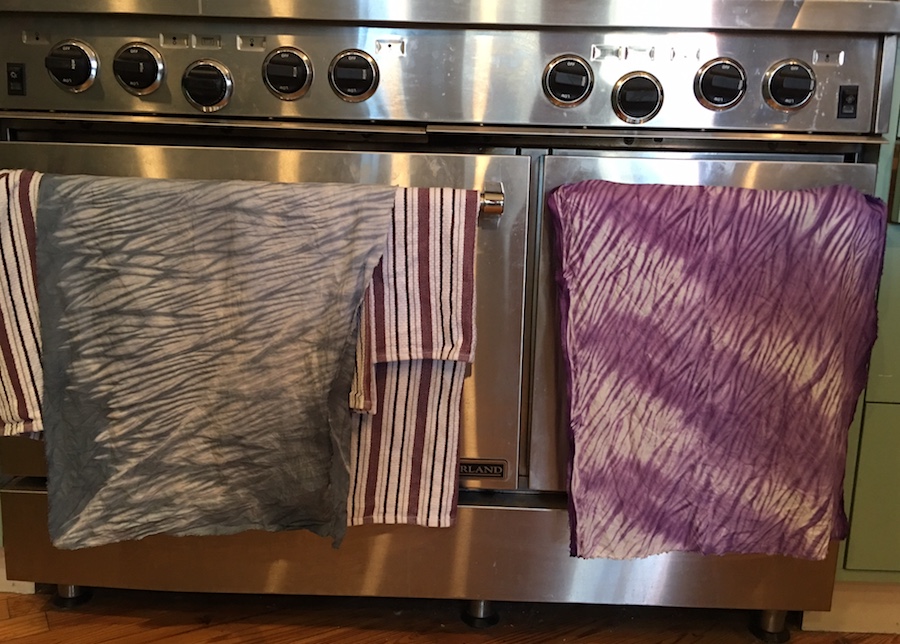
The third week of the class is well underway, my fabric arrived, the sink is running as is my walking foot (haha) and oh what fun I’m having! We are learning basic Shibori arashi dyeing. I still don’t have a washing machine, (and have two teenagers in the house) but these are luxury problems. I haven’t figured out what I’m doing with my beautiful dyed fabrics, but will come up with something in the next day or so. Here’s a sneak peak at this weeks dyeing and drying New York City style. And I didn’t make a single dye joke. The title doesn’t count because it’s Elizabeth’s name for her class. How can you not love that title? I may go back and edit a few in, just to amuse, or you can make a few in the comments!

 Then, having given up on the idea that I was going to be miraculously hit with a blast of inspiration, I cut up the fabric (just a little, nothing radical) and sewed it back together (photo below.) And then I sent it off to my class for feedback, that’s the whole reaching out thing that I mentioned above… Elizabeth is an excellent teacher and can be depended upon to make terrific suggestions.
 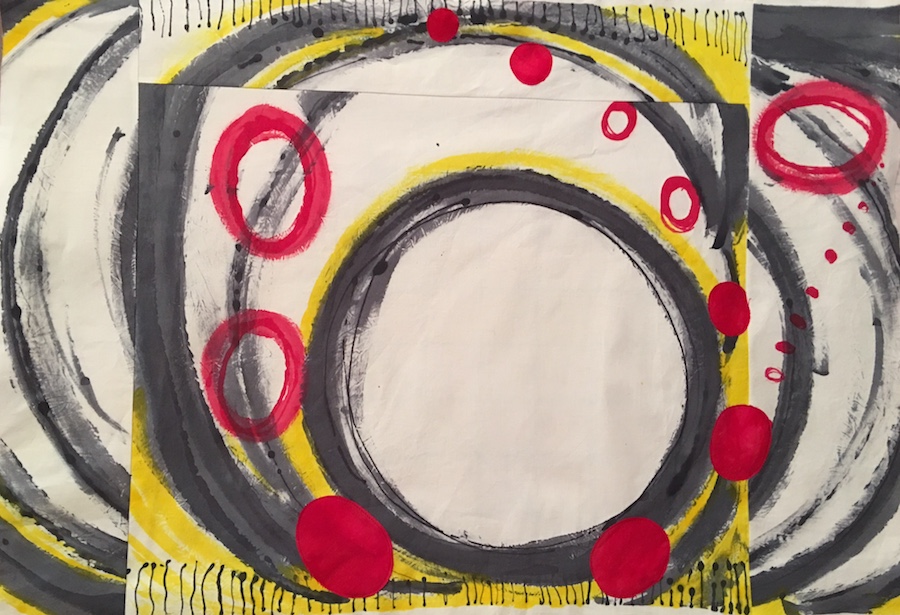 Which led to this…
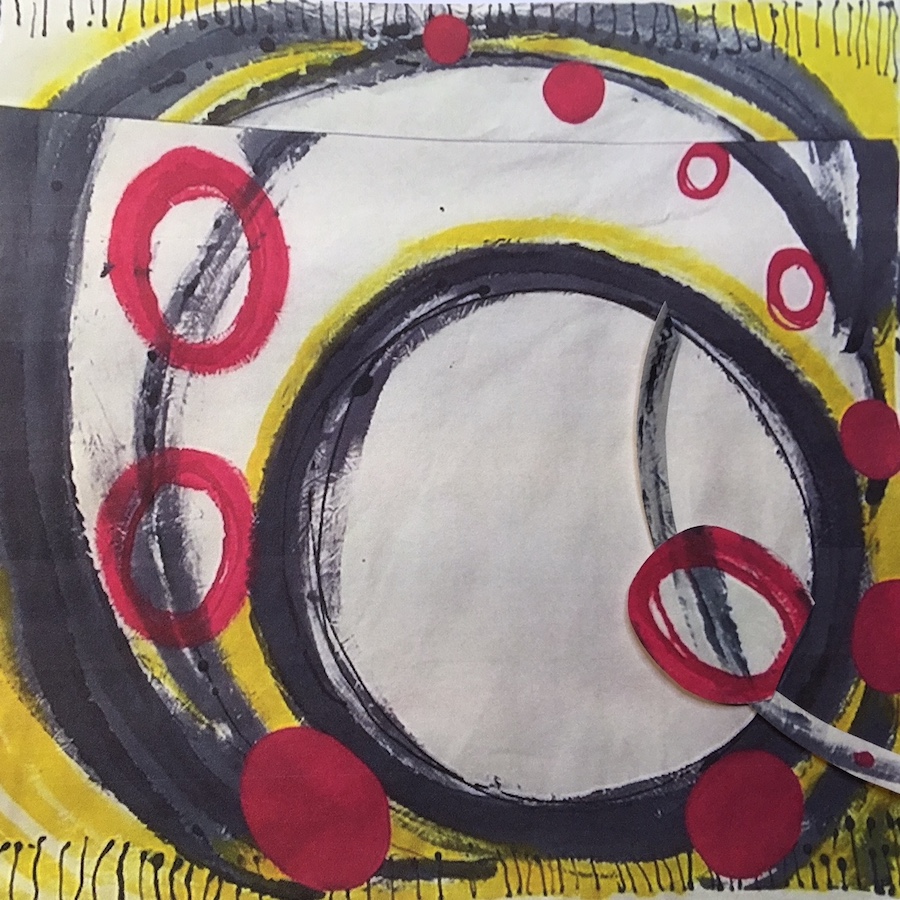 And this…
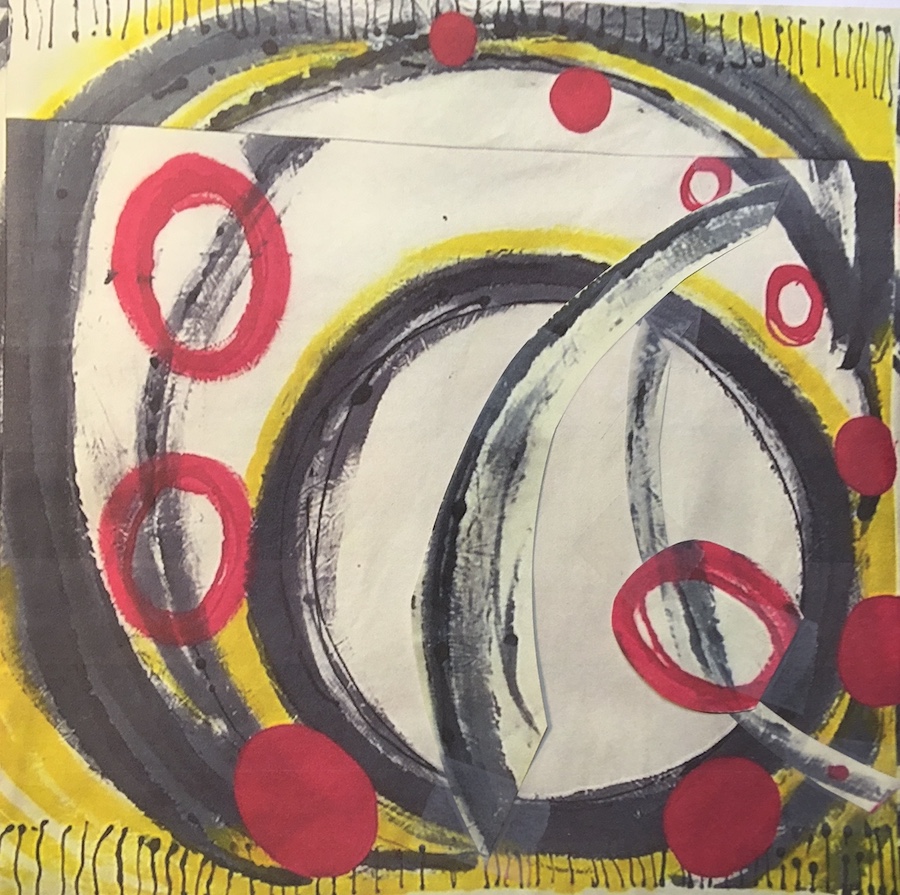 And this…
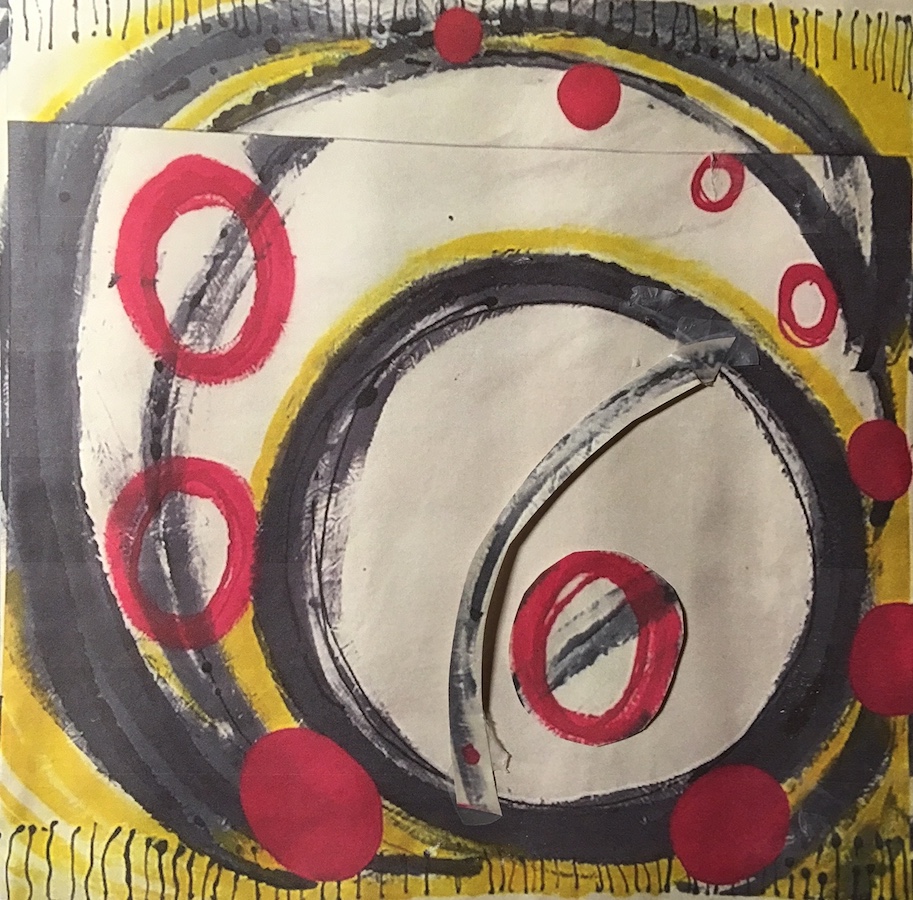
 Which became this… traveling along our various paths…
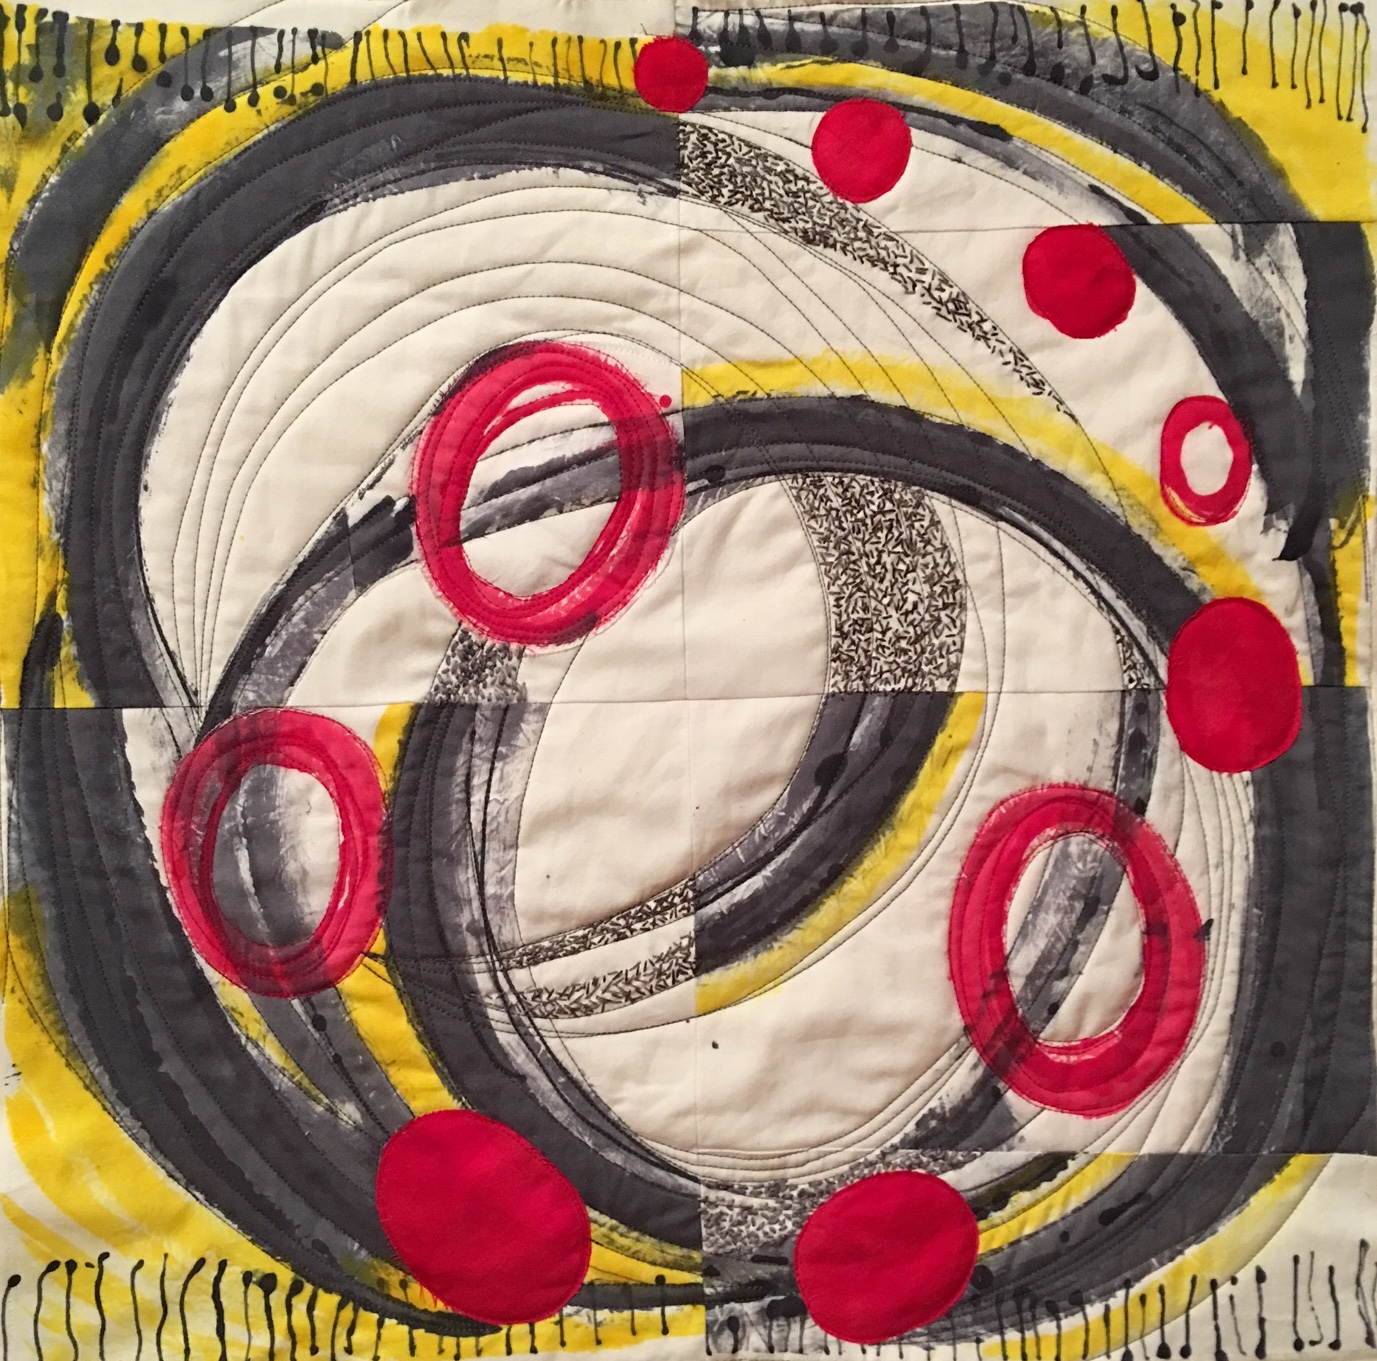 And finally, this… reaching out to others and no longer feeling so alone…
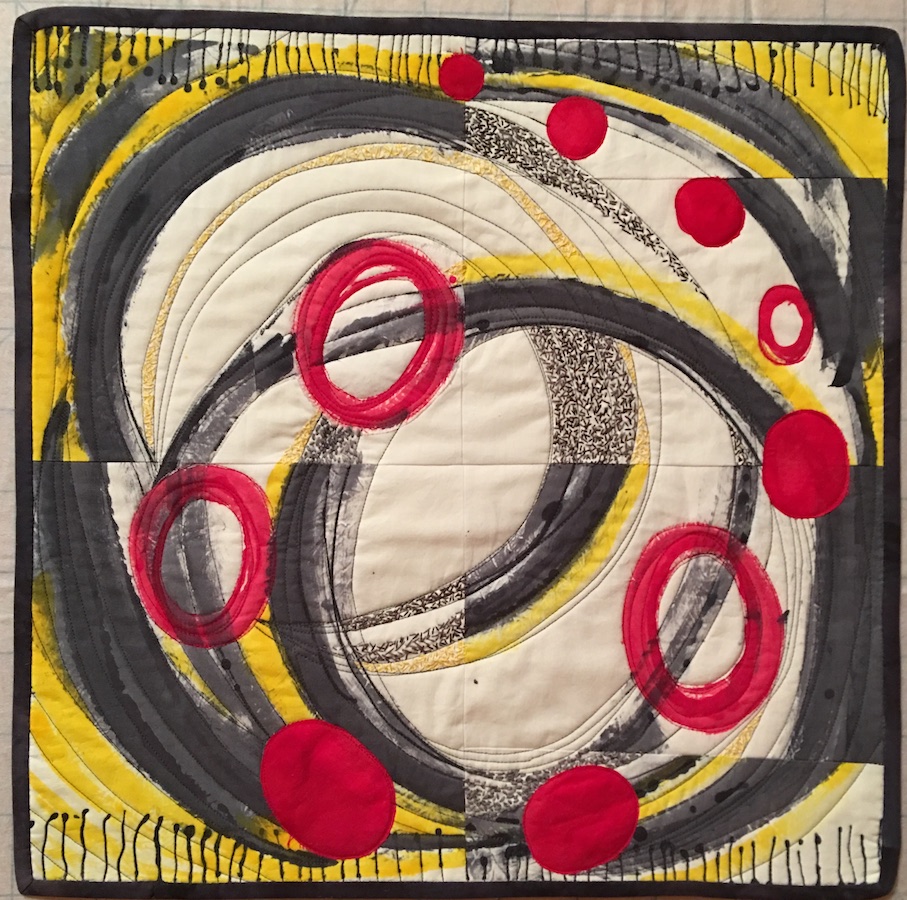 Here are a few close ups of the machine and hand stitching…
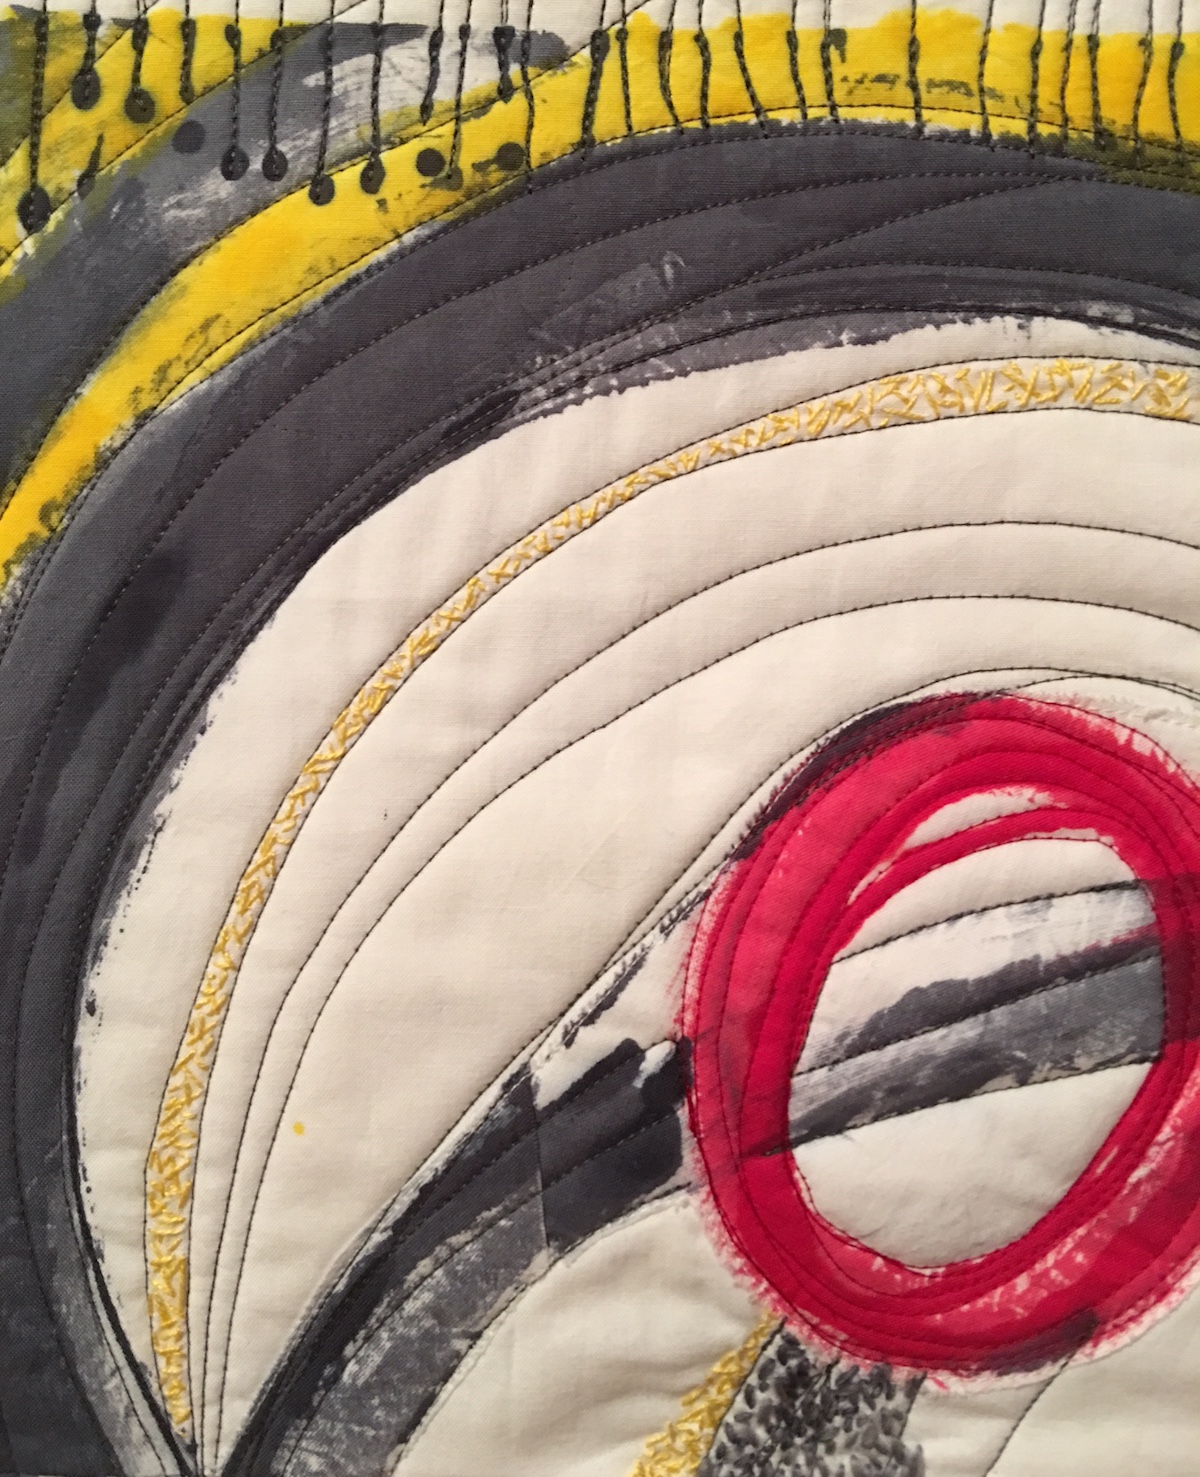


 And I didn’t make a single dye joke. The title doesn’t count because it’s Elizabeth’s name for her class. How can you not love that title? I may go back and edit a few in, just to amuse, or you can make a few in the comments!
Recent comments